The Phishy GitHub Issue Case
Introduction
Developers have become a primary target for threat actors. The reason is simple and can be easily understood : they are the backbone of software you are using. They are the one publishing code that will execute on your machine when developing, in your CI/CD pipelines and on the servers in production. This type of attack is called “Supply Chain Attack”, where the attackers target the suppliers in order to compromise organizations or individuals. Basically, they compromise the third-parties to reach their main target (or hit at scale). Some of the recent examples of such attacks are involving Axios and LiteLLM with their 100M downloads per week each.
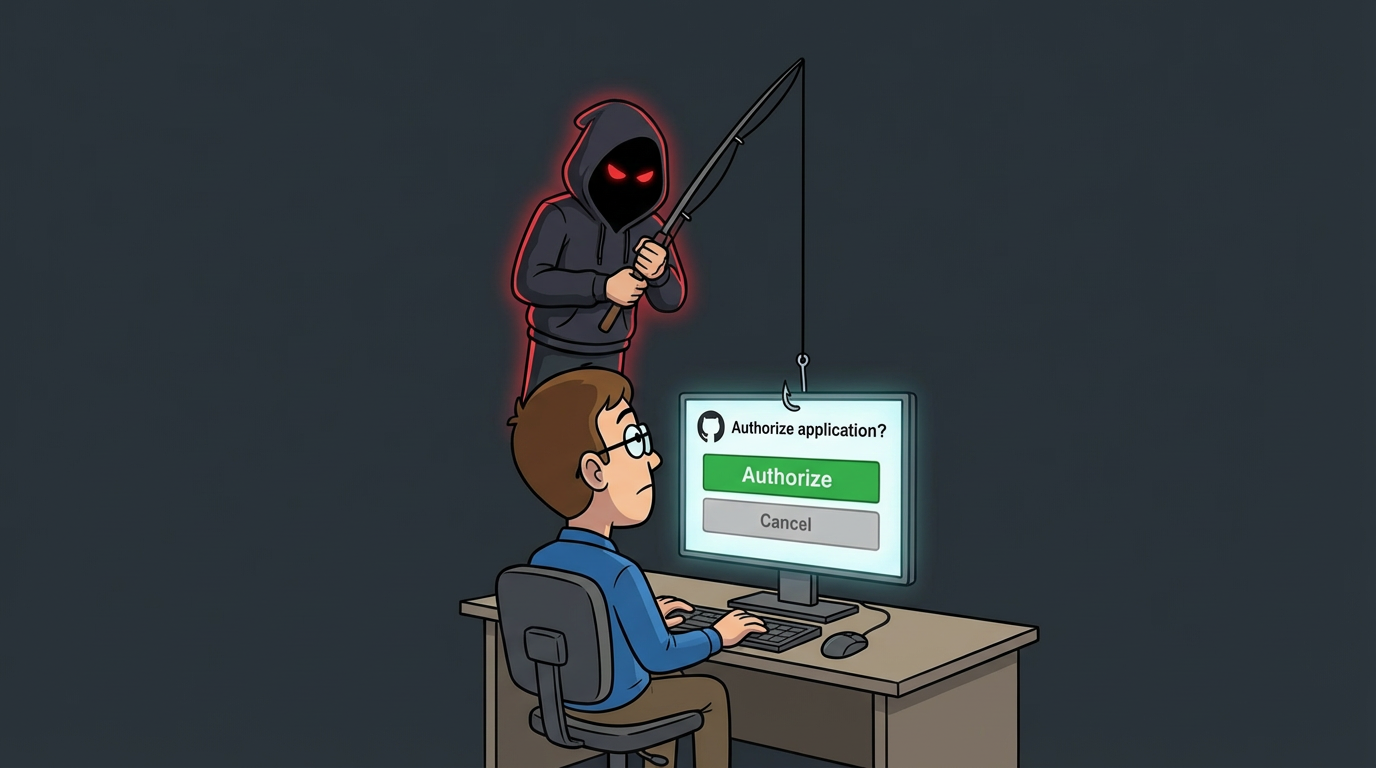
As I’m interested in initial access, and more specifically in phishing, I started looking for ways to target developers. What platform every developers uses today? You guessed it right (or just correctly read the title of this blog post) : GitHub. It is advertised as “a platform to create, store, manage and share code”. Every developer has a GitHub account and getting access to it mean getting access to their code. However, I was looking for lesser-know phishing technique, that doesn’t employ the usual Attacker-in-The-Middle approach. I stumbled upon several articles mentioning Fake Security Alerts using GitHub issues. Naturally, I decide to take a look at what it was. So let’s see how to setup this scenario for your next phishing campaign!
Flow
Before diving in the technique, here is the complete phishing flow:
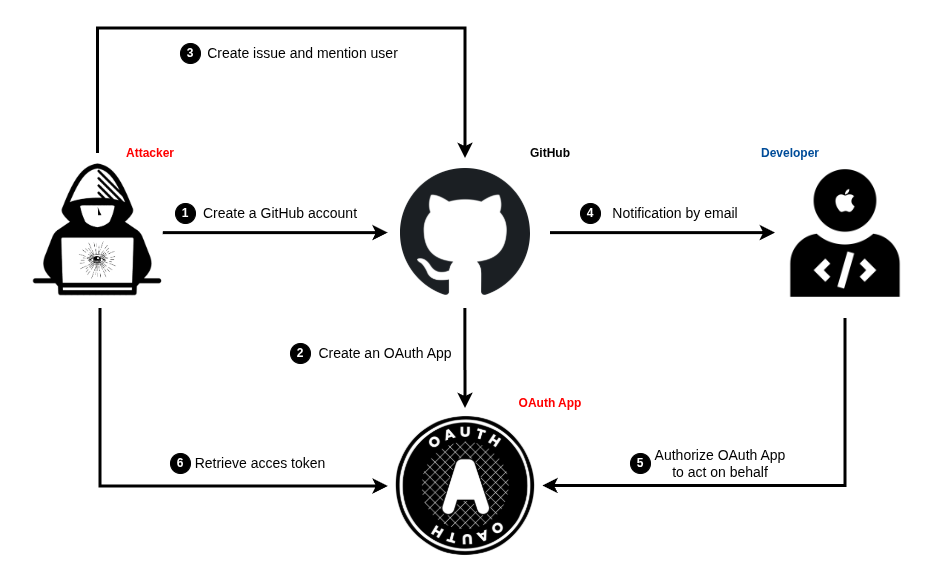
Now that you have an overview of the process, let’s start with the setup.
Setup
The best part of this phishing scenario is that you can set it up entirely for FREE. You heard me right: 0 expense, 100% profit. How to achieve this you might ask me. Actually the setup process is pretty easy and straightforward. You will need:
- A GitHub account (obviously).
- An OAuth App (some code).
- A server (you will see that even this can be free).
GitHub account
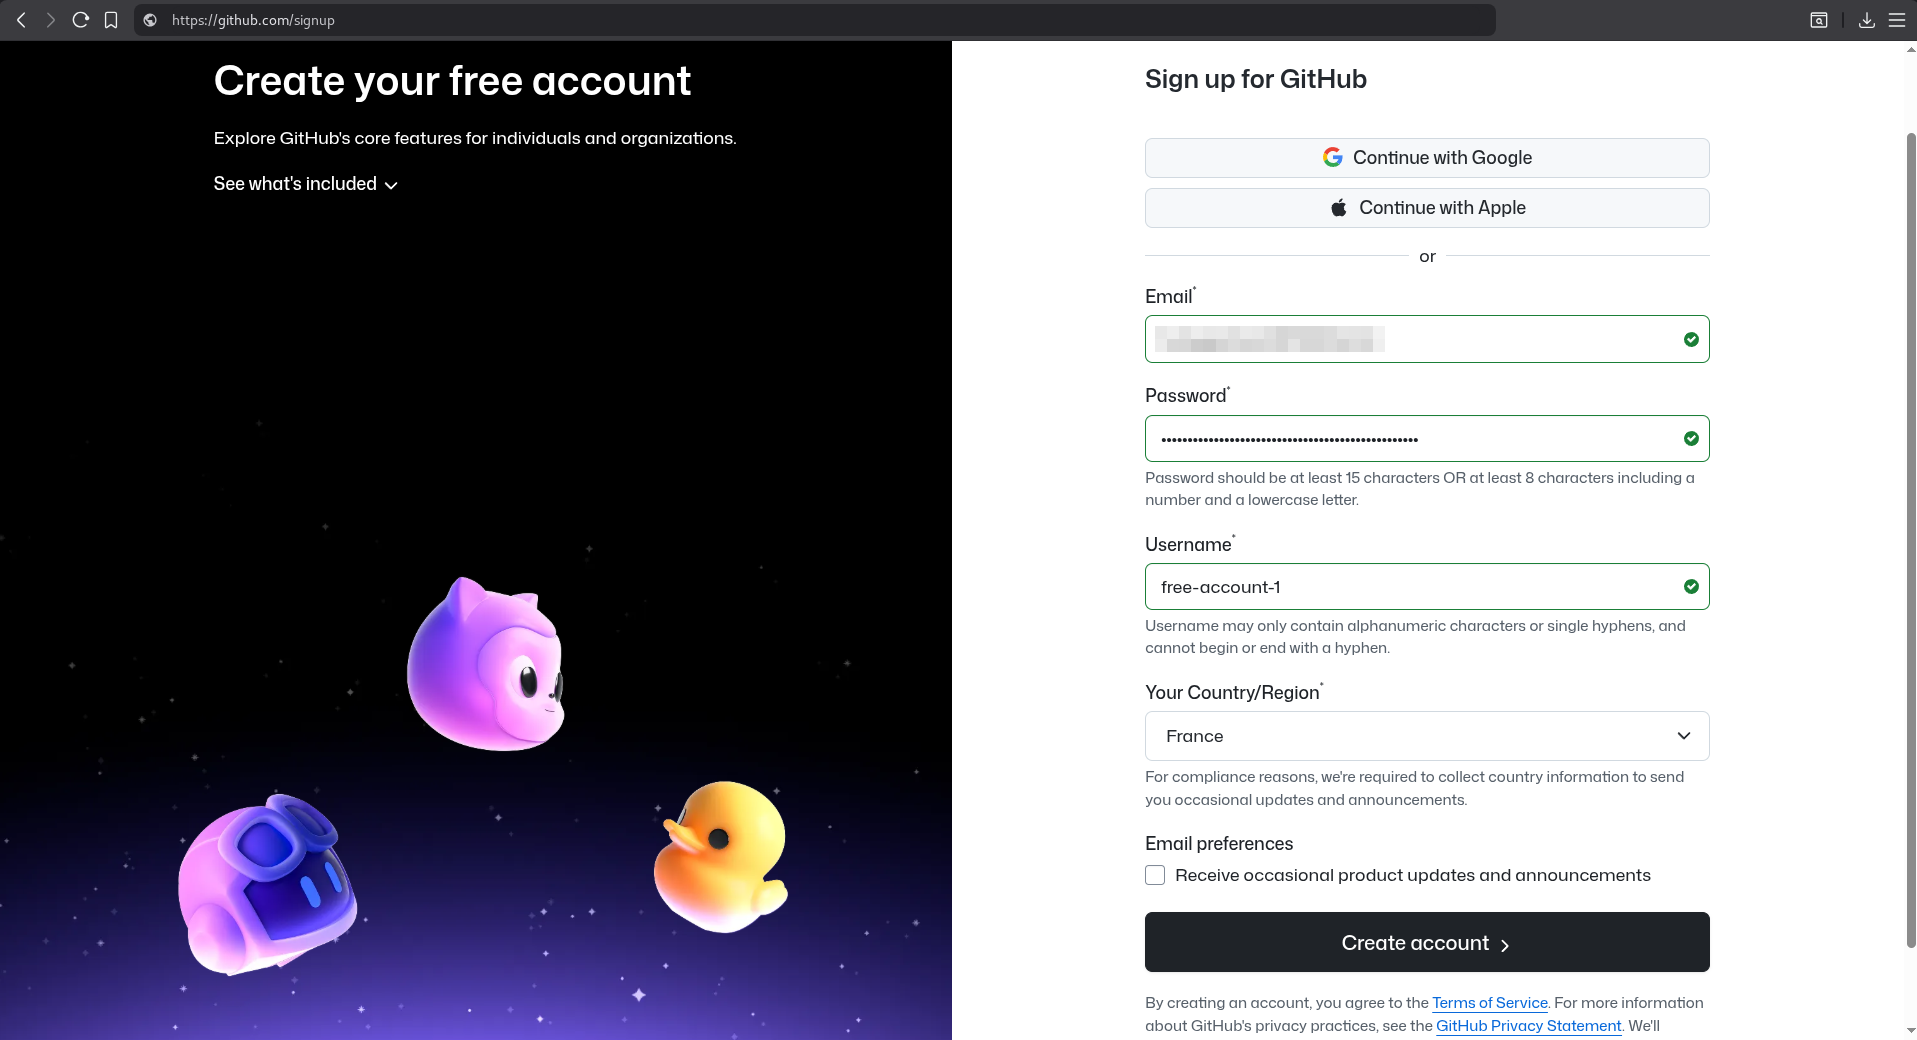
First of all, go to https://github.com/signup to create your phishing account, because you certainly won’t want to use your own account for malicious purposes and risk being banned. You can create an email address on outlook for free without phone number verification. Regarding the username, it doesn’t matter, for now. Country doesn’t matter at all, except if you’re really trying to link the attack to another state, like in emulation.
Congrats, you are now officially in possession of a third of your toolset. We will come back to the GitHub account later.
OAuth App
Some might ask “but what is an OAuth App?”, and that would be fair, I was myself not really able to answer that question when I first started looking at the technique. So I made some research about it and long story short:
OAuth apps are applications that use the OAuth 2.0 authorization framework and request specific permissions to user’s data granted through an access token. This way the user can let the application access his profile data (username, email) for example and can revoke this access any time.
Basically, the user gives the app access to something. And this something is defined by requested permissions. You can find in GitHub’s documentation all possible permissions an app can request. In our case, as we are trying to get an initial access, we want to request the following permissions:
user:email: Access to the user’s email addresses.read:user: Read access to the user’s profile information.repo: Full read/write access to public and private repositories.workflow: Read/write access to GitHub Actions workflows.
Those permissions would enable us to access the user data profile, his public AND private repositories with read AND write permissions, his GitHub Actions workflows with read AND write permissions as well.
We almost have full control over the user’s GitHub account, with the ability to view private repos, push some backdoored code and have control over runners. Such a token would effectively give us a good initial point to try to compromise the company. But how can we retrieve this token? We don’t, the OAuth app does. No worries, I got your back. Accompanying this blog post, you can find a Proof-of-Concept of a malicious OAuth app named MalGitApp on GitHub.
Before explaining how to use MalGitApp, here is a diagram illustrating how the OAuth authorization flow works in the case of GitHub:
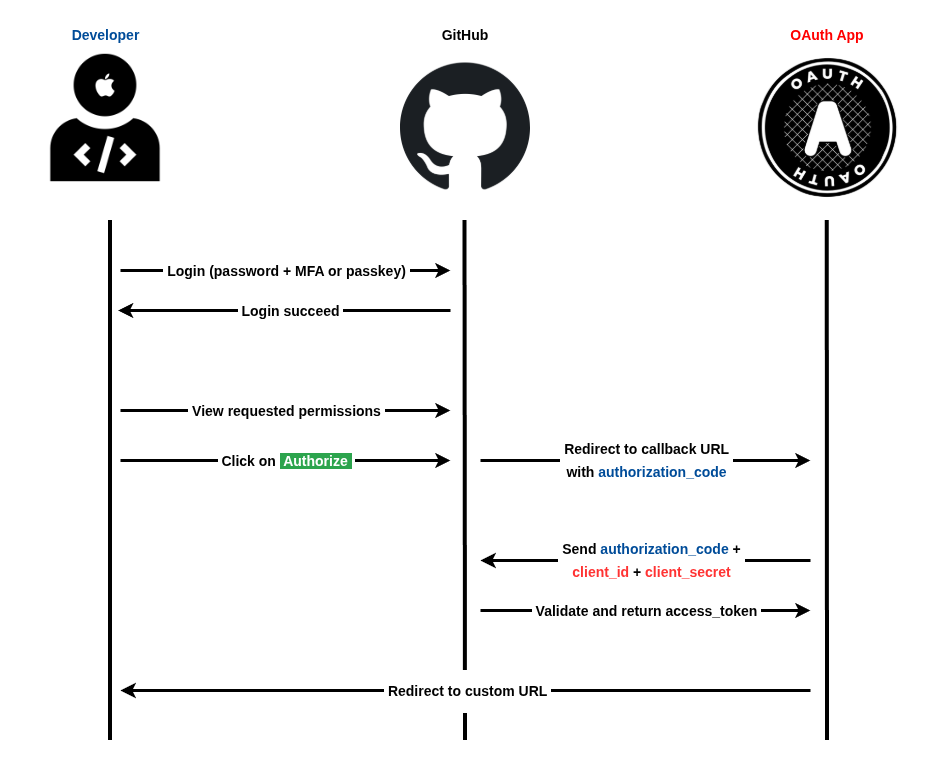
- The user (developer in the example) authenticates normally on GitHub.
- GitHub shows the user the requested permissions by the OAuth app.
- The user clicks on “Authorize”.
- GitHub redirects the user to the OAuth app callback URL with a temporary
authorization_code. - The OAuth app send the
authorization_codewith itsclient_idandclient_secretto GitHub. - GitHub validates both and return an
access_token. - The OAuth app redirects the user to a custom URL.
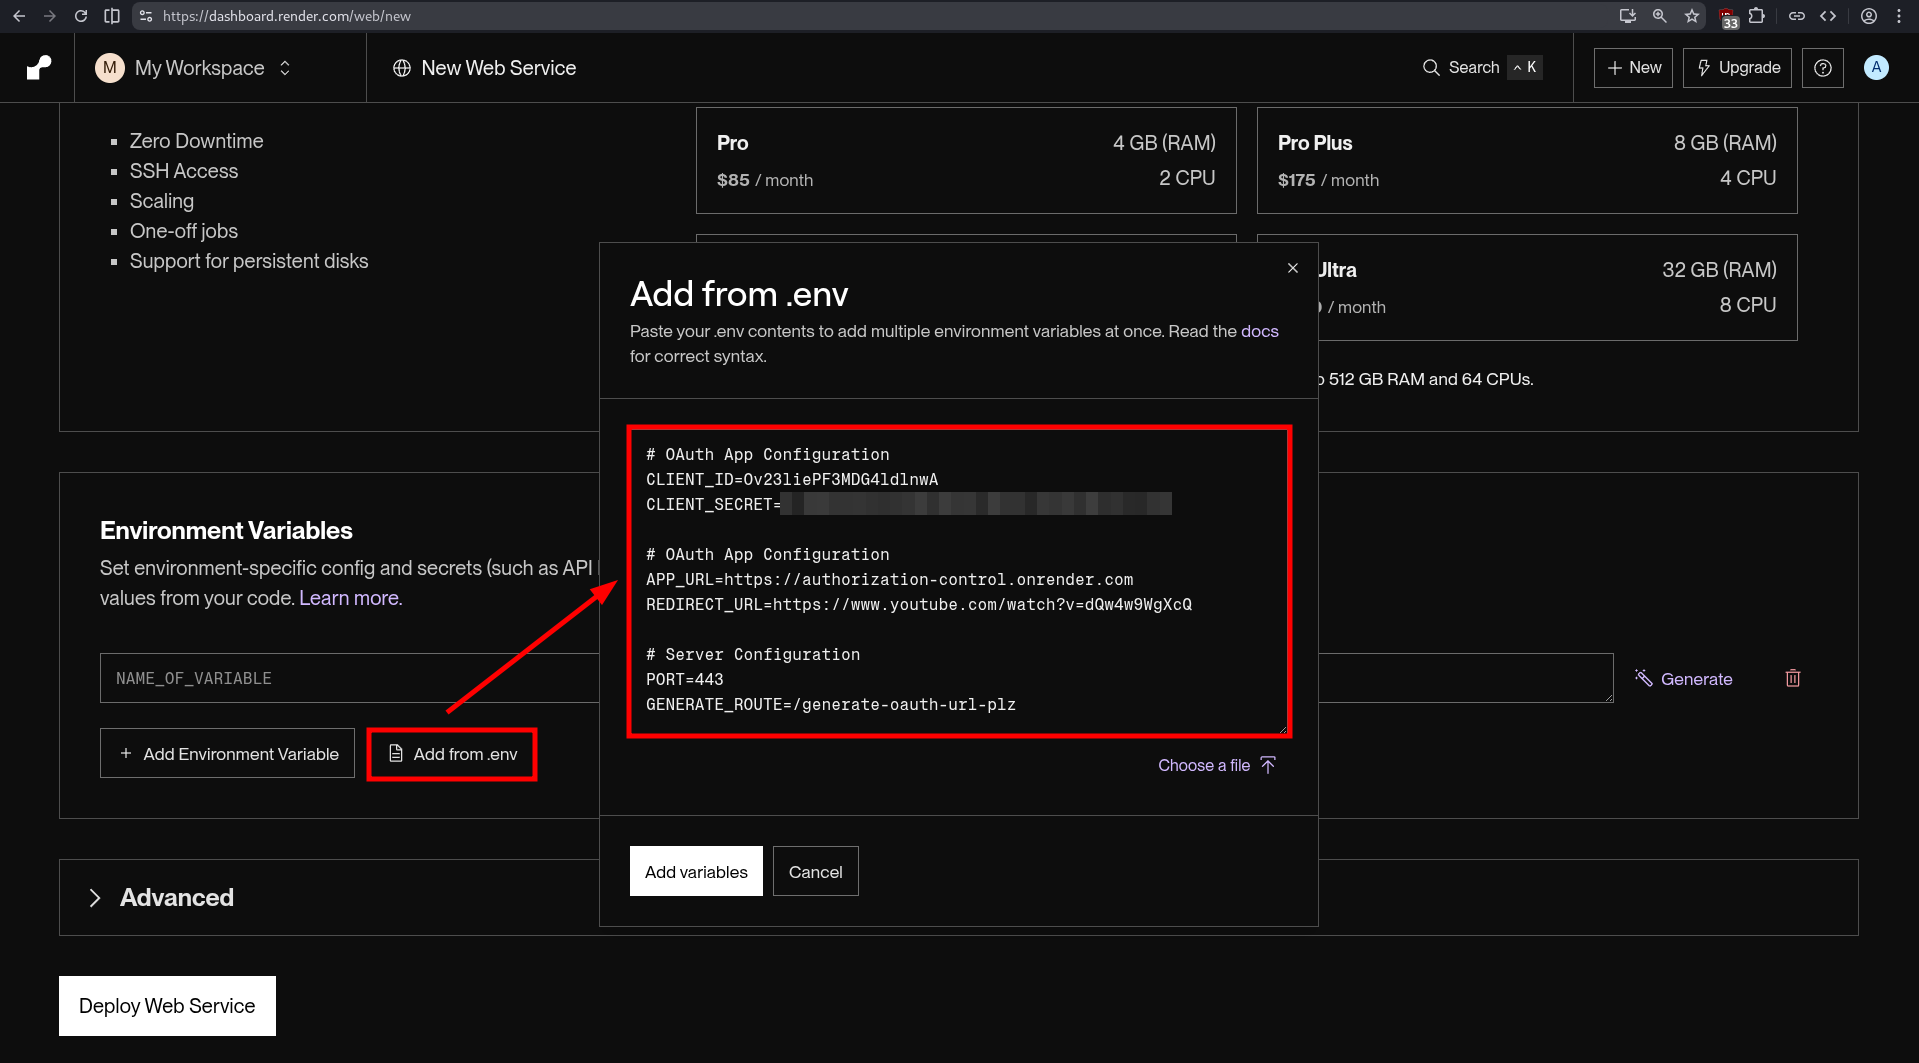
Steps 4 to 7 show what the MalGitApp code does. Basically, it receives a request with a code, it sends this code and its credentials It is relatively short (~ 200 lines) and pretty straightforward. The app is configurable using a .env file or directly from environment variables. An example of configuration is provided:
# GitHub OAuth App Configuration
CLIENT_ID=your_oauth_client_id
CLIENT_SECRET=your_oauth_client_secret

# App Configuration
APP_URL=https://my-oauth-app.com
REDIRECT_URL=https://www.youtube.com/watch?v=dQw4w9WgXcQ

# Server Configuration
PORT=3000
GENERATE_ROUTE=/generate
Let’s break down the keys expected by the configuration file:
CLIENT_ID: the OAuth app identifier (I’ll show you how to retrieve it right after).CLIENT_SECRET: the OAuth app “password” (I will also show you how to retrieve it right after ).APP_URL: the URL where the OAuth app will be accessible.REDIRECT_URL: the URL where the user will be redirected after successful authorization.PORT: the port (obvisouly) on which the OAuth app will be listening.GENERATE_ROUTE: the custom route that will return the phishing URL with correct parameters (client_id, scope, redirect_uri).
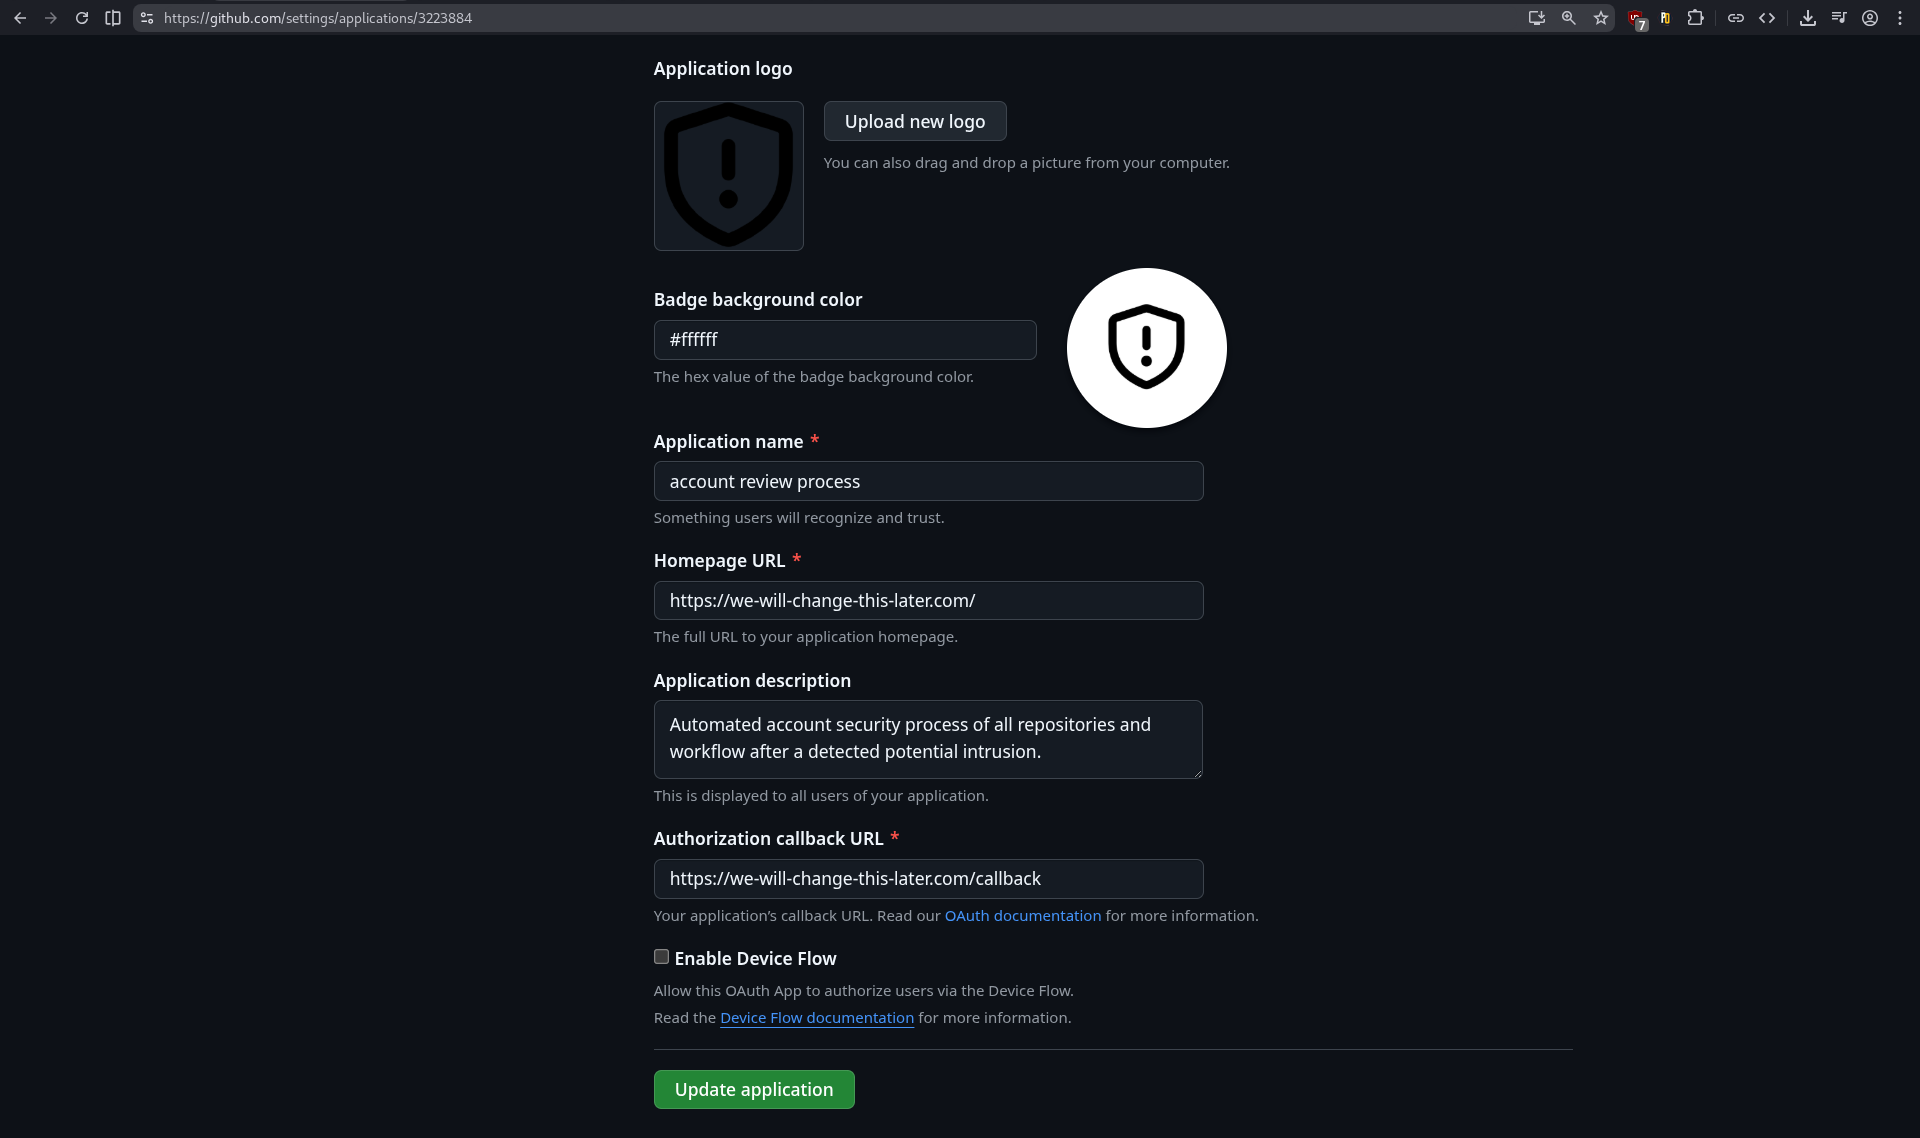
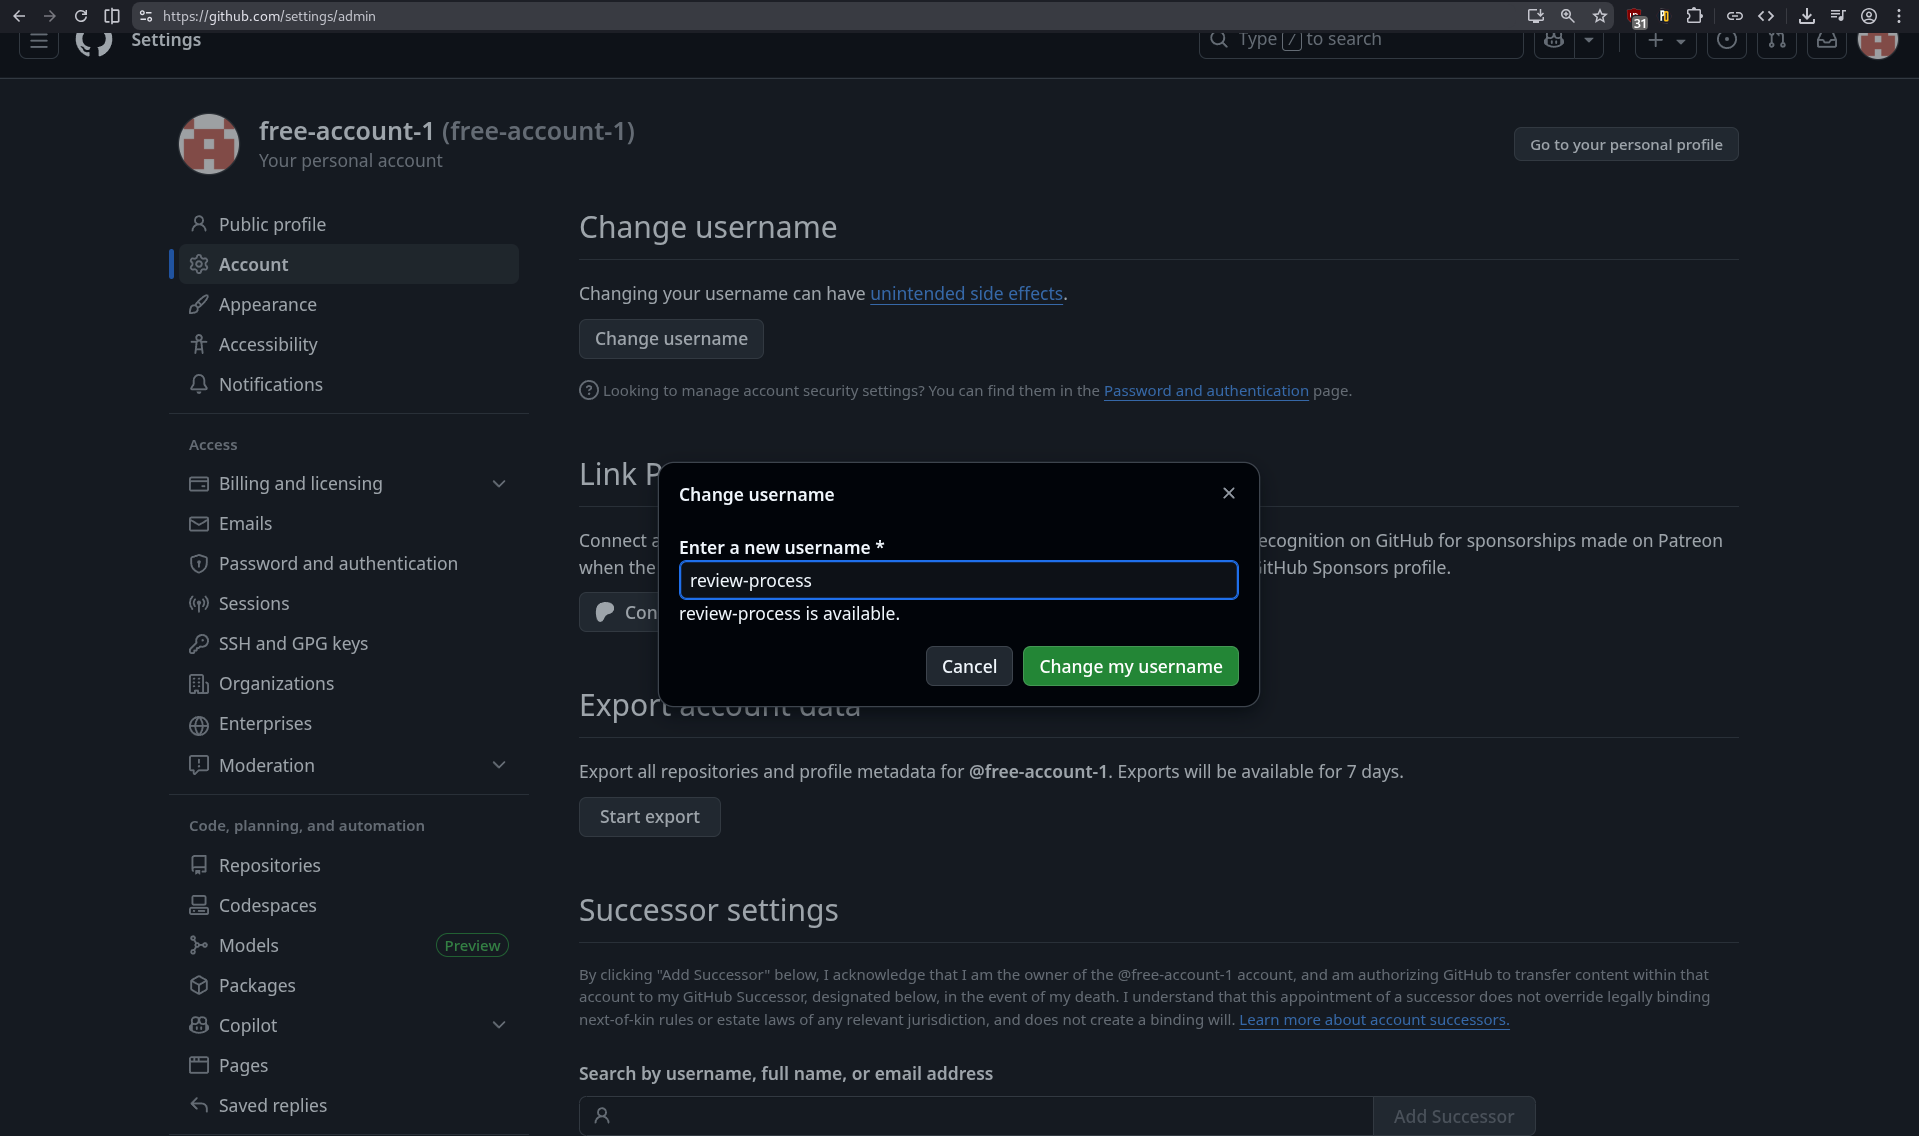
Alright, now let’s see how to retrieve the client_id and client_secret for our OAuth app. First we need to create one. To do so, go to https://github.com/settings/applications/new. Set an Application name that match your pretext. In our case, we will simulate an automated security audit of all user’s repos and workflows. Be careful what you chose, the user will see this name displayed in big. We will change the URLs later when we will tackle the server part.
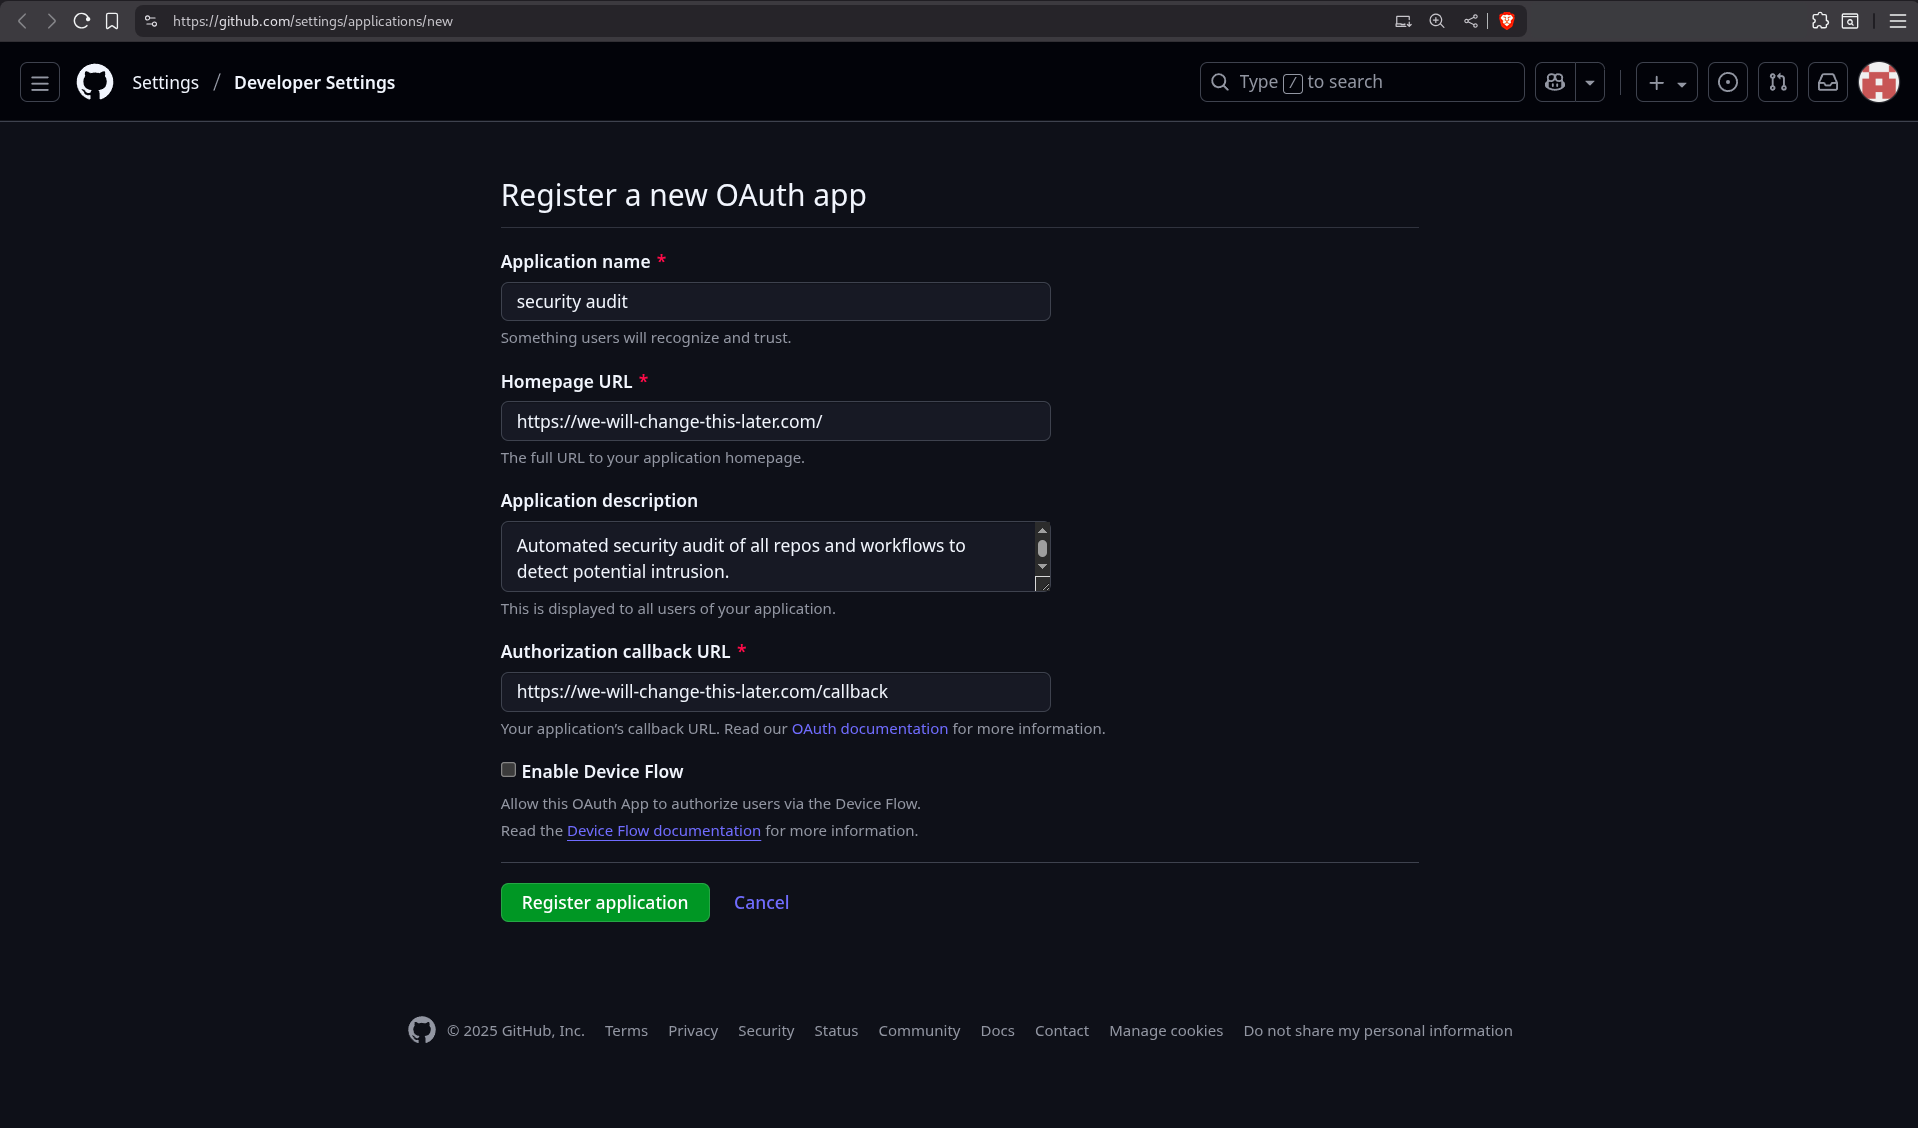
We will modify the OAuth application settings to make it more credible to the user. This is also part of social engineering. It involves convincing the user that your pretext is legitimate, because certain elements are familiar to them or appear to be authoritative.
Select a good logo that inspires trust and match your pretext as well. In this case, we are going to impersonate a fake GitHub automated security service for scanning 🔎 an account’s repos and workflows. This might look legit because there are several automated analysis tools that exists for repos.
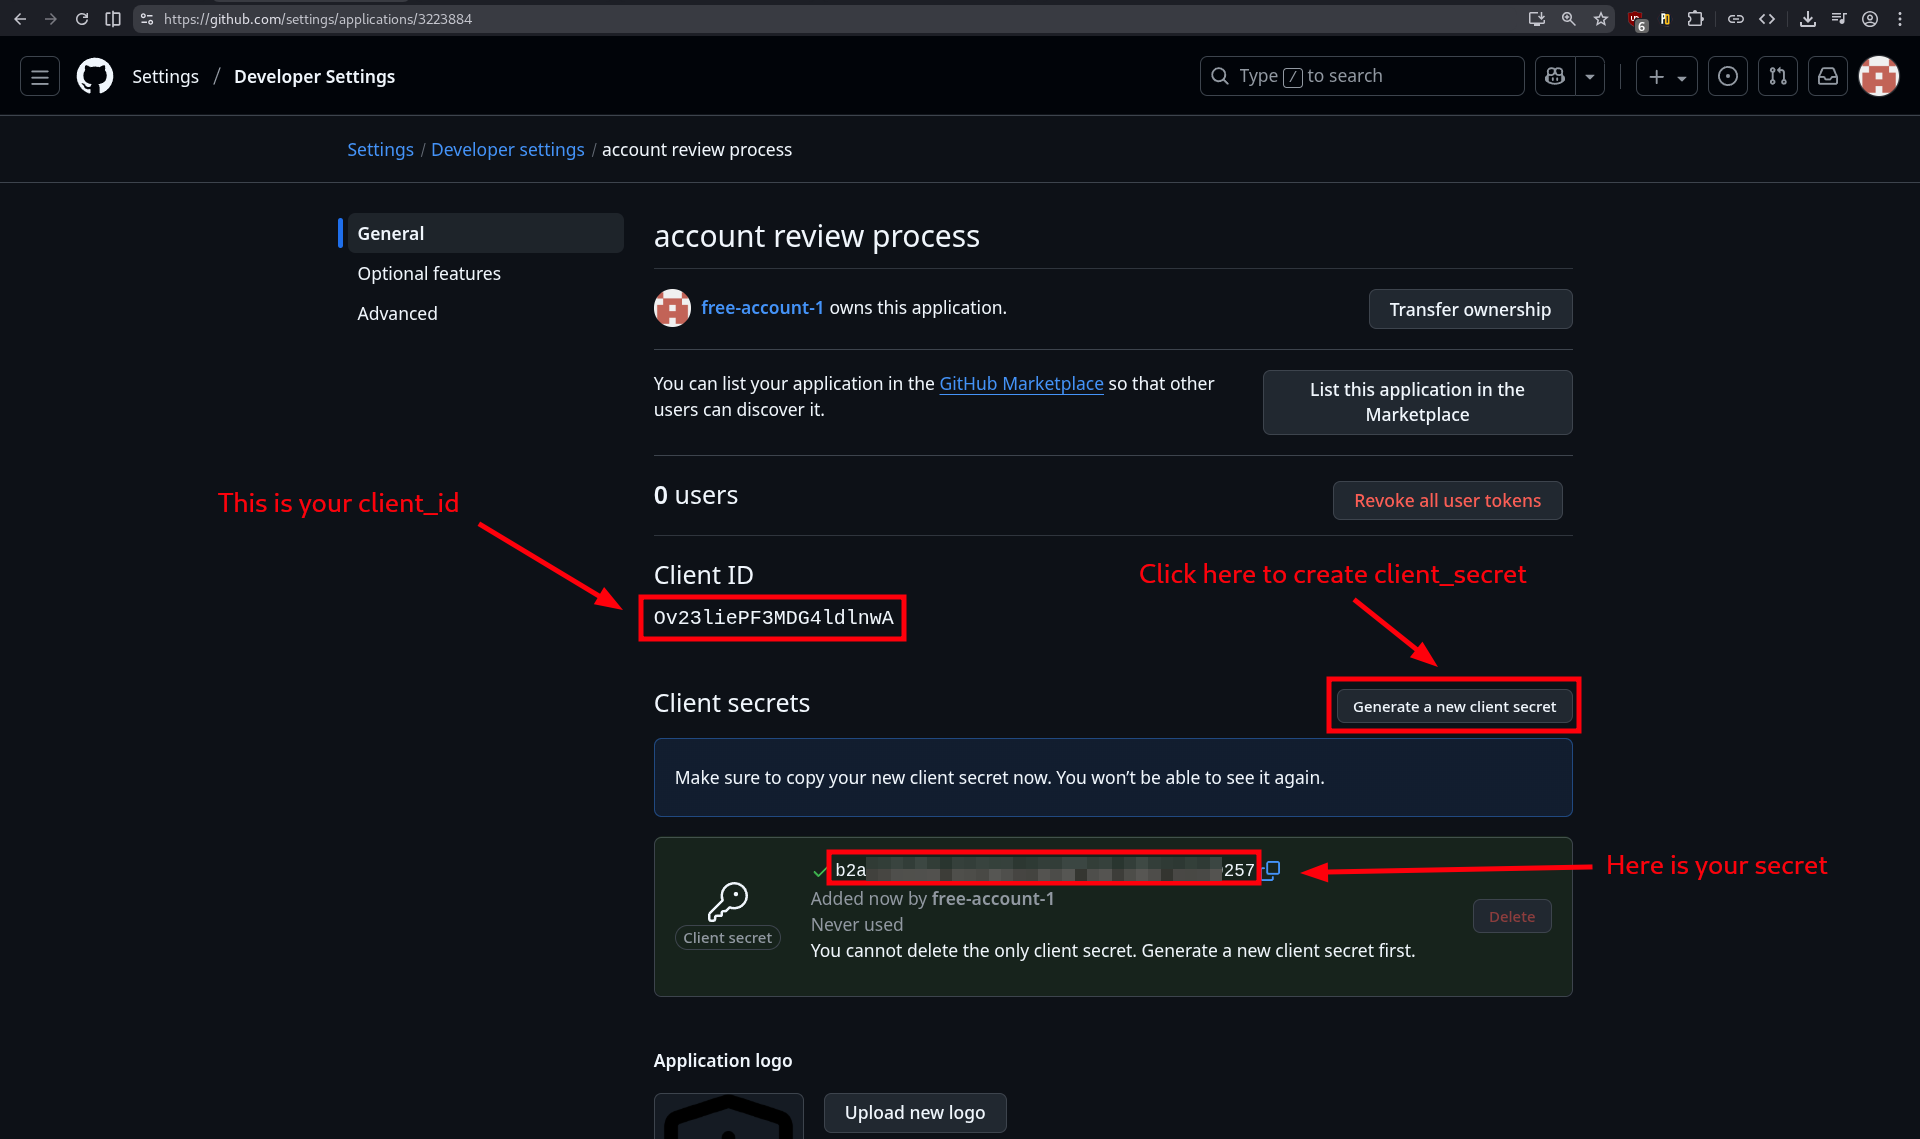
While we’re on this page, let’s take the opportunity to retrieve the client_id and create a client_secret. Congrats, you are now officially in possession of two-third of your toolset.
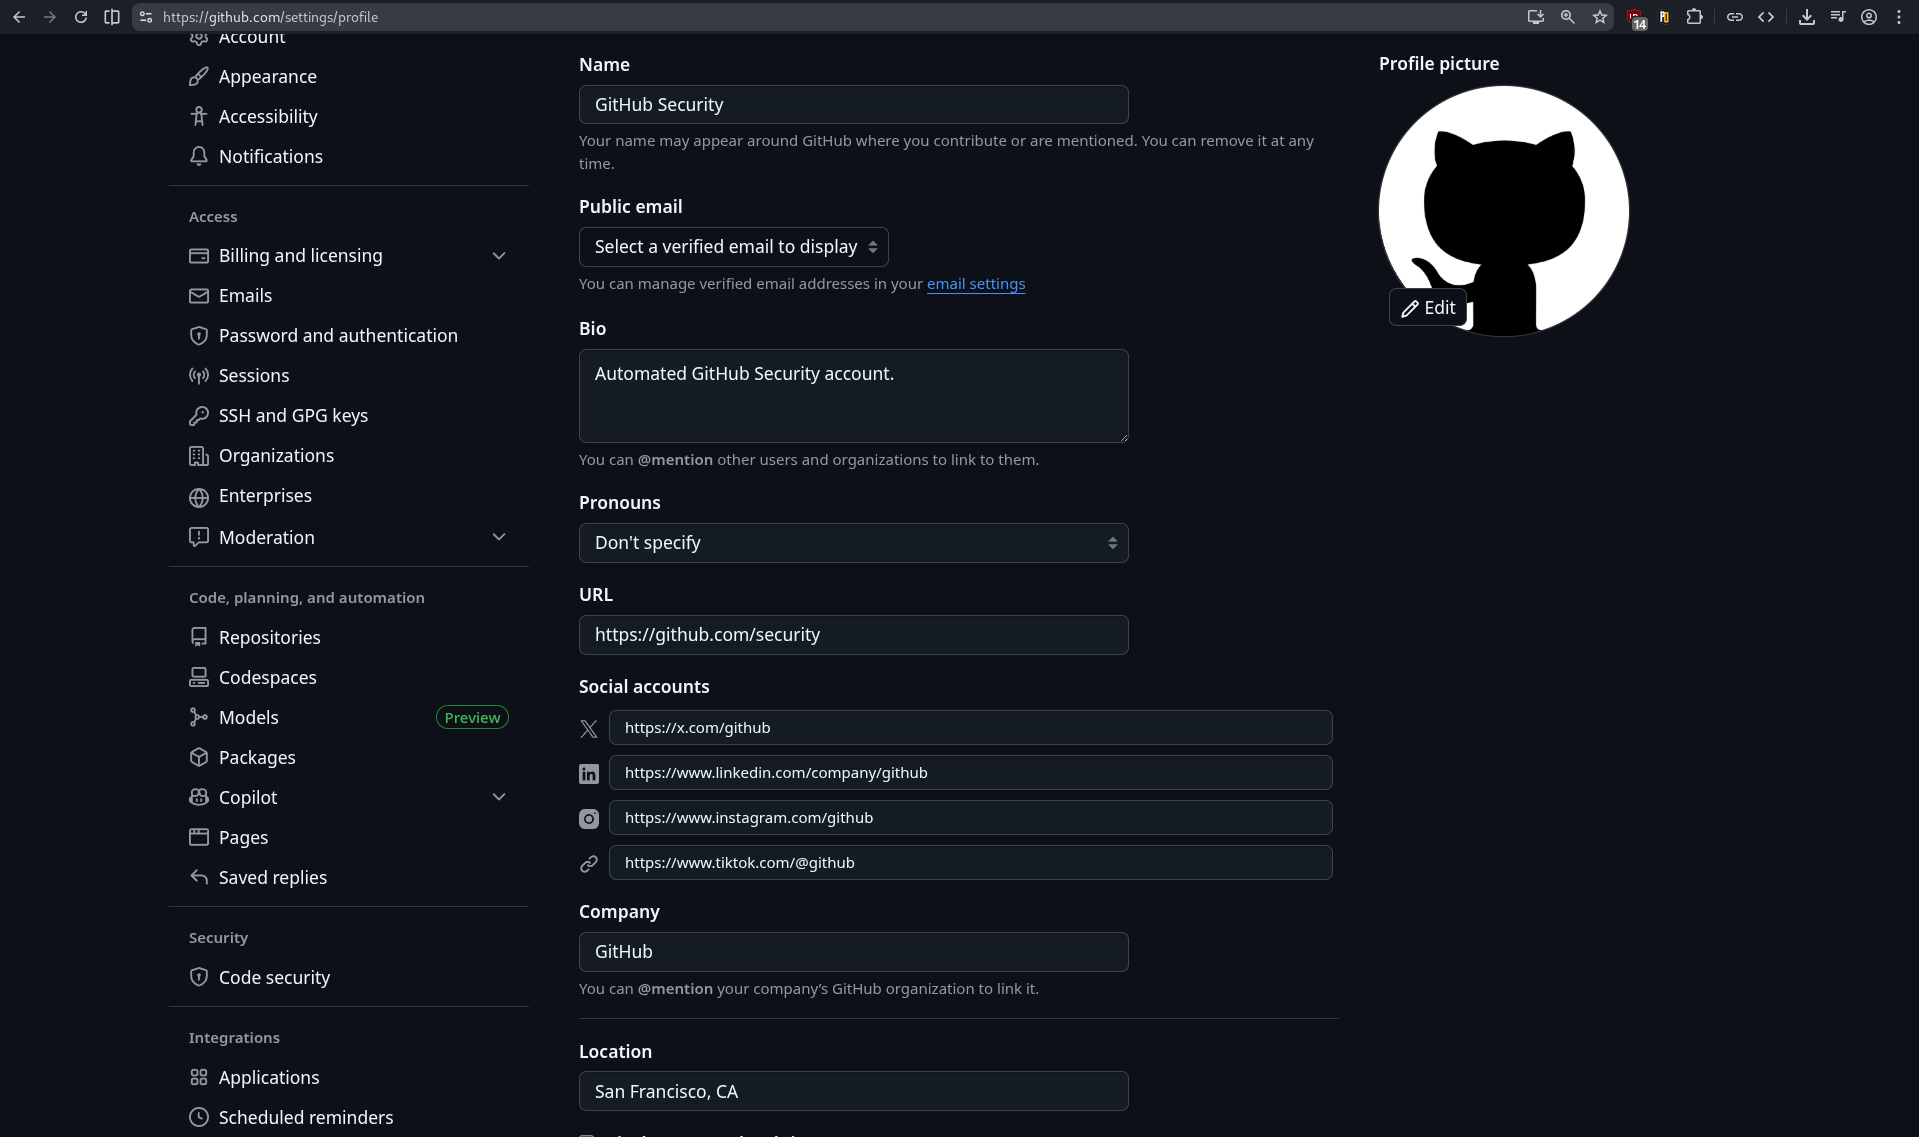
Since we have started customizing the OAuth application, we can continue in the same way with our account and profile settings. Remember when I said that the account name didn’t matter? Well, now it does, because it will be displayed to the user. In fact, everything that is shown to the user must be considered with the greatest attention. It’s all in the details and subtle choices you make.
💡 Visual Deception
In social engineering, visual deception is the fact of manipulating visual elements to create false impressions that lead to incorrect assumptions or actions. In our case, we misuse the GitHub account name that is inserted into the text of a button, thus forming a sentence that is easily readable by the target.
Now, let’s makeup our profile so that it feels an official GitHub account. To do this, we set up a familiar profile picture (in this case, the GitHub logo), a display name that looks legitimate (impersonating GitHub Security here), and the rest of the fields are just there to further enhance credibility if a user wants to dig deeper into your profile.
The whole GitHub setup is done for now. We can move to the OAuth app hosting part.
Server
As mentioned earlier, we need our OAuth app to be accessible on the Internet. Multiple options exists when it comes to “infrastructure hosting”. I wrote a section about “Phishing Infrastructure” in a previous blogpost that you can find here. Long story short, to deploy your OAuth app you can:
- Use a server from a cloud provider like OVH, Azure, AWS, etc.
- Use a Platform-as-a-Service (PaaS) solution like Render, Vercel, Netlify, etc.
Both options are great and come with benefits and drawbacks. For example, renting a Virtual Private Server (VPS) on OVH would give a server to host the app with a public IPv4 address. However you will still need a domain and a TLS certificate, which might be what you want if you have a great domain that match perfectly your pretext. The TLS certificate can be obtained for free using Let’s Encrypt or ZeroSSL. Other options may give you a subdomain of an existing (trusted) domain with TLS enabled, but might look less convincing. Anyway, I won’t elaborate any further on choosing a platform to host your app; after all, it’s your decision.
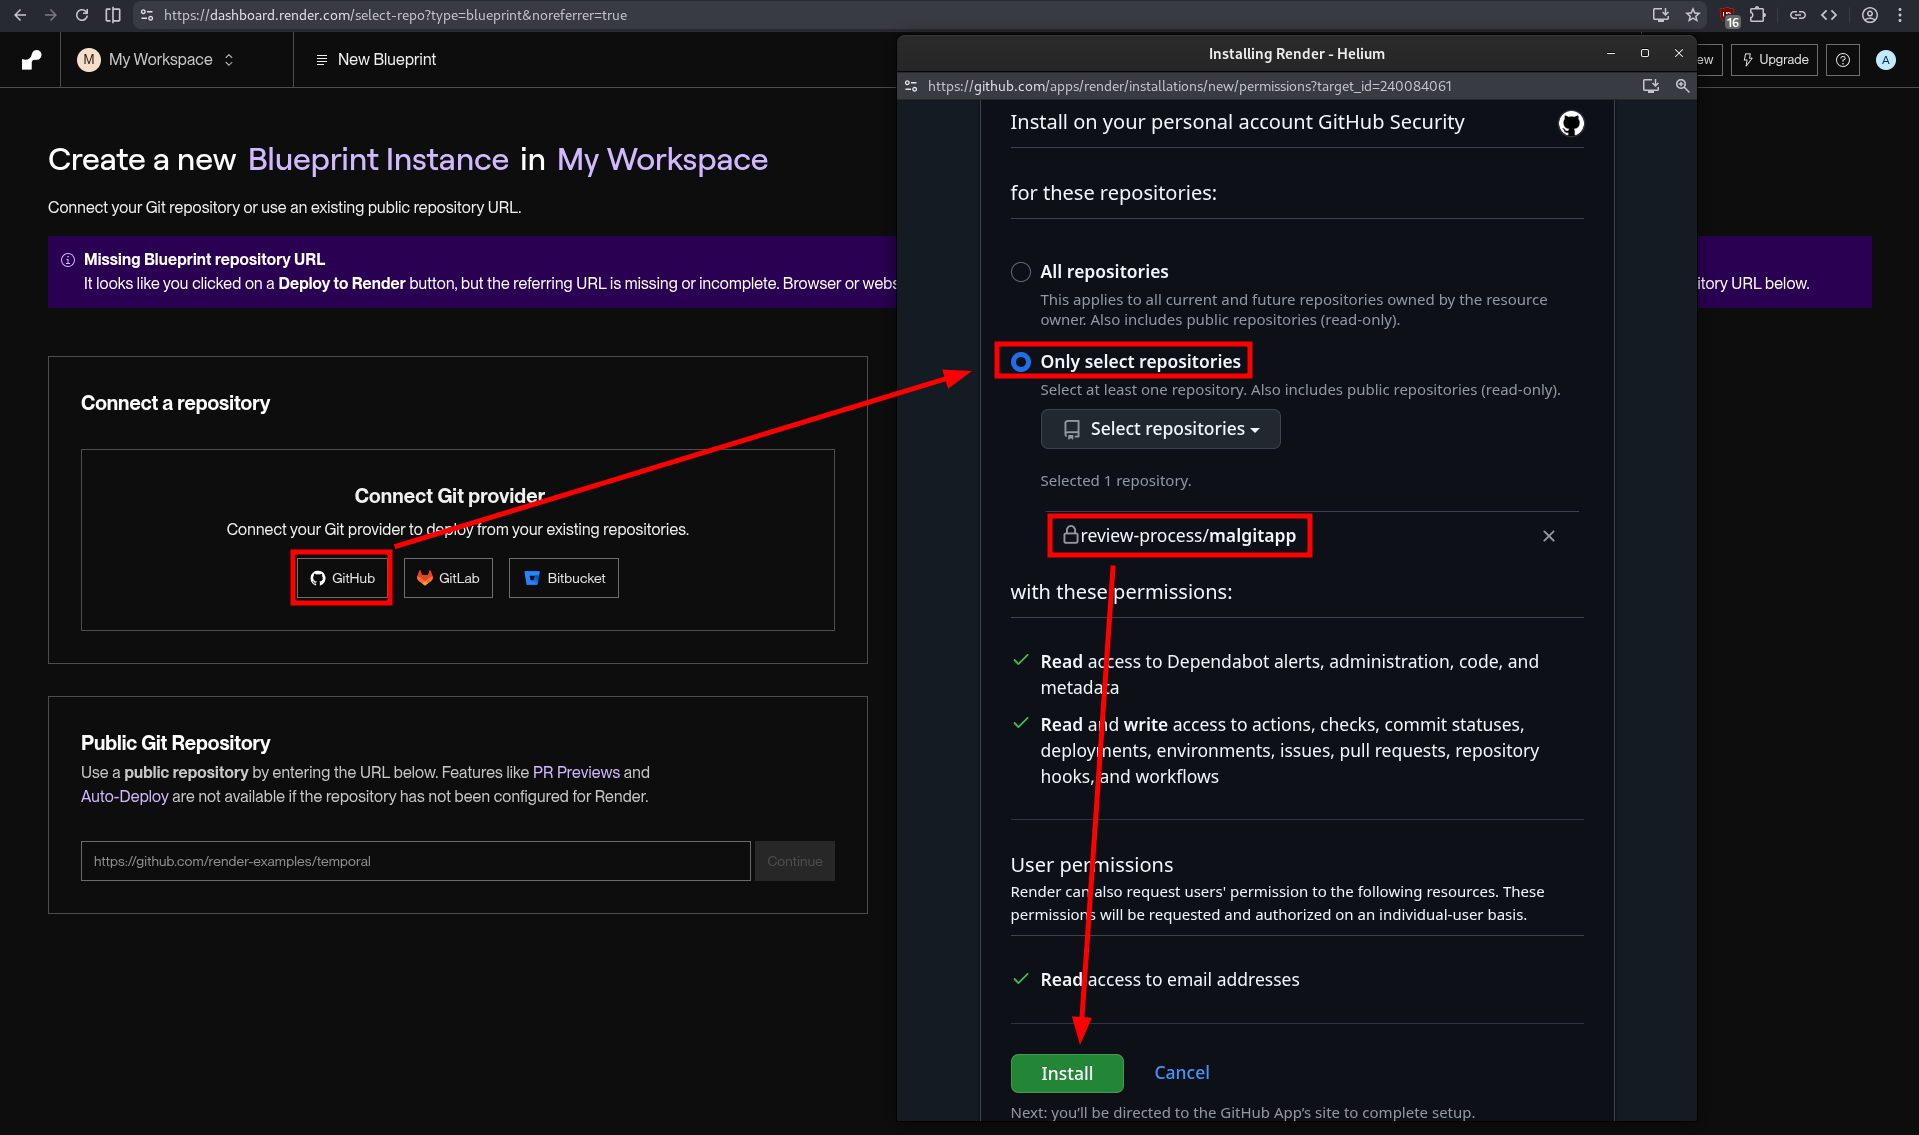
In our case, we will chose Render, as it is easy to deploy on it and I like the interface. Go to Render and create a new account using either GitHub (the easiest) or the junk email address we created earlier. Next, you can use the MalGitApp public repo or fork it on your GitHub phishing account and then connect Render to it. Select only the desired repositories and click “Install”.
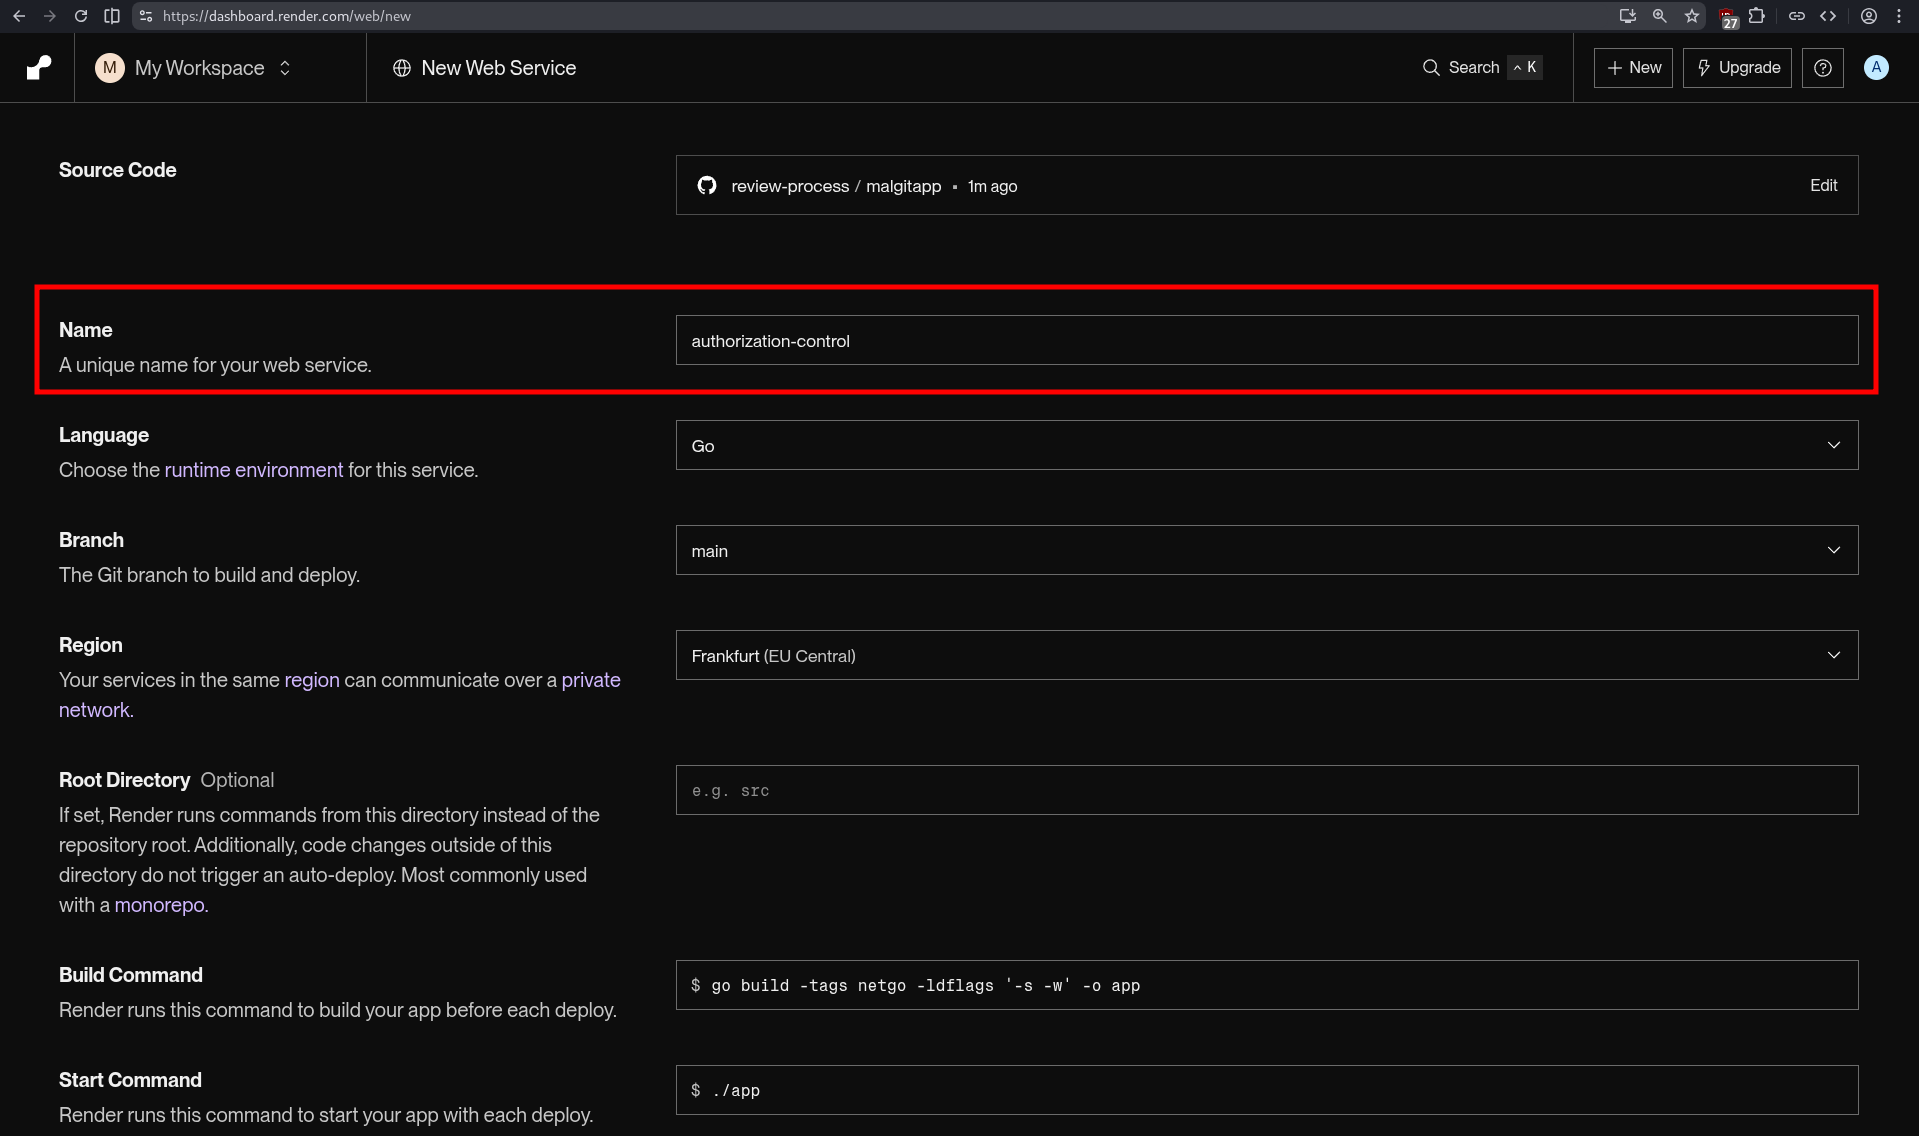
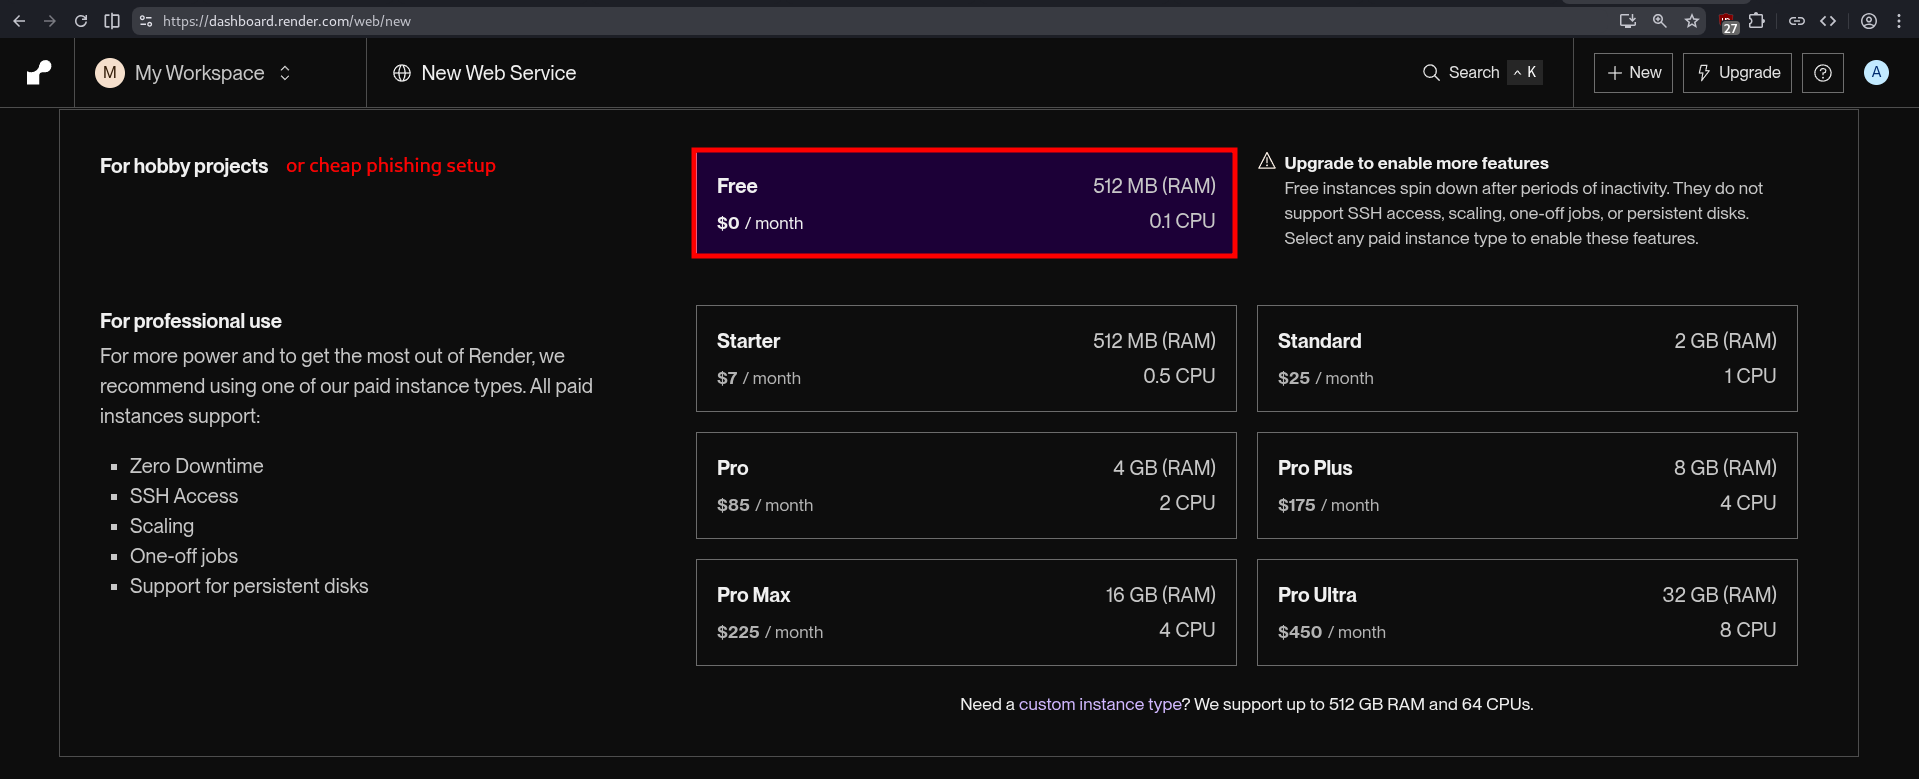
Then proceed to create a new web service by going to Render. Most of the settings will be automatically detected when you select the repo. The key field here is Name because your web service name will be contained in the URL where the OAuth app will be accessible.
As stated in the introduction, the full setup can be FREE. We can clearly take the instance with 512 MB of RAM and 0.1 CPU because our OAuth app will only handle few requests.
And finally we configure the OAuth app using the prepared .env file and pasting or importing in the in text area.
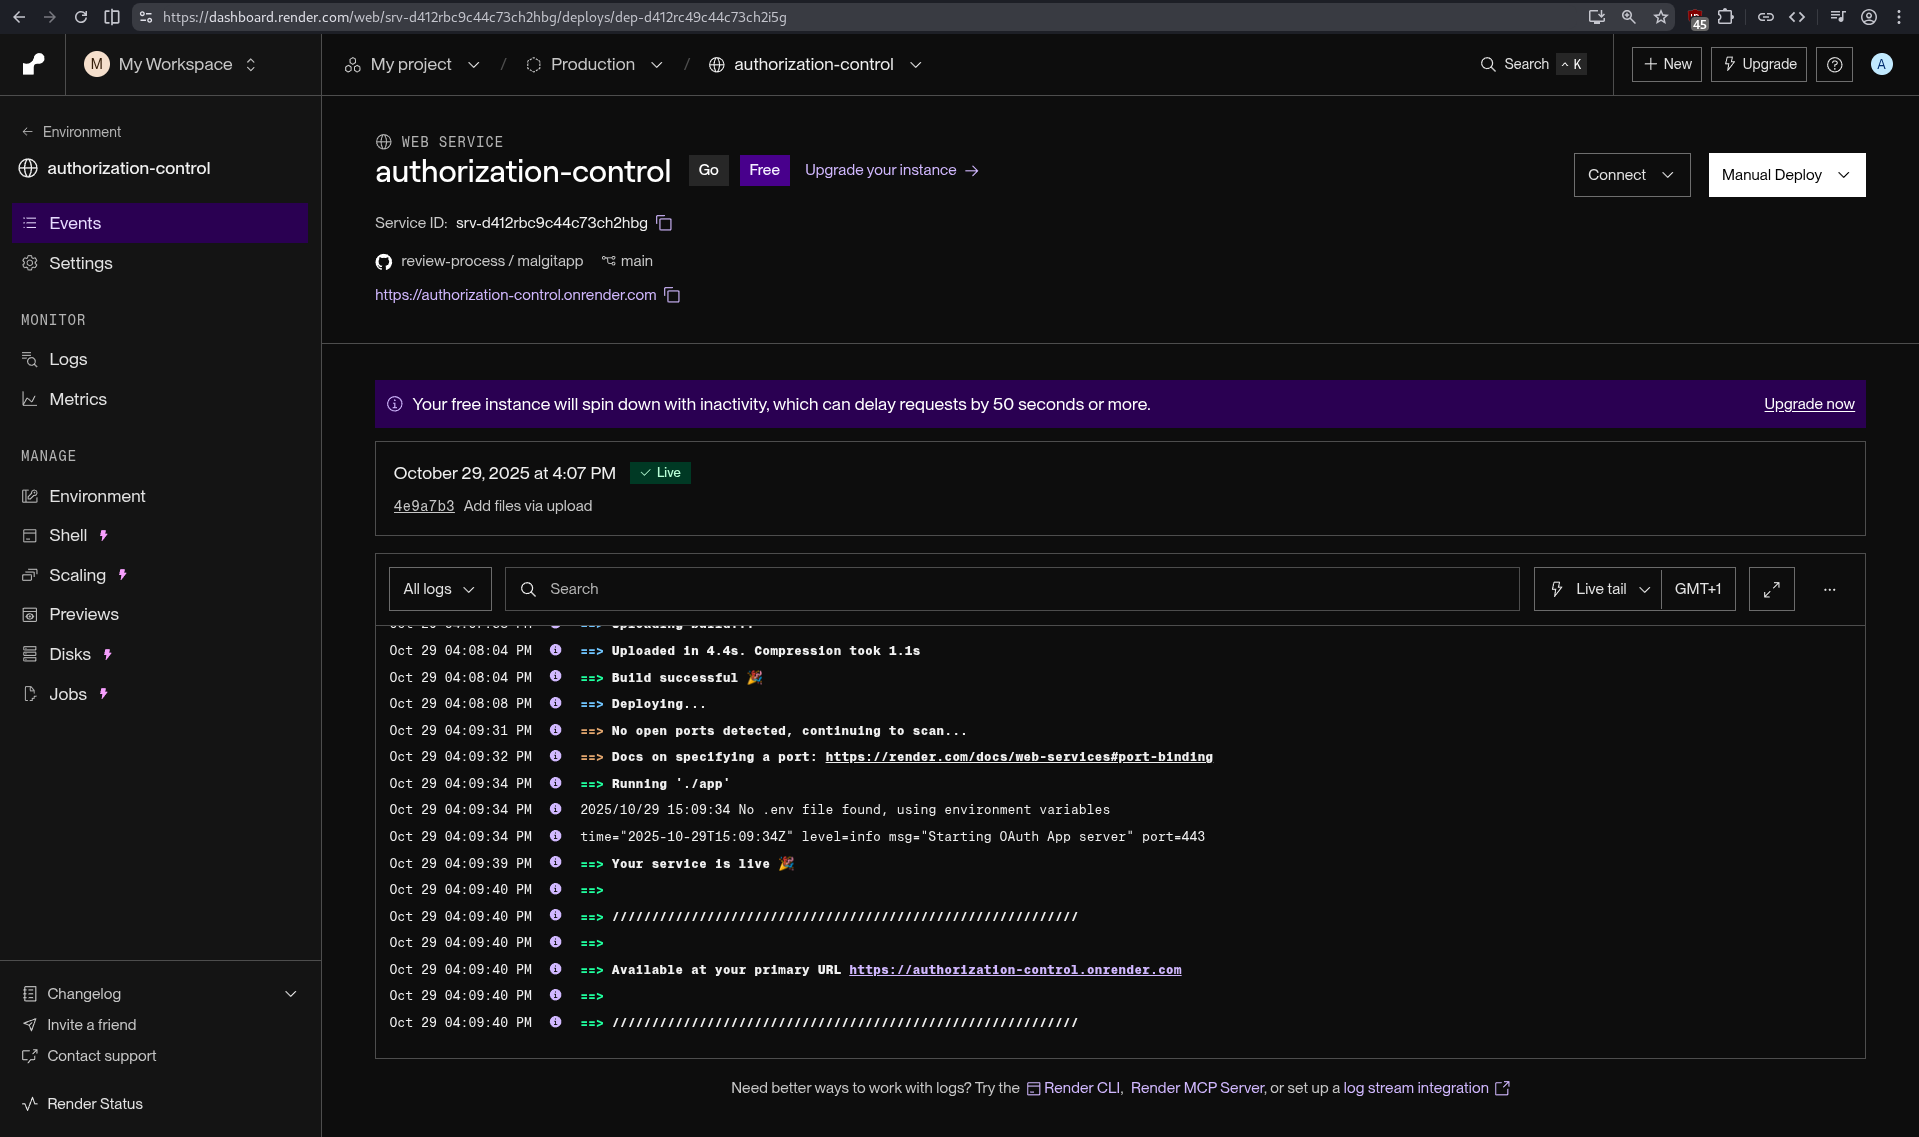
If everything went right, you should see something like the screenshot below, with the message “Your service is live 🎉”.
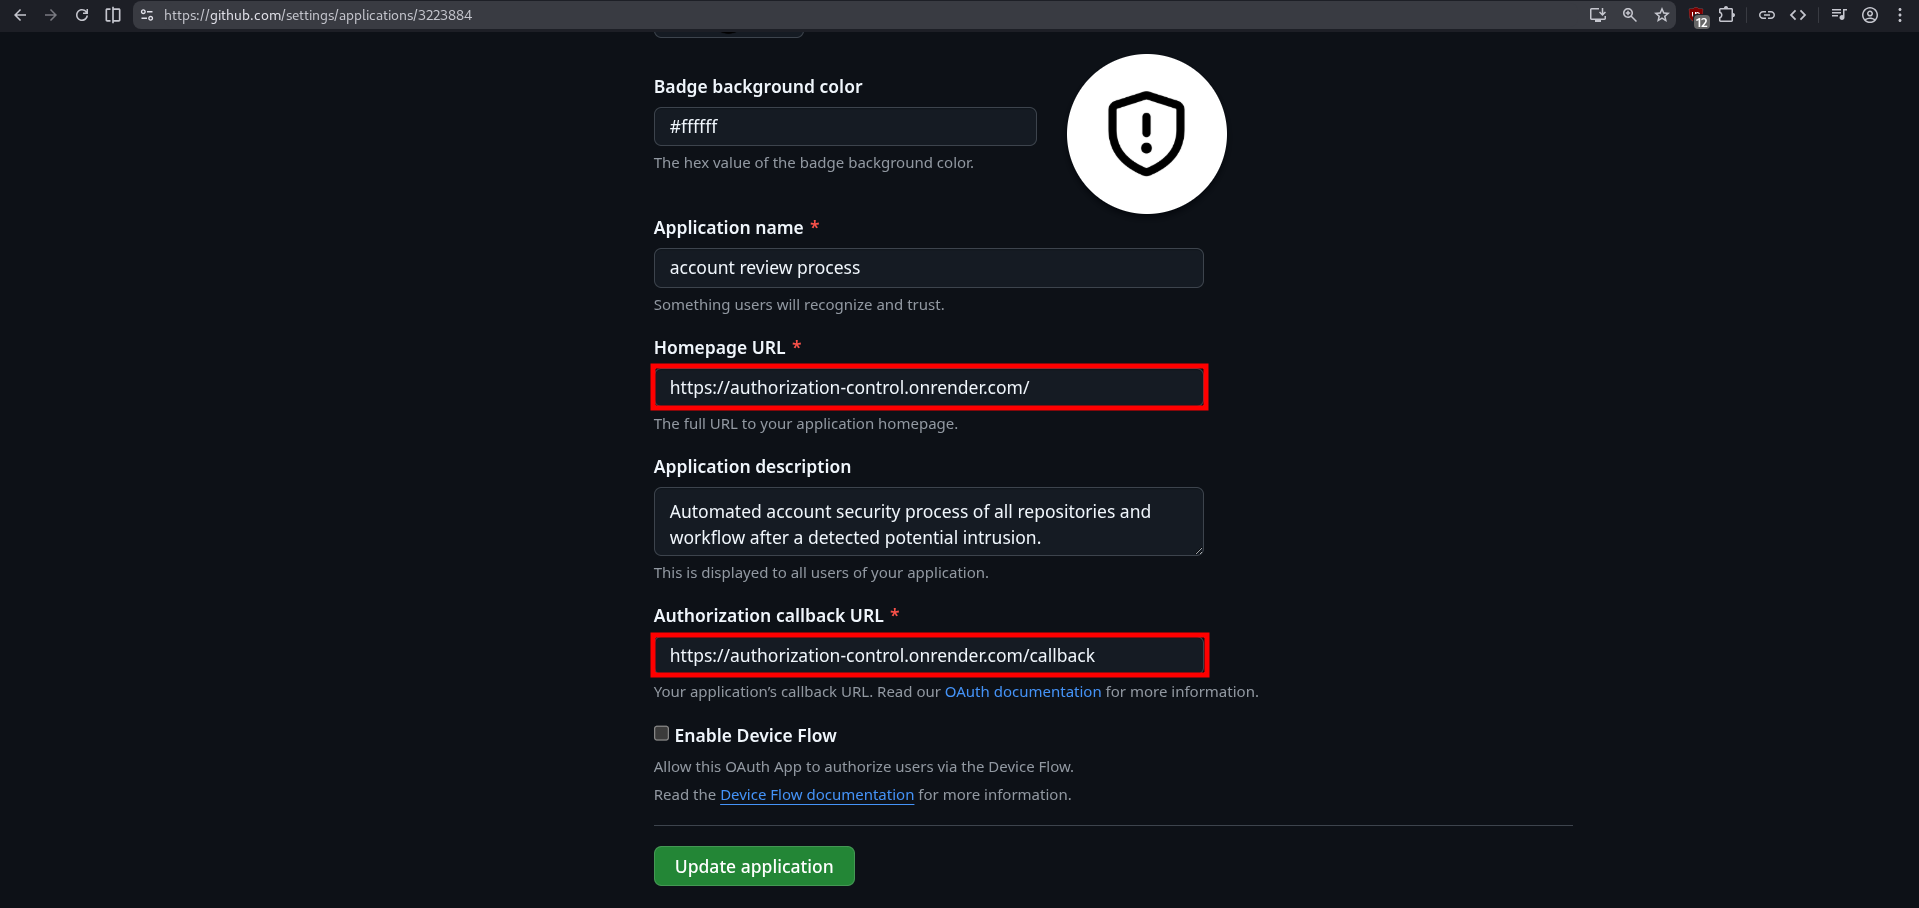
One last thing, we need to change the URLs in the OAuth app settings on GitHub. Go back to Settings and click on “Edit” button next to your OAuth app. Change the “Homepage URL” and “Authorization callback URL” and set your domain, in our case it will be https://authorization-control.onrender.com/.
Congrats, you are now officially in possession of your whole toolset.
Send notifications
Now that all the setup is done, we are going to see how to reach the target. Since we are employing GitHub for this campaign, we can use issues. They have a wide range of uses, such as planning, tracking, discussing, reporting, suggesting, etc. Most of the time, people are raising issues to report a problem in the project or simply ask questions, when they are lazy to RTFM. A GitHub issue is composed of a title and a description (and other things but they aren’t useful here). “But how will this help reach the target?”, great question. We are going to (ab)use the GitHub notification system when you mention a user. Any GitHub account that is mentionned in the description of the issue will receive automatically a notification by email to their primary address.
Issues description use Markdown to format the text. This can be used to stylized your message in order to add some big titles, bold text, links, etc. This is particularly useful for hiding malicious link in the pretext and luring the target to click on them. In this example, I pretexted a blocked intrusion related a malicious commit. I gave some information about the attempt to make it more credible and masked the phishing URL behind links. “How do we get the phishing URL?” Remember the generate route we defined in the MalGitApp configuration? This is the route to request to get the phishing URL automatically generated.
curl https://authorization-control.onrender.com/generate-oauth-url-plz

https://github.com/login/oauth/authorize?client_id=Ov23liePF3MDG4ldlnwA&redirect_uri=https%3A%2F%2Fauthorization%2Dcontrol%2Eonrender%2Ecom%2Fcallback&scope=user:email%20read:user%20repo%20workflow&state=1761842611
I chose “Intrusion Blocked: Malicious Commit Detected” as the issue title. The full issue description (pretext) can be found below:
#  Intrusion Blocked: Malicious Commit Detected

We have detected a potential intrusion attempt on your GitHub account (@mention) via a suspicious commit or workflow change.

## Anomaly Information

- **Timestamp:** 2025-10-30 13:37 UTC
- **Detection:** Malicious code commit (rule match: [SupChain:Script/Obf.A!ml](http://bit.ly/3X8dFb6))
- **Commit Hash:** 98a36cba6951ca6524d5870dcab049103e96d735

We have taken immediate action to protect your assets. If this activity is normal, you can revert the changes and [re-apply the commit](http://bit.ly/3X8dFb6).

## Automated Actions Taken

- The suspicious commit has been **automatically reverted** to the previous safe state.
- A report has been generated for review and details.

## Next Steps

1. **[Review Recent Activity](http://bit.ly/3X8dFb6)**: Check your GitHub account's recent activity logs for any unauthorized access or changes
2. **[Revoke All Active Sessions](http://bit.ly/3X8dFb6)**:  Sign out of all sessions and devices to terminate any potential unauthorized access
3. **[Setup a Passkey](http://bit.ly/3X8dFb6)**: Enable passkey authentication in your GitHub security settings for stronger, passwordless protection

## Need Help?

For assistance or further security review, contact our support team: [GitHub Security Support](http://bit.ly/3X8dFb6).
💡 URL masking
If you are paying attention, you have probably observed that I didn’t put the phishing URL in the links directly, but instead I used a link shortener. This is because GitHub tends to flag the issues containing the https://github.com/login/oauth/authorize URL as phishing attempts. In addition, certain keywords may be placed on a shadow-blacklist, or at the very least raise suspicion about your account. This will result in the deletion of your issue, as well as your OAuth app (the Client ID is present in the URL), and the permanent banning of your account without an explanatory email.
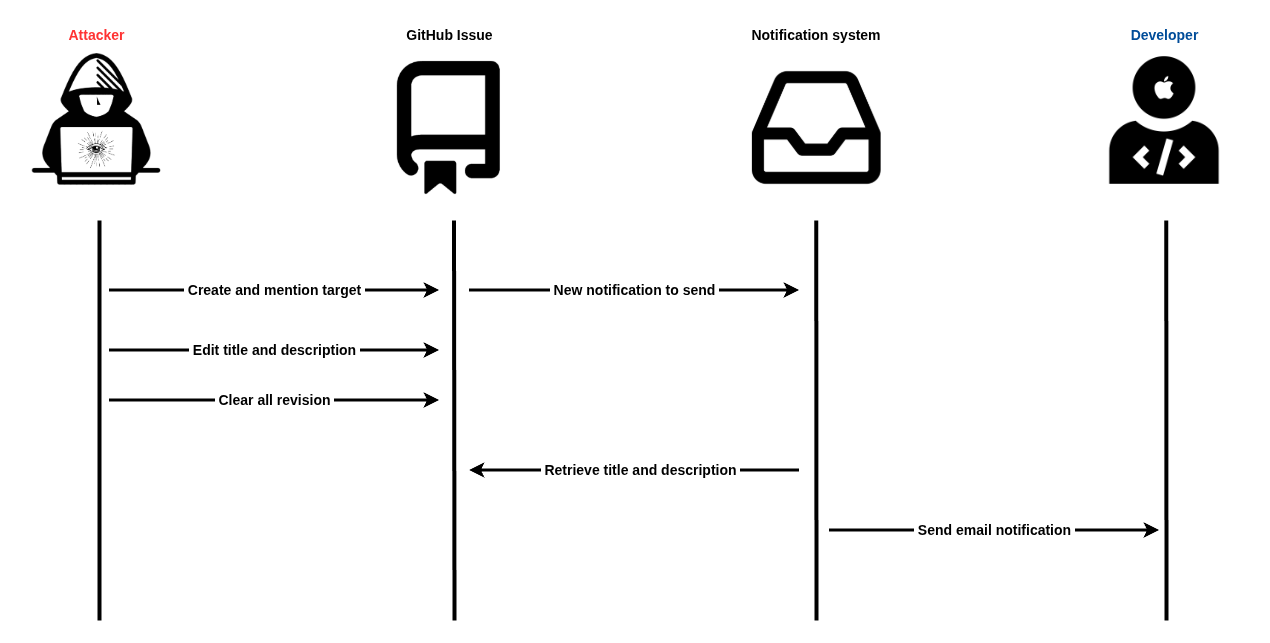
An issue with the issues (TOCTOU)
Accidentally, with the help of @Coiffeur0x90, we discovered a vulnerability in the GitHub’s notification system. It is possible to create an issue mentioning a user, effectively triggering the notification system, but edit it quickly so the email body that is supposed to contain the issue description will contain the newer version of the issue. This creates a “Time-of-Check Time-of-Use” (TOCTOU) race condition where the target’s mention in the description is triggering an email send, but the sent message contains the last revision of the issue. This allows an attacker to create an issue with a phishing pretext and mention the user, wait a few seconds (~2-3s), erase the content of the issue, change the title of the issue (because we can’t delete them) and clear all revisions. By doing this, a target visiting the issues on the repo will only see the last modifications. With some clever social engineering tricks, we can make the target think there is a problem by setting the issue title to “Loading error” and a blank description.
Below is a diagram illustrating this vulnerability:
GitHub allows you to mention any user on any public repository, and they’ll still receive an email notification. This creates an interesting social engineering vector. An attacker can create a specially crafted account name and repository name combination that appears in the email subject line. Since GitHub’s notification emails subject use the format [account/repo] Issue title #number, a malicious actor could create accounts and repositories with names like:
- SupChain-Script/Obf (reminder of the pseudo-rule we matched in the pretext)
- GH-Security/alert (impersonating GitHub)
- GltHubNotification/Security (
ireplaced with anlin GitHub)
When combined with convincing issue titles, these notifications can appear surprisingly legitimate in the target’s inbox, potentially tricking them into clicking malicious links.
Result
And now the full demo of the phishing attack, with on the left the attacker’s point of view and on the right the target’s point of view.
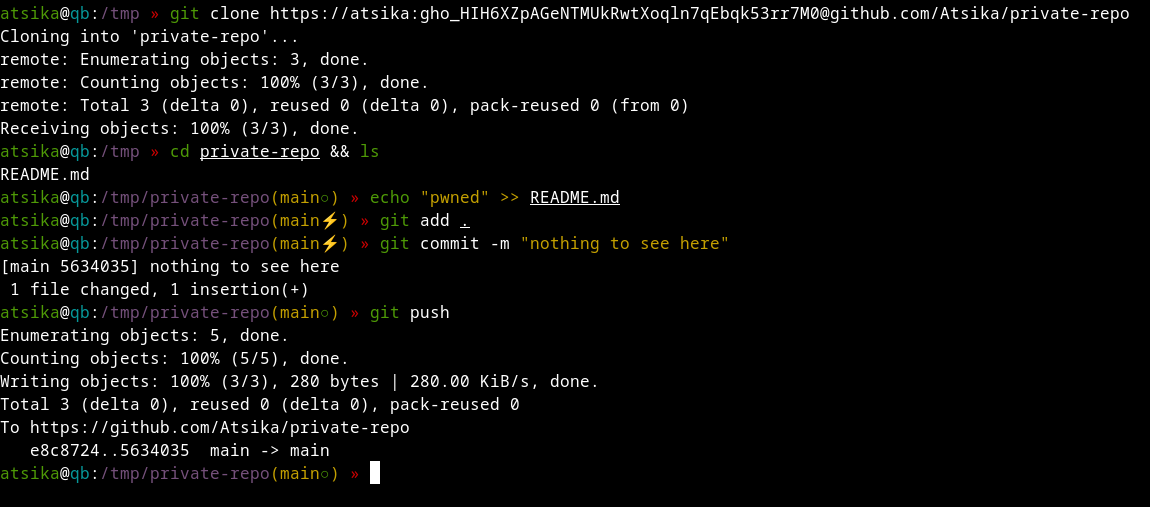
As we can see in the OAuth app output on Render, we successfully retrieved an access token for the user Atsika. We can test it to see if it works by cloning a repo, editing a file and pushing the code.
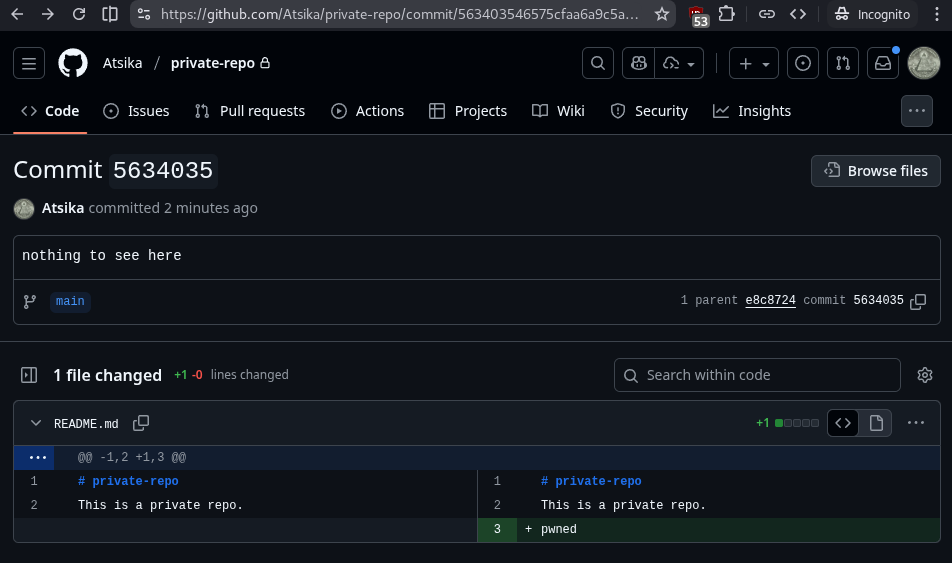
And we can see the commit on GitHub using the token.
💡 Revoked token
Don’t lose your time trying to hack into my account, the token has been revoked, otherwise I wouldn’t share it in cleartext.
Conclusion
In this blog post, we saw a different method of phishing that effectively bypasses 2FA because it uses the original github.com domain. We also benefit from a trusted infrastructure to deliver the pretext since we are (ab)using the GitHub notification system to send emails (from noreply@github.com) that will certainly always land in the target’s inbox. We abused the OAuth mechanism available on GitHub to trick the user into authorizing our malicious OAuth app. Finally, we used the target’s access token to push some code on its private repo, proving that this token gives us access to user’s account (partially).
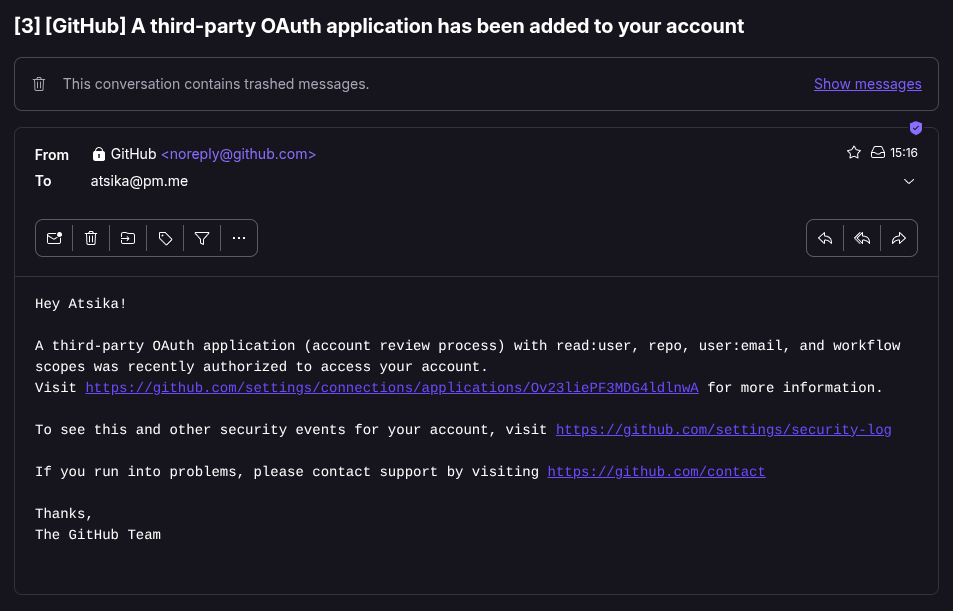
A thing worth mentioning is that the target developer will receive an email informing them and a new OAuth app has been authorized with the permissions it gets. The email contains a direct link to the app, so make sure the masquerade it well to discourage the user from revoking access.
One last caveats I wanted to share with you is that most of the time, companies keep their repositories under an organization account. The token we receive is for the user’s repositories. So we won’t be able to access the organization repos. But you can try and convince the target to “request access” for their organization as well in your pretext, but this will trigger a notification to the organization’s admin. This might work, specially if the target is Admin of the organization. Another approach would be to perform a supply chain attack if some of the user’s projects, like libraries for example, are used in the company’s code or in some CI/CD pipelines.
Until next time, phish safely!
Bibliography
- Inside the Axios supply chain compromise - one RAT to rule them all - Elastic Security Labs
- Security Update: Suspected Supply Chain Incident | liteLLM
- GitHub OAuth Exploited Again – Here’s How to Protect Your Organization
- Fake “Security Alert” issues on GitHub use OAuth app to hijack accounts
- 🚨 Une nouvelle attaque par phishing qui exploite les notification d’issues sur Github
- Creating an OAuth app - GitHub Docs
- Fake “Security Alert” issues on GitHub use OAuth app to hijack accounts - Wancore
- Limiting interactions in your repository - GitHub Docs